
Friday, August 13, 2010
Four Ways Friday on Saturday...
Hi! Thanks for stopping by! I am happy to say that I am home and exhausted! My hope is that by tomorrow I will feel awake, alert, alive and enthusiastic and will get Four Ways Friday posted a day late. Thanks so much for your patience! Please stop back by for a visit :)


Four Ways Friday Coming Soon!
Today's Lesson While Wishing I Was In The Craft Room: Some Things Don't Happen According To The Time Frame You Imagine
Alarm clocks going off at 4 a.m. in the hotel room next door to you...and off again...and again...every 15 minutes until Security can come and do something about it. Meeting rooms that are freezing no matter how many calls you make to get the temperature adjusted. Skies that open up and dump tons of rain that results in closed airports and canceled flights. These are the events that were not happening according to my time frame over the last few days. And so, like a domino effect, Four Ways Friday will not be here in the time frame I imagined. I wonder if there is some reason behind all of this. Some purpose or maybe a lesson I am supposed to learn. I do realize that when I am tired I have a short fuse. That I allow myself to get all worked up and that after awhile I calm back down. Maybe part of the lesson is learning to not let it get me so worked up. To allow myself to flow through the fact that some things in life...many things actually, won't happen according to the time frame that I imagine and instead will happen and unfold in exactly the right time. Yes, today I am learning a lesson...I hope to be back in the craft room at the exact perfect time to bring you Four Ways Friday...and I'm secretly hoping it will be some time on Friday!!!! :)
Thursday, August 12, 2010
Pocket Silhouettes Sympathy Card & Card Play Video!

Today's Lesson From The Craft Room: Sometimes The Impossible Is Exactly What We Need!
When was the last time you called something "impossible?" Sometimes this word comes up when we think about taking time off or changing our work situation or just slowing down and changing our pace. When this word comes up for you, it's a great sign that maybe you've hit upon something significant for yourself! What are those things that you consider impossible and why? Sometimes I tell myself it is impossible to be a full-time artist...and yet, when I start to examine that belief I begin to notice that there are tons of full-time artists out there who seem to be living that life just fine! Maybe the issue isn't that it's impossible at all. Maybe the real issue is my own belief in myself. This is where I need to begin my journey into the impossible...and watch it turn into the possible! How about you?
Today's card is a simple and peaceful sympathy card. We learned this week that a family in our hometown lost their father. He was 86 years old and lived a full and amazing life. It seemed important to pause and make a handmade card to send to them. Here is a video if you want to check out how the card was made. I hope you like it and, most importantly, I hope it brings the family a moment of comfort.
Wednesday, August 11, 2010
Extreme Elements Ink Blot Technique & Card Play Video!

Ok, maybe today's lesson is more for me than it is for you...at least you would know that if you could see my desk and my craft room right now! What a mess! I guess the good news is that the mess means that I've been busy and productive...although now the mess is getting in the way of my productivity! So, it's time to set aside some time to clean things up a bit so that I can actually see the desktop :) What do you need to clean today?
Today's card was a ton of fun to make! I was thinking about monotype printing - something that I have recently gotten interested in - and I decided that I could play around with freezer paper and my reinkers to create a great ink blot background! Here's a video to show you how I did it! I hope you like it!
Tuesday, August 10, 2010
Lazuli Bunting 2-Step Bird Punch - Little Bird Note & Card Play Video!

Today's Lesson From The Craft Room: Challenge Your Excuses!
It is so easy to come up with a list of excuses for why you can't do something. I don't have time. I don't have the energy. What would people think? Today I challenge you to challenge your excuses! You have time - you just need to determine how you want to use it. You have the energy if you make a commitment and start taking steps - any size steps - in the direction of your goal. We can't control what other people think. All we can control is what we think and today, I think I can!!!!!!!! Now go for it!!!!The Lazuli Bunting is cousin to the Lark Bunting, the state bird of Colorado. Here in Denver I must admit that I have only ever seen a Lazuli Bunting once - I think they like the mountains more than the city :) I guess I don't blame them :) I decided to try to create a colorful Lazuli Bunting using my 2-Step Bird extra-large punch. Here's a video to show you how I did it! The finished card size is 3 1/2" x 3 1/2". I hope you like it!
Monday, August 09, 2010
Artistic Etchings - Amour Love Note & Card Play Video!

Today's Lesson From The Craft Room: "Mantras you shouldn't say: I don't know; I'm not ready; I can't do it."
Today's lesson came from the tea bag in my tea this weekend :) I had a cup of Yogi tea for restless sleep and I had to smile when I saw the message on the tea tag! Our self-talk can uplift us and it has the power to send us into a serious state of the doldrums. Whenever I find my self-talk has turned to negative messages, I head on over to Louise Hay's website. If you click on "Daily Affirmation" on her site, you can instill some positive energy into your self-talk every day of the week! Make your mantra: I do know! I am ready! I can do it!!!!!
Today's card was made with the Artistic Etchings stamp set. I am loving this set!!!! Check out my video to see how I made this 4x4 Amour love note! I hope you like it!
Friday, August 06, 2010
Four Ways Friday #17 - Bella Toile Background Stamp
This week's Four Ways Friday focuses on different ways to use the Bella Toile background stamp!
 For this first card, I stamped the Bella Toile stamp onto Whisper White cs using a combination of Versamark ink and Basic Black ink. If you ink up your stamp with Versamark first and then ink over it with your classic ink pad and then stamp, the ink will stay wet enough to use embossing powder. I used clear embossing powder and heat embossed the image and then used sponges with Soft Suede and Basic Black ink to color the background. A piece of torn Basic Black cs was added and the greeting from Sincere Salutations was punched out with the Extra Large Oval punch and the edges were sponged with Soft Suede ink. This yummy Basic Black 1 1/4" striped grosgrain ribbon was tied around the layer and then the entire layer was adhered to a Soft Suede card base.
 For the second card I stamped the Bella Toile onto Very Vanilla cs using Basic Black ink. I then took my 1" circle punch and punched out 8 circles. The circles were adhered to a piece of Basic Black cs. It's hard to see it in the photo, but the central image is very "thick." I actually punched out six 1 1/2" circles using my punch and then glued them one on top of the other to create a think central embellishment. The top layer was stamped with the word "love" from the Things I Love stamp set and then the entire "stack" was adhered to a 1 3/4" Basic Black circle. I used the Big Shot and the Naturally Serif decorative strip die for the letters in the word "you." Finally, I added some dazzling diamonds to the Bella Toile circles using my 2-way glue pen.
 I used the Poppin' Pastels technique for this third card - I couldn't seem to get a great picture of it. I stamped the image in Versamark onto Whisper White cs and then pounced over the image with Certainly Celery and Perfect Plum chalks using my sponge daubers. This technique is a lot of fun! I sponged the edges with Perfect Plum ink and then used the color spritzer and my Perfect Plum and Certainly Celery markers to add a bit of "spatter." The center piece of Elegant Eggplant cs was stamped with the Bella Toile stamp as well, using Elegant Eggplant ink. The modern label punch was sponged and then adhered to the panel using antique brads. The greeting, from the Always stamp set was stamped and punched out with a circle punch. I then used my crop-a-dile to adhere the eyelet so that I could attach the greeting to the card using linen thread. Finally, I used sticky strip to attach the Certainly Celery satin ribbon to the card in a ruffle fashion and finished it off with a button.
 This background stamp was calling out to be cut down! I stamped the Bella Toile stamp onto a piece of Whisper White cs using the combination of Versamark and Basic Black ink and then heat embossed with clear embossing powder. I then cut out this portion of the image and began coloring it in using different colors of markers. Finally, I added a bit of glitz with my 2-way glue pen and dazzling diamonds. The greeting is from the Because I Care hostess set and was stamped in Elegant Eggplant onto Whisper White cs. I used my spiral punch on the edge of the Elegant Eggplant panel and finished the greeting panel with a piece of knotted Pretty In Pink taffeta ribbon.
I hope you've enjoyed this week's Four Ways Friday! If there is a product or stamp set that you would like to see featured in a future Four Ways Friday please let me know. I'll do my best to respond to your requests! If you can't stand going another minute without owning the Bella Toile stamp, you are always welcome to shop HERE now :)


I hope you've enjoyed this week's Four Ways Friday! If there is a product or stamp set that you would like to see featured in a future Four Ways Friday please let me know. I'll do my best to respond to your requests! If you can't stand going another minute without owning the Bella Toile stamp, you are always welcome to shop HERE now :)
Thursday, August 05, 2010
Simple 3x3 Thank You & Card Play Video - Episode #1

Today's Lesson From The Craft Room: Some Things Are Just Right!
Buddy and I used to pass a man on our morning walks. The man usually had headphones on and he always had his black standard poodle along for the walk. About a year ago, we saw the man walking alone and realized that his dog had passed away. For months we have passed the man - we try to say hello sometimes, but he always has his headphones on so he doesn't hear us. Today our walk was extra special because there was the man, no headphones, with a very young black standard poodle puppy with him! We said "hello!" and he said "hi" back! I wish I would have said to him "that's a very good look for you!" A man and his new puppy - some things are just right!
Today's card was inspired by a pad of paper on my desk at the hotel I stayed at earlier this week. I used the Dot, Dot, Dot background stamp on Very Vanilla cs and stamped with Baja Breeze ink at 1/2 strength. You may notice I had used the extra large oval punch to create a mask so that part of the card stock did not get stamped. I kept the mask on and then stamped a portion of a stamp from Baroque Motifs in full strength Baja Breeze on the same card stock. Then the mask was removed and I used my stamp-a-ma-jig to stamp the greeting from Sincere Salutations in Early Espresso ink. I adhered this piece to a piece of Early Espresso cs. Then I took a piece of Whisper White taffeta ribbon and sprayed it first with a mixture of Baja Breeze ink refill and water that I keep in a small spray bottle. Then I sprayed it with my mister of Champagne shimmer paint and alcohol. I used my heat tool to dry it since I didn't want to wait :) The ribbon was knotted around the card stock and then the layer was adhered to the Baja Breeze card using dimensionals. The finished size of the card is 3x3. I hope you like it! Here's a video to show you how I made it, step-by-step!
Wednesday, August 04, 2010
Manhattan Flowers Embossing Folder - Sympathy Cards


In the September 2010 issue of Vegetarian Times, editor Elizabeth Turner shares The Dirty Dozen. This is a list of the 12 fruits and vegetables most likely to be contaminated with pesticides. The list may surprise you: celery, peaches, strawberries, apples, blueberries, nectarines, bell peppers, spinach, cherries, kale/collard greens, potatoes and grapes (imported). Be kind to your body. If at all possible try to find the 100% organic version of these fruits and veggies to reduce your exposure to pesticides. After all, if we truly are what we eat, I'd prefer being 100% natural :)
These are two takes on a sympathy card using the Manhattan Flowers embossing folder, the Define Your Life stamp set and the letter "M" from the Lovely Letter Alphabet. Natural images seem so fitting to me for sympathy cards since life and death are all a part of the natural cycle. For the monogrammed card, I stamped the "M" at half strength and used my stamp-a-ma-jig to stamp the greeting in full-strength right over it. This is a great way to get multiple shades from the same ink pad - in this case, Soft Suede. I hope you like them!
Tuesday, August 03, 2010
In A Word Sympathy Card

Today's Lesson From The Craft Room: Begin Whatever Calls To You!
Today's lesson comes from the book Living Juicy by SARK. If you don't know SARK and you are an artist, you need to check her out! She is such an inspirational spirit! There are some books that find their way to my bookshelf and sit there and then seem to find their way back into my life when I need them. SARK's books definitely fall into this category. I always feel uplifted and inspired when I read her encouraging words. What is calling to you? What is your inner voice tempting you to try? Don't get in the way...go for it!!!!
A friend's mother passed away the other day and I felt it was time to make a few sympathy cards to have on hand for these moments difficult moments. This card came together quickly. I put the Very Vanilla panel through the Big Shot with the Manhattan Flowers embossing folder. I rounded 3 of the edges and left one square. The greeting is from the In A Word stamp set and was stamped in Early Espresso onto Very Vanilla cs and punched out using my 1 1/4" circle punch. A separate 1 1/2" circle was punched out of Early Espresso as a layer for the greeting and the greeting was popped up on dimensionals as was the entire embossed panel. A knot of Very Vanilla satin ribbon finishes the look. I hope you like it. Now, go and begin whatever calls to you - you are still here and there is no time like the present!!!!!
Monday, August 02, 2010
Friends Fur-ever Birthday!

For those of you that have been following my blog, you know that in March I decided to start running. I couldn't run for more than a few minutes (if that) without wearing myself out. Well, I want to give you an update...yesterday I went for a 16-mile run!!!!! You read that right - 16 miles!!!! I am sooooo proud of myself! I am following Jeff Galloway's running program. He advocates a run/walk approach so I run for 5 minutes and then walk for 1 minute...and I did that for about 3 hours, bright and early, before the day turned hot. I still can't believe it! It truly is amazing what you can do when you set your mind to it. All you need to do is decide to begin! Now I have my goal out in front of me - Marine Corps Marathon in Washington, D.C. in October - watch out world, here I come!!!!!
I am still addicted to the Friends Fur-ever stamp set! It is just too cute! This is a birthday card for Michael's mom. I stamped the dog and the presents in Basic Black onto Whisper White cs and cut them out with a hobby blade. I then stamped the cart onto Crumb Cake cs with Basic Black ink and also cut it out. The tire was colored with a Basic Gray marker and I added a cute little silver bead for the tire center. The presents were colored with markers and then glitzed with 2-way glue and dazzling diamonds...as was the dog's color. The ground was made by cutting curves into a piece of Certainly Celery cs and then sponging a bit on the edge and the cs in general with Certainly Celery ink. The greeting came from Happy Everything - one of my favorite, although retired, stamp sets. I hope you like it! If you have to have the Friends Fur-ever stamp set, feel free to shop HERE now :)
Saturday, July 31, 2010
Four Ways Friday #16 - Greetings, Earthling!
Thanks so much for your patience and stopping by to see this week's Four Ways Friday on Saturday :) This week's Four Ways Friday focuses on the adorable Greetings, Earthling! stamp set.
 Creating a scene is a great way to put your stamped images into context! For this first card I used my Coluzzle (retired) to cut out a "planet" half circle out of Sahara Sand card stock. I then took a scrap piece of paper and punched random holes in it using my 1/2" circle punch and the 2 punches on my crop-a-dile to create a stencil for the craters for my planet. I sponged with both Sahara Sand ink and Basic Gray ink and then added a bit of Soft Suede ink with a sponge to give my planted a craterly look :) The two aliens were stamped with Basic Black ink - one onto Daffodil Delight and the other onto Whisper White card stock. I covered the yellow alien with 2-way glue and added dazzling diamonds. I used markers to color his features. I also used markers to color the pink alien and also added some dazzling diamonds to his tummy. Both aliens were cut out using a hobby blade and both were popped up on dimensionals. I ran into the kitchen to grab a toothpick for the sign and made a small banner with a strip of Whisper White card stock. The greeting is from Tiny Tags.
 For this second card I used a great technique for your greeting stamps. If you stamp them repeatedly, you can make a great background! By using my stamp-a-ma-jig, I repeatedly stamped the greeting using Basic Black ink on Whisper White card stock. I then used Rose Red ink and a sponge to color over the entire piece of card stock and to add a bit more Rose Red color to the edges. This piece was adhered onto a Whisper White card base. The alien was stamped in Basic Black ink onto Whisper White card stock and cut out with a hobby blade. I then used 2-way glue and dazzling diamonds to make him sparkle! I colored his mouth with a Pink Pirouette marker and then popped him up on dimensionals in the center of the card.
 Repetition isn't just for words! Here I used my stamp-a-ma-jig to repeat the alien image in a line across the front of the card. A quick tip - when I am stamping in this way, I always begin my stamping in the middle of my card and work my way out to the sides so that the card appears even. I stamped an extra alien on a scrap piece of Whisper White card stock, cut him out with a hobby blade and colored him with markers. I popped him up on dimensionals on top of one of the stamped images. Finally, I used my stamp-a-ma-jig to position the greeting from Upsy Daisies on the bottom of the card. I love using my stamp-a-ma-jig since I was able to stamp the greeting twice - directly on top of itself - to make it look really crisp.
 Random repetition can also be used for backgrounds! Here I took two of the images from the set and randomly stamped them in Tempting Turquoise ink on Bashful Blue card stock. This served as the backdrop for the rest of the card. The alien image was stamped twice in Basic Black ink onto Whisper White card stock. I stamped him twice so I could cut out his head and pop it up on dimensionals (that sounds a bit odd, doesn't it?!). I colored the alien with markers and used Crystal Effects to highlight his shirt. I used Pacific Pointe and Tangerine Tango card stock to create the center layer. I scalloped the edge of the Tangerine Tango piece with my scalloped edge punch. Ooh - I forgot to mention that I used a Basic Black marker to stamp the alien - that way I was able to not ink up his alien gun and instead left his hand empty. I then used my stamp-a-ma-jig and the balloon string stamp from the Friends Fur-ever stamp set to make it look like he was holding a balloon all along! The balloon was made my punching a circle using my 1" circle punch and then using my white gel pen to create some reflection marks. I popped the balloon up on dimensionals and then covered it with Crystal Effects. I always save my Crystal Effects until last so that I can leave the card alone and let it dry. The greeting is a combination of the word "earthling" from the Greetings, Earthling stamp set and the "happy birthday" from the Teeny Tiny Wishes stamp set. I used markers to stamp the greetings and then cut them out and adhered them to the card with glue. Finally, I attached a piece of 1/8" Marina Mist ribbon.
If you like the Greetings, Earthling! stamp set as much as I do, but don't have it yet, feel free to shop HERE now! Thanks for stopping by! Have a wonderful weekend!


If you like the Greetings, Earthling! stamp set as much as I do, but don't have it yet, feel free to shop HERE now! Thanks for stopping by! Have a wonderful weekend!
Thursday, July 29, 2010
4 Ways Friday Coming On Saturday!
I wanted to leave a quick note to let you know that due to a hectic schedule this week, 4 Ways Friday will be posted on Saturday. Thanks for your patience! I hope you'll come back to visit on Saturday! Have a beautiful day!!!!!!
Wednesday, July 28, 2010
Enjoying Creation

I thought I would share a photo with you today. This was the view outside my room yesterday. I was at the Broadmoor Hotel in Colorado Springs, Colorado - no craft room in sight. However, what was in sight was the amazing beauty of creation! I hope you enjoy the peace of this scene. I hope to be back in the craft room tomorrow - later in the day. I hope you'll come back for a visit! In the meantime, don't forget to take some time to enjoy creation :)
Tuesday, July 27, 2010
Animal Stories & Inspired By Nature

Today's Lesson From The Craft Room: We Each Need Different Things To Grow
We have a vegetable bed in our backyard that we had been warned against building. "There's too much shade and not enough sun." "Your vegetables won't do well there." These were some of the concerns we heard. Being the new gardeners we were, we built the bed anyway...and...it has turned out to be a wonderfully productive lettuce bed! What may not be the perfect place for some things or some people, is the exact perfect place for others. There might be some vegetables that won't do well in that bed. Lettuce, however, loves it. We each need different things to grow. What makes you grow best? I know that balance, nature, creativity, and a whole lot of love seem to be just the soil I need to grow well :) How 'bout you?
Today's card uses a few stamp sets - Animal Stories for the animals; Upsy Daisies for the greeting; Inspired By Nature for the grass. I stamped the animals in More Mustard and Basic Gray and cut them out with my hobby blade (you may notice a bit of dazzling diamonds on the elephant's spots :). The grass was stamped using VersaMark on Pacific Pointe card stock. I crumpled the piece of Sahara Sand card stock and then sponged over the crease lines with Sahara Sand ink. The edges of the Soft Suede panel were also sponged with Soft Suede ink. The greeting was stamped after coloring the stamp with Pacific Pointe and Old Olive markers. Don't you just love the new 1/8" taffeta ribbon?! I love that it can fit through the button holes :) I hope you like it!
Monday, July 26, 2010
Stamped Gesso Background Video!

Today I wanted to share with you how I made the stamped gesso background for this card. Enjoy the video!
Friday, July 23, 2010
Four Ways Friday #15 - Favorite Things Stamp Set
This week's Four Ways Friday focuses on the Favorite Things stamp set.
 For this first card I stamped the "few of my favorite things" stamp onto Whisper White card stock with black ink. I adhered it to Riding Hood Red card stock. Riding Hood Red also serves as the base for this card. I used the Spiral Border punch on a piece of Wild Wasabi card stock and added it as a layer on top of a piece of So Saffron card stock. I stamped the journal block from the Favorite Things set onto the So Saffron card stock in So Saffron ink. I stamped the letters "y," "o," and "u" from the Rough Type stamp set in Basic Black onto Crumb Cake (formerly Kraft) card stock and then punched the letters out with my 1/2" circle punch. The letters were then popped up on dimensionals. The arrow was punched using the This Way punch (retired) from Soft Suede and then popped up on dimensionals. I coated the letters and the arrow with Crystal Effects (still one of my most favorite products!). A piece of linen thread and a So Saffron button finish the look.
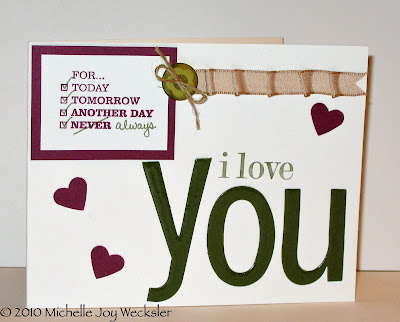 For this second card, I stamped the "For Today" stamp from the Favorite Things set onto Whisper White card stock in Rich Razzleberry. I used an Always Artichoke marker to check the boxes and to hand write the world "always." I adhered this to a piece of Rich Razzleberry card stock and used dimensionals to adhere it to the Whisper White card stock base. A piece of Kraft taffeta ribbon was attached to the card using sticky strip - this enabled me to fold the ribbon back on itself in order to create the ruffle. A button was threaded with linen thread and attached to the ribbon using a mini glue dot. The "i love" was taken from a stamp in the Things I Love stamp set and stamped onto the card using Always Artichoke ink from a marker. The letters for the word "you" were made using the Simple Letters alphabet in the Big Shot with Always Artichoke card stock. Of course, I had to coat the letters with Crystal Effects :) The hearts were added using the Heart to Heart punch with Rich Razzleberry card stock.
 This set lends itself really well for use in scrapbooking! Here I created a small 6x6 scrapbook page that is just waiting for the perfect picture! The greeting was stamped in Rich Razzleberry onto Whisper White card stock and then mounted onto layers of Rich Razzleberry and Old Olive card stock. A piece of Rich Razzleberry card stock was run through the Big Shot with the Scallop square die and then adhered behind a piece of Tangerine Tango card stock to create the frame for the photo. A loop of striped Old Olive ribbon was added before adhering the element to the page. Finally, the modern label stamp was stamped onto Whisper White using Tempting Turqoise ink, punched out using the Modern Label punch, and then adhered to the page using small silver brads. The page itself is a piece of textured Tempting Turquoise card stock.

 For this final project, I decided to make a small book where I can record a few of my favorite things! I stamped the journal block image multiple times onto both So Saffron card stock and Wild Wasabi card stock. I used Rich Razzleberry ink on the So Saffron card stock and Wild Wasabi ink on the Wild Wasabi card stock. I cut the journal blocks out by hand and then punched arrows using the My Way punch out of Rose Red card stock. You can't see the arrows in these photos - however, I did adhere an arrow to each of the pages in the upper left-hand corner - exactly over the arrow image that is a part of the stamp. The front and back cover were cut from Rose Red card stock. The front cover was sprayed with a mixture of shimmer paint and alcohol (this is a great and economical way to create your own Smooch Spritz - it lasts a long time!). I then adhered a piece of striped Old Olive ribbon. The "favorite things" stamp was colored using Rose Red and Wild Wasabi markers and then stamped onto Whisper White card stock and adhered to layers of Wild Wasabi and So Saffron card stock. This piece was then adhered to the front of the book using dimensionals. A button with a piece of linen thread was added using a mini glue dot. The corners of the covers were rounded and then the crop-a-dile was used to punch a hole through the covers and the inside pages. A 1" ring was placed through the holes to attach the book together and pieces of Rose Red and Whisper White 1/4" grosgrain ribbon were tied around the ring to complete the look. If you don't have your Favorite Things stamp set yet, please feel free to shop HERE now! See you next week for another Four Ways Friday - thanks for stopping by!


Wednesday, July 21, 2010
Post Card Stamping - Bugs & Kisses!

Today's Lesson From The Craft Room: Learn About Other People's Lives - They Just Might Inspire You!
This past weekend we watched the movie Temple Grandin. It is a true story about a woman with autism who overcomes obstacles to pursue her passion of helping animals. It was amazing! I love the message that Ms. Grandin kept repeating - "Nature can be cruel. We don't have to be." Temple Grandin continues to dedicate her life to trying to improve the well-being of animals - particularly cattle - even in places like slaughter houses and feed lots. I was incredibly moved by her determination and the difference she is making. It inspires me to consider how I can make a difference in my world - whether on a small scale or a grand scale. Who have you met or read about lately who inspires you? How might your story inspire someone else?
Today's post card also began with a Crumb Cake postcard and I used two rectangle masks for the "to" and "from" boxes. I sponged the card with Soft Suede ink. The ants and bugs and greeting were stamped in a variety of colors - Wild Wasabi, Pacific Point, Basic Black, Cherry Cobbler, and Old Olive. Of course, I had to add some 2-way glue and Dazzling Diamonds to give my worm some glitz! I hope you like it! :)
Tuesday, July 20, 2010
Post Card Stamping - Friends 24/7

Today's Lesson From The Craft Room: It's OK To Go Into Your Cave...As Long As You Come Out For Air Every Once In Awhile
I don't know about you, but I have a tendency to withdraw when I am going through difficult times. I don't feel like socializing and I don't even feel like reaching out to friends. For whatever reason, I find it easier to just be on my own and try to make it through my downer moods. I've come to learn that going into my cave is ok...as long as I do come out for air...or a chat with a friend, every once in awhile. If I don't come out for air I know that I can spend too much time in my cave. Too much time feeling sorry for myself. I can get trapped in negative thinking. If I allow myself to reach out to a friend or family member it seems that they always have something positive to say - something that touches me and breaks me out of my downer mood. So allow yourself to go into your cave if you need to...just remember that we all need a little air :)
This is the second post card in my series for my nieces. I started with Crumb Cake card stock again and sprayed it with my shimmer paint/alcohol mixture to make it sparkle! The bird was stamped in Rich Razzleberry and the decorative image was stamped in Baja Breeze. The greeting was stamped with Chocolate Chip. I even added a bit of sponging around the masked areas (I can't seem to remember which green color I used) to make the masked areas stand out a bit. I hope you like it! Postcards are such a quick and easy way to reach out to someone!
Monday, July 19, 2010
Post Card Stamping - Punched Posies

Today's Lesson From The Craft Room: There Are Some Things You Are Just Meant To Do
What a crazy Sunday we had! The neighbor's dogs got out and saw our cat in the driveway and decided to come running after her. The poor thing was panicked! She did what she knew to do (although I had never seen her do it). She ran for the closest tree and started climbing! Of course, the closest tree was a huge evergreen that doesn't have any branches until about 30 feet off the ground! So, up went my gorgeous cat and I was a MESS! I admit it - I called 911 and said something to the effect of "Two dogs just chased my cat up a tree will the fire department come?!" The emergency responder quickly told me that the fire department does not do that :( I was tempted to say something like, "But in every show I watched as a kid the fire departments helped cats out of trees!" I bit my tongue. Long story short, I did call animal control, which was closed, although there was someone there to talk to and she informed me that cats know what to do. That they know how to get up into trees and they know how to get out of them - I just needed to be patient - it could take hours...or, as some internet sites indicated...it could take days! Well, I'm glad to say it didn't take hours or days and the story has a happy ending. She made it back out of the tree and we got through the trauma (I think she made it through better than I did). What I did learn is that there are some things we are just meant to do. For me it is creating. For her, it is climbing back down out of trees :)
My nieces are in camp for the summer so I decided to stamp a series of post cards so that I can send them quick messages. This is the first postcard. I used Crumb Cake card stock and cut it down to allowable postcard size. I then made two rectangular paper pieces that I temporarily adhered as masks to the front of the postcard. I sprayed the card with my alcohol/shimmer paint mixture to make it sparkle. Then I stamped some of the Punched Posies images with White craft ink and with Soft Suede. I also added some hearts from the Hello Again stamp set in Rose Red. I colored the middles of the flowers with my Rose Red marker and then added some stickles for some sparkle! Hope you like it!
Subscribe to:
Posts (Atom)