Friday, September 02, 2011

Four Ways Friday #60 - All In The Family

This week's Four Ways Friday is all about All In The Family!  This adorable stamp set lends itself well to cards, scrapbook pages, frames and tags.  Here are four ways to use it:
Just stamping and coloring these adorable kids is a ton of fun!  Here I stamped the bodies, arms, and heads using basic black ink on a Whisper White card base.  I then colored each of the kids in using markers.  A touch of dazzling diamonds adds a bit of sparkle.  The greeting is from Friends 24-7 and I stamped it with basic black ink and positioned it using the stamp-a-ma-jig.  Notice that you can easily color over lines, like the hair, to add additional color to these images.
For this second card I decided to make a family thank you card.  The images were stamped using a variety of ink colors and colored in using markers.  I combined the All In The Family set with the letters from the Broadsheet Alphabet stamp set.  This same idea could easily be used for an adorable scrapbook page or picture frame.  I sponged the card stock with Not Quite Navy ink and then spritzed the card stock with the Soft Suede marker using the color spritzer tool.  The edges were distressed with my fingernail.  I crunched the panel and then mounted it to a Soft Suede card base that had been spritzed with Soft Suede ink.  Finally, I took Very Vanilla seam binding and made a "bow" and then tied a piece of twine around the center before attaching it to the card with a glue dot.
The images in the All In The Family stamp set can create adorable backgrounds!  Here I stamped the dog multiple times using Always Artichoke ink on an Always Artichoke card base.  I then stamped the dog on a piece of Ivory Naturals card stock and cut it out.  A Confetti panel was cut and then a smaller Soft Suede panel was run through the paper crimper before attaching it to the Confetti panel with glue.  The dog was attached to the panel using a dimensional and then I covered the dog with Crystal Effects.  The greetings are from a combination of On Your Birthday and Friends Fur-ever.  They were cut out and added to the panel with glue and then the entire panel was attached to the card with dimensionals.
Don't forget that you can use the heads and legs without the bodies and you can use the clothes on their own too!  For this card I began by stamping the head and the arms, as well as the clothes, using basic black ink.  I then added color using markers and a bit of dazzling diamonds and cut out all of the images.  Next, I stamped the legs onto the Whisper White card base.  I cut a piece of white cotton batting to act as a towel and attached it to the card using glue.  The arms were added with glue and the head with a dimensional.  Next I made tiny wire hangers using wire, round nose pliers and wire snips.  I then "hung" the clothes on the hangers using glue and added a brad (after I cut off the prongs) using glue.  The clothes were then added to the card using either glue dots, glue or dimensionals.  Finally, I added the words using the Calendar Alphabet & Numbers stamp set (and a black marker for the dots and the exclamation mark).  I love how you can use alphabet stamp sets to create any sentiment you want!
I hope you've enjoyed this week's Four Ways Friday!  I hope these cards will inspire you to pull out this oldie but goodie stamp set and get creative this weekend!  Have a wonderfully creative and peaceful weekend and, if you live in the United States, enjoy the Labor Day weekend!

Thursday, September 01, 2011

Trio Punch Flower Gift Card

Today's Lesson From The Craft Room:  I Still Like To Be Validated
There is a bookstore not far from where I live.  There is a parking garage where the store is located and, if you take your parking ticket in the store with you, they will validate the parking for you so you can park for free.  When I was there awhile back and walked up to the register and asked to be validated, the person at the register said, "You are a beautiful human being!" and then stamped my parking ticket!  Talk about validation!!!!!  Although I have tried to convince myself that other people's opinions don't matter at all, I realize that I'm a bit full of it!  It still feels good to be validated - here on the blog - or when I receive evaluations after I've conducted a training session (something that I do quite frequently as part of my work life).  I guess Maslow was right when he said that as human beings we all have a need for recognition - to be acknowledged for our contribution.  It truly does feel good!  Thank you to those of you that leave comments for me (Lorraine and Doris I really appreciate your words - they make me feel AWESOME!!!).  I really appreciate your validation!!!!!
Today's card was one that I put together quickly to leave on Michael's pillow before heading out on my last work trip.  I took a 3" x 6" piece of River Rock card stock and folded it in half.  I then adhered a little rectangle of Whisper White card stock with glue.  The greeting from Teeny Tiny Wishes was stamped in Basic Black ink with the help of the stamp-a-ma-jig.  I then punched three little flowers using the flower punch from the trio punch out of Basic Black card stock.  I adhered them to the card and then placed a self-adhesive rhinestone jewel in the center of each flower!  I hope you like it

Check out the new HOLIDAY MINI CATALOG!!!  You can click on the picture in the upper right-hand corner of my blog to see inside the catalog for our new products & ideas!  Enjoy!!!!

Wednesday, August 31, 2011

Every Little Bit Hello Card

Today's Lesson From The Craft Room:  Do We All Feel Inside Like We Are A Fake And That Someone Is Going To Figure That Out?
I had dinner with a beautiful friend tonight and somewhere along the way in our conversation we began to talk about how there are times in our lives when we feel like we are fakes and that someone is going to discover our masquerade and realize that we are just us after all.  I was actually relieved to hear that I'm not the only one who walks around this planet concerned that somehow I will be found out - that people will realize I really don't know what I'm talking about - that underneath it all I am still that little geek who went through my younger years feeling pretty small and irrelevant and somehow a part of that has stuck with me.  So rather than wait to see if you figure out that I'm just a fake and that underneath it all I am a sensitive little girl with a squishy underbelly wanting to be loved, let me just tell you - I am.  I cry when I am sad.  I hurt when I see others hurting (or when I watch Hallmark commercials!).  I want to protect those that I love and the underdogs.  I pick up worms that find their way into puddles in the rain and sidewalks in the sun.  I have curly hair most days and straighten my hair when I travel for work - it is part of the "costume" I wear.  I get tired after conducting training courses and rejuvenate best by being in a quiet space or watching the birds in the backyard - away from electronic devices and mechanical noise.  I worry about my stomach (more affectionately known as my "pooch") and find it easy to criticize myself when I look in the mirror.  I get scared that when I am conducting a training session everyone will just stand up and walk out on me.  So there you have it.  Now that you know, you can decide whether to visit with me again.  I hope you will :)
Today's card was simple - just like me :)  I punched a hole into the front of the Rich Razzleberry card stock using the 1 1/2" circle punch.  I then punched a hole in a piece of River Rock card stock and then punched again with the scallop circle punch to make the "frame" for the hole.  I adhered it with glue.  Next I stamped the "hello" from Pennant Parade using the stamp-a-ma-jig and basic black ink.  The cat from Every Little Bit was stamped onto a piece of Whisper White card stock, punched out with the 1 3/4" circle punch, adhered to the inside of the card, and then colored in with markers.  Finally, I covered the cat with Crystal Effects for a bit of shine.  I hope you like it!!!!


Tuesday, August 30, 2011

Circle Circus Birthday Greetings

Today's Lesson From The Craft Room:  Surround Yourself With Supportive Voices
When we decide to make changes in our lives - to pursue that which we feel is best for us - we need to surround ourselves with those voices that are supportive of us, as opposed to those that will try to throw up obstacles or fears.  Sometimes we can't find a friend or relative who can be that support.  Don't you worry!  There are plenty of supportive voices out there - you just need to find them!  You can find those voices in books, from on-line friends, from songs - if you look for the supportive voices you will find them and they will speak to your heart.  And don't forget, you are your own best support system!!!! :)
Today's card began with stamping the image from Circle Circus onto the River Rock card base using VersaMark ink.  I then crumpled a piece of Early Espresso card stock, tore a couple of the edges, and sewed it to the card with my sewing machine and gold metallic thread.  I punched a decorative label out of Naturals Ivory card stock and stamped the same background image using River Rock ink at 1/2 strength.  I sponged the edges with Early Espresso ink.  I then adhered the greeting from On Your Birthday which I stamped in Early Espresso onto Naturals Ivory card stock, punched out with the modern label punch and then sponged with Early Espresso ink.  Next I adhered a very small piece of seam binding ribbon and added an antique brad on top of it.  This entire piece was then adhered to the card front using dimensionals.  I hope you like it!

Monday, August 29, 2011

Circle Circus Thinking Of You Card

Today's Lesson From The Craft Room:  Learn What Centers You
This past weekend I seemed to be totally out of whack.  I had somehow gotten myself into a funk and felt like I was totally out of sorts.  Physically I felt exhausted and mentally my internal voice was filled with all kinds of negative yuckiness (that's a technical term :)  I realized I was very much off center and had to figure out what would center me.  I turned to a few of the things that I can rely on to bring me back to a state of calm - walking Buddy, stamping in the craft room, sitting outside and watching the birds.  I know that any and all of these activities have the power to help me find myself again.  Do you know what centers you?  Keep that list in your journal or in the forefront of your mind.  If you don't know what centers you, consider when you feel the most calm.  Where are you?  Who is around you?  What are you doing or not doing?  If you know what centers you, you have the power to bring yourself back to a safe space when your life tries to turn you upside down.
Today's card was all about simplicity.  I stamped the image from Circle Circus in a variety of ink colors:  Perfect Plum, Early Espresso, Rich Razzleberry, and River Rock.  I then added a touch of dazzling diamonds to the circles.  The greeting from Sincere Salutations was stamped with Basic Black ink using the stamp-a-ma-jig.  I hope you like it!

Sunday, August 28, 2011

Look Where I Was Today!!!!

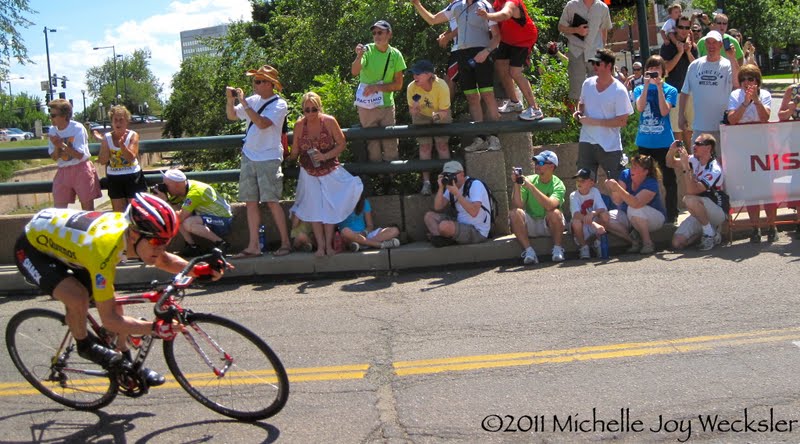
The USA Pro Cycling Challenge was happening in Denver today!  It was the final stage of the race - Stage 6.  The stage began in Golden, Colorado and came right into Denver!  We biked down to watch the action first hand and we found a perfect spot on a corner that was part of a lap that the racers rode 6 times!!!!!  This was the last pass around and Levi Leipheimer, the ultimate winner of the overall race, came by and I snapped this lucky picture!!!!  Yeah Levi!!!!!  It was amazing to watch these racers - they truly ride like a swarm of bees!  So close together and moving as one!  I hope they come back next year!!!!

Thursday, August 25, 2011

Four Ways Friday #59 - Dot, Dot, Dot

This week's Four Ways Friday is all about the Dot, Dot, Dot stamp!  I combined the stamp with a few other stamp sets to give you some ideas for how versatile the Dot, Dot, Dot stamp is!
The Dot, Dot, Dot stamp serves as a great background stamp for your cards!  Here I stamped the dots using River Rock ink.  I stamped the greeting from Vintage Vogue in Chocolate Chip ink with the help of my stamp-a-ma-jig.  I then used a rock & roll technique to stamp the flowers from Vintage Vogue onto scraps of Whisper White card stock.  I cut the flowers out and then adhered them to the card front using either glue or dimensionals.  Adding the buttons to the flower centers with glue dots was the final touch!
Don't forget that you don't have to stamp the entire dotted image!  Here I used sticky notes as masks to mask off a rectangular area in the middle of the card and then stamped over the masked area with the Dot, Dot, Dot stamp and Tempting Turquoise ink.  I stamped the greeting from Short & Sweet with Basic Black ink and then added the cut out dog from Friends Fur-ever (one of my favorite stamp sets!).  The Melon Mambo punched heart was the final addition - adhered with glue.
I created this tag using the Dot, Dot, Dot stamp in a couple of ways...can you see them?  Here I die cut the tag from Very Vanilla card stock using the Two Tags die.  I then stamped the front flap of the tag with the dot stamp and Crumb Cake ink.  I stamped the back of the tag with Crumb Cake ink at 1/2 strength.  The greeting is a combination of stamps from Define Your Life and Upsy Daisy.  I used the modern label punch to punch out the word "birthday" and sponged the edges with Early Espresso ink.  Crystal Effects was used to adhere the champagne glass glitter to the greeting.  Can you see where else I used the Dot, Dot, Dot stamp?  I took a piece of Very Vanilla seam binding and stamped the seam binding (front and back) with the Dot, Dot, Dot stamp and Crumb Cake ink!  I love dressing up ribbon/seam binding this way!  I tied the ribbon with a small piece of linen thread.  The cut out bird from Friends 24-7 peeks out from the inside of the tag :)
Don't be afraid to stamp the same image over and over on top of itself!  Here I kept stamping the Dot, Dot, Dot stamp, using different ink colors, onto a piece of Whisper White card stock.  I then punched out the card stock using the ornament punch.  It's hard to see, but I added a whole bunch of dazzling diamonds with 2-way glue to make the ornament sparkle!  I sponged the edges of the ornament with Tempting Turquoise and then tied a small piece of gold elastic to the top of the ornament.  A piece of grosgrain ribbon acts as the ornament hanger and was glued to the Very Vanilla panel before adding the ornament with dimensionals.  I sponged the edges with Old Olive ink and then adhered the panel to a Real Red panel.  The large eyelet was added using the crop-a-dile.  I finished off the tag with red satin ribbon.
I hope you've enjoyed this week's Four Ways Friday!  I hope you have a very creative and peaceful weekend and for those of you who live in the United States and are in the path of Hurricane Irene, I wish you a very safe weekend as well!

Short & Sweet Best Wishes Card

Today's Lesson From The Craft Room:  How Easily Is Our Attention Diverted?
I remember that as a child I had the ability to sit and play or read for hours.  I remember coloring those geometric patterns in my Altair Design coloring books for long periods at a time (did you color in those coloring books?).  Today, the ability to approach things with that type of focus is what I crave.  It seems that the slightest thought or distraction can totally set me off in a new direction - I might be reading and then I see a reference to another book or author and I am immediately up and out of my chair, headed for the computer, to go and look up the reference.  Or I will start to tell a story to a friend as we walk toward the park and their attention will be grabbed by a person up the street and we will never come back to my story.  So I'm sensing I'm not the only one suffering from this condition - I won't call it attention deficit disorder - although the name seems to fit.  Where has our ability to provide our undivided attention to our tasks or to others gone?  I miss it.  I feel more scattered these days - like I am a bouncing ball who never comes to a state of rest.  I appreciate the craft room as one of those places where, if I am protective and vigilant, I can allow myself to remain in a state of focused attention.  (It's so funny - as I was typing my last sentence, my attention was just taken away by the finish of Stage 2 of the US Pro Cycling Challenge on tv and Willow meowing at the top of her lungs :)  A reminder that I still have some work to do on focusing my attention :)
Today's card began with a Melon Mambo card base that I ran through the Big Shot with the Tulip Frame embossing folder.  I then stamped the floral image from Tiny Tags at half strength using Chocolate Chip ink.  I then took a piece of Confetti card stock and scored it in half and then 3/4" from one end.  I tore the end of the scored 3/4" piece and used a piece of twine to hold this little "pocket" together.  I stamped the pocket with the floral image from Tiny Tags using River Rock ink and then stamped the other decorative image using Melon Mambo.  An adhesive pearl adds a bit of elegance.  Finally, I created a small River Rock insert for the "pocket" and stamped the top with a greeting from Short & Sweet with Chocolate Chip ink.  The pocket was then adhered to the front of the card using dimensionals.  I hope you like it!

Wednesday, August 24, 2011

Vegging Out

Today's Lesson From The Craft Room:  Sometimes You Just Need To Veg Out!
I think Willow has it right :)  She climbed into this oak barrel where we grow tomatoes and decided it was the perfect place to take a nap!  I am following her lead today and I am going to veg out as well (although not in the oak barrel...not enough room for the two of us!) :)  I will be back tomorrow.  Hope you have a great day...maybe you'll get a chance to veg out too :)

Tuesday, August 23, 2011

Retired Stamp Set Note Cards


Today's Lesson From The Craft Room:  Sometimes We Fret About Things For More Time Than It Actually Takes Us To Do Those Things
I'm guilty!  Sometimes I get myself so worked up about my "to-do" lists - all the things I need to get done by a certain day.  I think if I counted all of the minutes I worry about getting those things done, they would far surpass the amount of time the tasks actually take to get done.  So why am I bothering to allow myself to worry about them?!  Case in point.  On Friday I had a list of things I needed to get done by Monday and I had anticipated working on them all weekend.  I think I had started worrying about the list beginning on about Wednesday of last week!  So, what happened?  On Saturday I decided to take a 2 1/2 hour hike rather than sit and do work (yeah!).  In my mind I began to realize that the work would likely, in reality, not take me much time.  And then on Sunday I ended up on a 4-hour biking adventure to a gorgeous park!  And here I sit (I am writing this on Sunday night) and guess what?  I was able to get the tasks done in about 2 hours of focused time!  I am so glad that I decided to stop all the fretting and do those things I really wanted to do.  I know I still need to work on minimizing the fretting - at least I'm headed in the right direction!
Today's cards were made using a retired stamp set from a number of years back.  I LOVE the quotes!  I stamped the images with Jet Black Staz-On and then colored the images in with colored pencils.  I added a dash of Crystal Effects and a bit of dazzling diamonds for some added texture and bling.  I really like the simplicity of these cards since the quotes are truly the focal point.  These are headed to a family member as a birthday gift.  I hope she likes them! :)

Monday, August 22, 2011

Friends 24-7 Scrap Card

Today's Lesson From The Craft Room: You Can Miss Beauty So Easily
I was out of town for a few days last week.  The drive to the airport turned out to be a learning experience for me.  I was driven to the airport and rode in the back seat of the car.  Once I was inside the airport I realized that I hadn't even looked up while I was in the backseat and so I totally missed one of the favorite things I enjoy about the drive to the airport - the amazing vista of the mountains to my left.  I couldn't believe I hadn't even caught a glimpse of the mountains!  Usually it is the one thing I anticipate on the drive!  I was fortunate when it turned out that the gate for my flight was at the end of a terminal.  And there, at the end of the terminal was a full wall of windows looking out onto those gorgeous mountains!  This time I got lucky.  What it made me realize is that you can miss beauty so easily if you don't pick your head up and look around you.  I know this is true when I walk with my head down on the sidewalk.  Now I know it is true when I am traveling in the backseat of a car.  From here on out I'm going to do all I can to keep my eyes open and take in the beauty around me!!!!
Today's little 3x3 card is a card that I put together using scraps on the craft table!  This is becoming one of my favorite things to do since I usually end up with a piece that I would never have created if I had set out with intent!  I used bits and pieces from die cuts and a cut out of the bird from Friends 24-7.  The greeting is from Elements of Style.  Life truly is a matter of moments - moments that we will miss if we don't open our eyes!

Friday, August 19, 2011

Four Ways Friday #58 - Sincere Salutations (& Video!!!!)

For this week's Four Ways Friday I decided to use the Sincere Salutations stamp set in four simple ways!  For each of these cards, I only used the Sincere Salutations stamps and no other stamp sets!  I have to admit that this is one of my favorite stamp sets and I use it again and again and again!
This first card is so simple to make!  Here is a video to show you how to use your punches and die cuts as stencils to create this card:

Talk about simple!  For this second card I die cut a piece of chipboard using the Serif Essentials dies and then coated the letter with Crystal Effects and silver glass glitter!  I stamped the greeting with the stamp-a-ma-jig and Basic Black ink and then adhered the letter with glue.  So simple and quite dazzling!
I love the look you get when you repeatedly stamp a greeting!  Here I stamped the "get well soon" greeting three times using the stamp-a-ma-jig.  First I stamped it in Regal Rose, then Melon Mambo, and finally Rich Razzleberry.  I then punched flowers from card stock of those same three colors using the Boho Blossoms punch and the Itty Bitty Shapes Punch Pack.  I adhered them to the card with a mix of glue and dimensionals, just to create some dimension on the card.  Finally, I added some rhinestones and pearls.
This final card is all about repeat stamping as well!  Here I began by stamping the "holiday greetings" stamp onto a scrap of Whisper White card stock using Cherry Cobbler ink.  I then went back and stamped over it using the same stamp and Always Artichoke ink.  I then cut out the two triangles and sponged the edges with Always Artichoke ink to create the trees.  The trunks are just rectangles cut from Soft Suede card stock.  I then sponged the edges of the trunks with Soft Suede ink.  The trunks were adhered to the Very Vanilla card panel with glue and then the greeting was stamped on the card, with the help of the stamp-a-ma-jig, using Cherry Cobbler ink.  I then adhered the larger tree to the card with dimensionals and the smaller one with glue.  The final touch was to add some rhinestone brads (with glue dots) as ornaments on the larger tree before adhering the panel to an Always Artichoke card base with glue.
I hope you've enjoyed this week's Four Ways Friday!  I hope you have an amazingly peaceful and creative weekend!!!!!  Enjoy!!!!!

Thursday, August 18, 2011

Notably Ornate Birthday Card

Today's Lesson From The Craft Room:  No Matter How Pretty The Flowers Are Somewhere Else; The Flowers Are Always Prettiest In Your Own Backyard :)
Michael went on a business trip and when he got home I asked him to help me come up with a lesson from the craft room for today.  Today's lesson is what he shared :)  There were flowers outside of the small house where he stayed on his trip and he would sit and watch them in the late afternoons.  He loved watching the small bees and bugs flying around; watching all the colors change in the light.  And yet, the flowers that grow here, in his own back yard, feel special in a different way.  I wonder if these flowers reflect back to him the love he has shared with them.  That somehow they know what care he has provided to them and that shows in the way they bloom and radiate in the back yard.  When you pour your love into something - when you help something grow - it truly does become the prettiest thing around! :)
Today's card began with a desire to bring the kitchen into the craft room!  I hadn't played with salt in my art work in a long time and this card provided the perfect opportunity!  I began with a piece of glossy white card stock and sprayed it with Perfect Plum ink (that I had mixed with water in a little spray bottle) and So Saffron ink and then sprinkled the piece with two different kinds of salt (finely ground and coarse) and then let it dry.  Once it dried, I brushed off the salt and then stamped the piece with black Staz-On and images from the Notably Ornate stamp set.  I then sponged the edges with Perfect Plum and Basic Black ink.  Next I punched a decorative label from Perfect Plum card stock and sponged the edges with Basic Black ink.  I then stamped the greeting from On Your Birthday with Basic Black ink on Very Vanilla card stock, punched it out with the modern label punch and sponged the edges with Basic Black ink.  The greeting was adhered to the decorative label with glue and then the piece was adhered to the salted and stamped panel.  I then poked the antique brad through the layers before adhering the entire panel to the Very Vanilla card with dimensionals.  I hope you like it!

Wednesday, August 17, 2011

En Francais & Tiny Tags Thank You

Today's Lesson From The Craft Room:  Exercise Is Self Love!
One of the sites I like to visit frequently is Louise Hay's site.  I visit to look at her daily affirmation and the other day her affirmation was "Exercise is self love!"  It was the perfect affirmation for me to see since lately I have been road biking and it is making me feel soooooo good emotionally!  It really does feel like I am loving and appreciating myself every time I go out on the bike for a ride.  I know that I sometimes fall into a rut and begin to think of exercise as a chore and a bore.  How nice to put a different spin on it and recognize that every time I do something active I am expressing my love for myself :)  How 'bout showing yourself a little self love, in the form of exercise, today!
Today's card was inspired by some odds & ends that were sitting on the craft table staring up at me :)  I began with a Crumb Cake card base and then stamped a piece of Very Vanilla card stock with the En Francais background stamp and some Sahara Sand ink.  Next came tearing a small strip of Sahara Sand card stock and adding it to the bottom of the Very Vanilla panel.  I punched out a decorative label punch from Naturals Ivory card stock, cut it in half, and then sponged the edges with Rich Razzleberry ink.  The piece was then adhered to the panel with glue.  A small piece of Victoria lace was adhered to the label with a glue dot.  I then used a piece of twine to attach a small tag that was stamped with a greeting from Tiny Tags and the punched with the jewelry tag punch.  The Rich Razzleberry button was the added with glue dots and the entire panel was adhered to a Rich Razzleberry panel before being adhered down to the card base.  It is fun to see what you can do with the scraps that stare up at you from your craft table :)

Tuesday, August 16, 2011

Medallion Stamp & Gesso Card

Today's Lesson From The Craft Room:  Work Through The Resistance!
Resistance is such an interesting emotion!  It seems to come up for me quite a bit in the craft room, especially when I find myself not liking the creation that is unfolding in front of me.  I begin to resist finishing the project and I just want to begin another one.  That moment is a big decision point for me - do I abandon and give up on what I am doing and just begin something new (or walk out of the craft room)?  Or, do I forge forward and work through the resistance and see what unfolds?  I believe it takes strength to be willing to forge forward - to face the demon that is staring you in the face and let that demon know that you won't be dissuaded.  I know it's just a card, but if I can face that demon in the craft room and get through it, maybe I will learn that in other parts of my life the demon can be slayed as well!
I wish I could deconstruct the process I went through while making this card, but I honestly went through so many steps I don't even remember what I did!  The part I do remember though is that when I was ready to walk away I thought to myself, "gesso!"  Gesso is a wonderful art medium that can be used to cover surfaces, while allowing the layers beneath it to show through (depending on how thick you apply the gesso).  You can also use a toothpick or other pointed surface to scribe designs into the gesso and the gesso also gives the surface "tooth" so that you can paint or stamp on top of it.  I began with a plain piece of watercolor paper for the background and applied ink and gesso in different layers (that's as specific as I can be about the process since it was a all a bit of trial and error as I went along...not to mention fighting the demon that wanted me to abandon this background all together!).  The Medallion background stamp was inked with Melon Mambo ink and stamped at half strength onto Very Vanilla card stock.  I then cut it out and sponged the edges with black ink.  The greeting is from Bring On The Cake and was stamped with Basic Black ink onto a strip of watercolor paper.  I hope you like it!

Monday, August 15, 2011

Emboss Resist Inspired By Nature Card & Video!!!!

Today's Lesson From The Craft Room:  You Have So Much More In You Than You Think You Do!!!
If you had told me that this past weekend I would go for a 38-mile bike ride, I would have told you you were crazy!!!!  I would have to eat those words since yes, I did it!!!!!!  As I have begun to enjoy bike riding what I am learning the most about myself is that I underestimate me.  I think I am weaker or less athletic than I actually am and I am learning to stop underestimate myself.  It has taken this new sport to make me feel so proud and to begin to develop a different kind of confidence in my abilities and it feels GOOD!!!!!  I am also very grateful for the synchronicity that led me to run into my neighbor on the bike trail just over a week ago because she has become a wonderful biking buddy!  That is also something new for me.  I have always been a bit of a loner when it comes to exercising and I am actually enjoying riding with someone who is supportive and encouraging and inspirational!  I believe that each of us has so much more inside of us than we give ourselves credit for.  Sometimes it just takes a new sport/activity to give us insight into our potential!
Today's card uses an emboss resist technique with the Inspired By Nature stamp set.  Here is a video to show you how I made it!  Enjoy!!!!

Friday, August 12, 2011

Four Ways Friday #57 - Make A Monster!

This week's Four Ways Friday is all about the adorable Make a Monster stamp set!  This set is a ton of fun.  It also lends itself well for stamping with children and creating coloring books for kids to color.  I hope you enjoy the following four cards!
This first 6"x 3" card is so simple to make!  I stamped the monsters using different eyes and mouths and then punched them out with a 1 1/2" circle punch.  I glued them to black circles punched with a 1 3/4" circle punch.  The greetings are from the On Your Birthday stamp set.  Of course, you could color the monsters if you wanted, or give the card to a child to color for their birthday :)  I really liked the black & white look.
It doesn't take long to be overcome by the urge to color these adorable monsters!  Here I simply stamped the monster using Staz-on onto a Whisper White card base.  I colored in the monster using markers and then stamped the greeting from Bring On The Cake using the stamp-a-ma-jig.  Finally, I took some crystal effects and added it to the monster's eyes and teeth and the word "cake."
Remember that you can use your monster parts in non-traditional ways!  Here I used the monster "hair" stamp to create grass!  I stamped the image multiple times using Wild Wasabi ink and then sponged over it with Certainly Celery ink.  I then sponged the background with So Saffron ink and stamped the dot stamp at half-strength using More Mustard ink.  The monster was stamped onto a piece of Whisper White card stock with Staz-on.  I then colored in the monster with a Bashful Blue marker and cut it out.  I added crystal effects to the monster eyes.  The greeting is from the Pennant Parade stamp set and was stamped with Staz-on with the stamp-a-ma-jig.  I mounted the panel onto a Perfect Plum card base that I had stamped with Basic Gray ink and the Wonderfully Worn background stamp.
This card began with a black card base.  The eyes were stamped with Versamark and the heat embossed with white embossing powder.  The word bubble was drawn freehand with black marker and then cut out.  I used the Calendar Alphabet & Numbers stamp set to stamp the letters.  The bubble is popped up on the card front using dimensionals.  Of course, this card makes no sense until you get to see the inside! :)
It makes me smile even as I'm typing this :)  I stamped the different monsters with black Staz-on and then colored them in with markers.  A few of them were then covered with dazzling diamonds by using a 2-way glue pen.  The message was stamped with the Calendar Alphabet & Numbers stamp set (the exclamation points were hand drawn).
I hope you've enjoyed this week's Four Ways Friday!  May you have a relaxing, inspiring and creative weekend!!!!!


Thursday, August 11, 2011

Paper Pieced Sailboat Birthday Card

Today's Lesson From The Craft Room:  If You Are Passionate About It, Do It!
I was following the news on Diana Nyad's swim from Cuba to Florida with rapt attention!  When I saw that she had been swimming for over 20 hours I was amazed!  Here was a woman, 61 years old, following her passion...without a shark cage!  I was sad for her when I learned that she had to abandon her swim after 29 hours - suffering from shoulder issues, asthma and nausea.  I know how much she would have loved to have made it to Florida.  Regardless of whether she reached her destination, her journey - her process - is an incredibly inspiring one!  To go after that which you are passionate about.  To put your whole self - body, mind and spirit - into pursuing your passion...now that takes courage!  Although she did not reach the shores of Florida under her own power, she definitely found her way to the shores of my soul!  Thank you Diana Nyad for showing us what it means to do that which you are passionate about!!!!!!
Today's card may look slightly familiar :)  Do you see the direct-to-paper background from yesterday's card?  I had one left over and decided it needed to be made into a card :)  The card was also inspired by a retired stamp set called Nursery Necessities.  I never owned the stamp set, but the image of the sailboat from the catalog has always stuck with me.  It was from this imagination that I began to build this paper-pieced boat by cutting pieces of Crumb Cake and Not Quite Navy card stock.  I popped them up onto the background using dimensionals after sponging all the pieces and the background panel with Chocolate Chip ink.  I then mounted the panel on a piece of Whisper White card stock and sponged the edges as well.  The greeting from Sincere Salutations was stamped using the stamp-a-ma-jig and Chocolate Chip ink.  I then added the brad from the antique brad set before mounting the panel, using dimensionals, on a Crumb Cake card base.  The brad reminds me of a compass and it seemed perfect for this card!  I hope you like it!

Wednesday, August 10, 2011

Direct-To-Paper Technique Baby Card & Video!!!!!

Today's Lesson From The Craft Room:  A Whole World Of Possibilities Await You!!!!
Why do I love being in the craft room?  The list is a long one, but I would have to say that one of my favorite reasons is that a whole world of possibilities await me every time I walk into the room!  Oh that I could look at my entire life with this same zest and excitement!  I passed a woman walking an adorable Golden Retriever puppy this morning and the puppy got so excited!  The woman turned to me and, trying to sound like her puppy speaking, she said, "Oh!  The world is just so exciting!"  I replied, "Oh that we could all walk around the world with that feeling!"  So that will be my challenge for myself - to continue to push myself to see every moment as presenting me with a whole world of possibilities!  Each moment holds that potential - the excitement of experiencing something new or experiencing something familiar in a new way!  Wish me luck :)
Today's card came out of the world of possibilities that were waiting for me in the craft room today!  Here is a video to show you how I made it!  Enjoy!

Tuesday, August 09, 2011

Pennant Parade Pocket Birthday Card & Video!!!!!

Today's Lesson From The Craft Room:  You Are Safe And Secure In This Very Moment!
If you are reading this post right now, that says to me that you are safe and secure in this very moment.  And this very moment is what matters!  I can get very caught up in fear - particularly when it comes to my safety.  I don't like to watch scary movies because I don't want to put those images in my head.  The reality, however, is that I do a fine job all on my own putting those terrible images into my head!  I can especially drive myself crazy if I happen to be home alone at night.  I can keep myself awake just imagining all the bad things that might happen!  I'm sure it doesn't help that I have a tendency to have the tv on in the craft room and it always seems to be tuned in to an episode of Law & Order or NCIS - both shows about crime and craziness.  So now I try to repeat the mantra, "you are safe and secure in this very moment."  This reminds me that I have a choice - I can let the fear take over or I can recognize that the images only exist in my mind and the reality is that I am perfectly safe in the moment.  Whether I am in a hotel room, home alone one evening, or on a plane what matters is that I release the fears and live in this very moment.  I am safe and secure right now :)
Today's card is a fun and easy card to make and it is a nice change from a traditional folded card.  Here is a video to show you how it's done!  Enjoy!!!!