

Friday, August 16, 2013
New Photopolymer Stamp Set: Another Thank You
We have another new photopolymer stamp set called Another Thank You!!!! Yeah!!!! Another Thank You (item 133454, $13.95) is an exclusive, versatile set for any occasion that calls for a thank you. Check it out!
Tuesday, August 06, 2013
In Need Of A Little Break...
Just wanted to let you know that I'll be taking a little bit of a break for the rest of the week. Lots on my plate right now and I figured I should take a little bit of the pressure off :) Hope you have a wonderful, creative, and peaceful week :)
Monday, August 05, 2013
Gingham Garden Happy Birthday Card

I went swimming yesterday. I am still learning - working on my strokes - getting back to feeling comfortable in the water. There was one other man in the pool - swimming in the lane next to me. At one point I was resting at the end of the pool and he asked if he could give me a little bit of advice on my stroke. My first reaction was to say, "Thanks, but no thanks" since I am currently taking lessons from an instructor and already have a lot floating in my head when I swim (there's a lot to think about!). But instead, I paused and the man continued, "I taught the Red Cross swimming program for over 50 years." I told him that I was taking lessons and that I would also like to hear what he had to say. He shared his advice and I said thank you and the next time I was at the end of the pool he told me that those last few strokes looked better :) I'm not sure I really did anything different - maybe I did - what I do know is that I allowed him to be seen. This man who was unknown to me when I got in the pool was able to define himself as someone who had something to contribute - someone who had accomplished a lot with the Red Cross in his years. What I did was allow him to have his dignity and I could then choose to do what I wanted to with the advice he shared We all have a need to be seen. How can you recognize someone today?
Today's card was quick and easy with the Gingham Garden designer washi tape. I stamped the pedestal portion of the cake image from Make A Cake with Pacific Point ink. Next, I tore strips of washi tape and layered them one on top of the other to form the layers of the cake. The butterflies from Make A Cake were then stamped using Daffodil Delight. Next, with the help of the stamp-a-ma-jig, I stamped the sentiment from Express Yourself on top of the sentiment from Bring On The Cake using Melon Mambo and Wild Wasabi respectively. The final touch was to add Dazzling Details on the layers of the cake for some bling! I hope you like it!
Friday, August 02, 2013
Six-Sided Sampler Hello Card

I was sitting on the porch yesterday - just being still - relaxing - enjoying the sound of the breeze. Then I noticed a quick, darting motion out of the corner of my eye! It was a beautiful, tiny hummingbird. He was so curious! He hovered over one of the fountains in the yard and then he decided it was the perfect size for a bath! I sat there on the porch and watched this amazing bird take a bath and then sit on a branch and primp and preen. It was amazing! Sometimes stillness leads to miracles!
Today's card began with some leftover 1" and 3/4" Crumb Cake circles that were sitting on the craft table. I decided to adhere them to a Very Vanilla card base - all in a row. Next I tied a piece of Early Espresso Baker's Twine around the card and tied it in a bow. The final touch was to stamp one of the Six-Sided Sampler images with Crumb Cake ink onto Whisper White card stock. I added the sentiment from the same stamp set with Early Espresso ink and the help of my stamp-a-ma-jig. I punched the image with the Hexagon punch and added it to the card with dimensionals. I hope you like it and I hope you have a wonderful weekend filled with stillness and miracles!!!!!
Wednesday, July 31, 2013
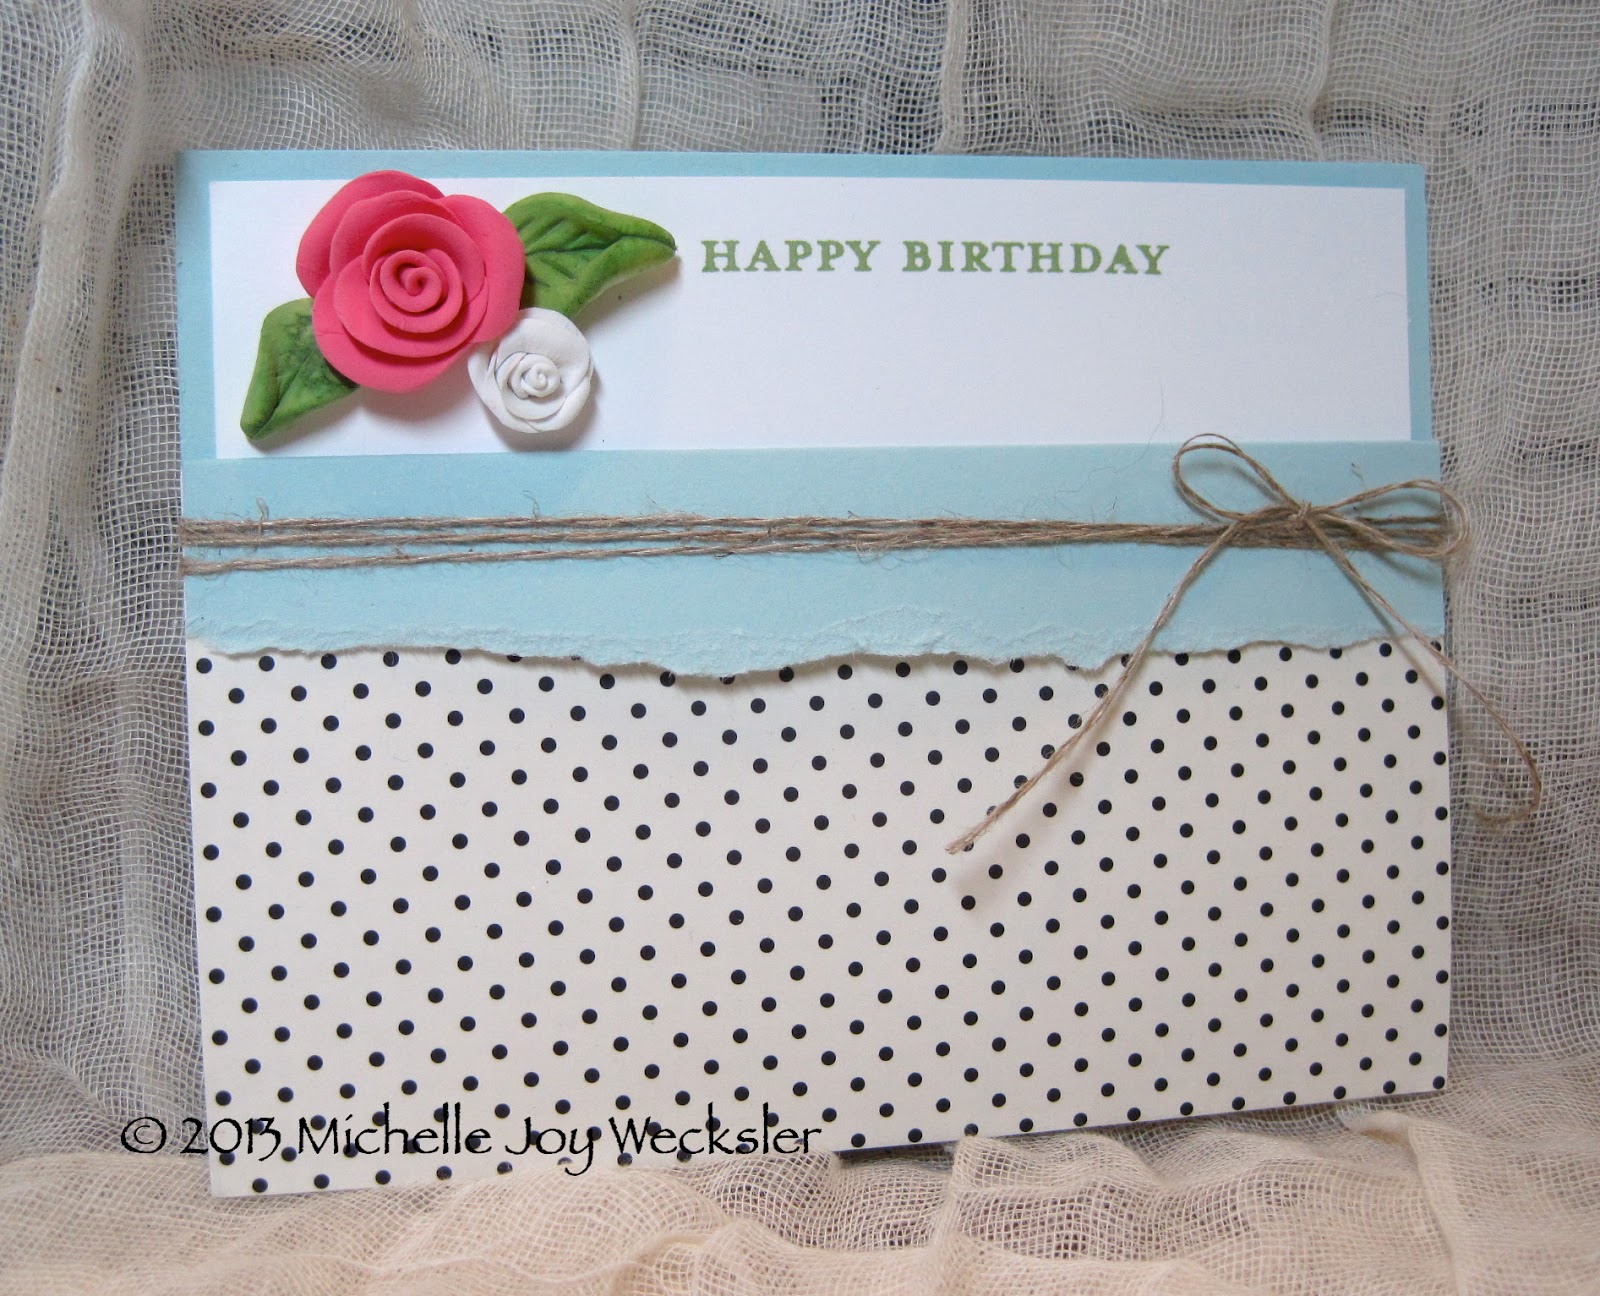
Simply Pressed Clay Roses Pocket Card
Our friend and artist, Mario Rivoli, told us a wonderful story the other day. He said that when he was a child his mother used to sit him on the kitchen floor and tell him to find the running horse in the patterns created by the marble-like surface of floor. He would spend hours looking at the patterns in the floor and then drew the animals he found. It's no wonder he grew up to become a wonderful artist - able to see things where others see nothing. Mario shared this story as he showed me some of the paper pieces he had kept from our marbling class. As part of the class, we used newsprint paper to clean the marbling tray. These "clean up" sheets have become magical in Mario's hands! He looks at the patterns created by the stray paint and sees birds and dragons and people. He has put his pens to these papers and the works of art that are emerging are phenomenal. I hope I can begin to look at what is in front of me differently - to see the running horse in the pattern.
Today's card was created for Michael's mom's b'day! I decided to put some of the Simply Pressed Clay roses to use and, since this card is getting mailed with a gift, I was able to have the card be bulky - without the need for an envelope. I created a pocket card with Soft Sky card stock and then added a piece of Modern Medley designer paper and some linen thread. The inside card was stamped with the sentiment from Morning Meadow using Wild Wasabi ink. The roses and leaves were added to the card with Crystal Effects. I hope you like it! :)
Tuesday, July 30, 2013
Floral Bedroom Ensemble by Me :)

To qualify for all the instructions for the bonus projects, readers must subscribe to July at Craft Project Central and then meet one of the bonus project requirements of subscribing to two or more months in a row, putting the CPC badge on their blog or referring a friend and when they subscribe, letting Craft Project Central know!
I am also excited to report that Craft Project Central has asked me to join them as a regular member of their design team! I am very excited!!!! Starting September I'll be sharing more fun projects with you!!! :)
Monday, July 29, 2013
Simply Pressed Clay Roses: A Video!!!!

My friend Helen put a huge smile on my face on Friday! I had been having a lot of fun making Simply Pressed Clay roses and she and I exchanged a few emails and each mentioned how much we were enjoying playing with the clay - that it is meditative and a great tension reliever! When she sent me some pictures of what she had been creating, I cracked up! Here are Helen and I living thousands of miles apart and yet we both had been making clay flowers! We each made roses and Helen made a gorgeous calla lily (something I definitely need to learn!)! I was once again amazed by the fact that we may live far apart, but we are so close together! I feel that way towards those of you who visit my blog or leave comments. It seems that no matter where we live, we create a close community through our love of creativity!
Today I wanted to share a video with you so that you can also create Simply Pressed Clay roses where you are! :) Enjoy :)
Sunday, July 28, 2013
And The Winner Is....

Saturday, July 27, 2013
Yummy Bread & Jelly Gifts by Jen Arkfeld

To get all of the step-by-step instructions to create these gifts yourself, head on over to Craft Project Central and sign up for a membership for the month of July! You will receive these instructions as well as directions for all of the other projects featured for the month of July at Craft Project Central!
Friday, July 26, 2013
Happy Day Washi Card

On Monday night we were treated to the most amazing full moon I have seen in a long time! Did you see it???? It was so huge and so bright here in Colorado! I was mesmerized. We walked up to the park under the light of the moon and when we arrived we saw some of Buddy's usual friends. When we got up to some of the usual suspects we asked them if they had seen the moon. Two of them said they had not so we told them to take a few steps to the left - to be out of the line of the trees - and WOW - they were amazed! It's interesting to realize that sometimes you are not seeing something because something is blocking your way and, if you could only move a few steps to the left, you might see something spectacular! What are the things that get in our way? Sometimes it is a stand of trees, sometimes it is our own stance on an issue or an agenda that we have. Sometimes it is just that we are so focused on what we are doing or what we are thinking that we totally miss the opportunity to step to the left. What is blocking your way right now? Can you take a few steps to the left? You might see something spectacular!
For today's card I decided to do some more experimenting with making my own washi tape! You can see my basic video on how to make your own washi tape HERE! For the ruler washi tape I first sponged the creped filter paper (already on the adhesive backing) with Daffodil Delight ink. Then I inked up the Measuring Stick wheel with Basic Black ink and rolled it over the Daffodil Delight inked creped filter paper! I love how it turned out! I combined it on the Very Vanilla card base with some of the This and That washi tape and Gingham Garden washi tape and stamped the sentiment from Happy Day onto Daffodil Delight card stock. I attached the sentiment with dimensionals. The final touch was to stamp the bicycle from Postage Collection and then use a ruler to draw some dashed lines to form a path for the bicycle. I hope you like it and I hope you have a wonderfully creative weekend! Don't forget, leave a comment on any of this week's posts on my blog and you will be entered to win a free subscription to the month of July projects at Craft Project Central! In your comment, let me know how you manage to keep your craft space clean (I'm looking for help!) :) The winner will be chosen on Sunday! Good luck! :)
Thursday, July 25, 2013
Happy Day Mini Book

Pantyhose are not my thing! I remember as a child that my mom used to wear pantyhose with everything - skirts, pants, shorts - you name it. I have to admit that that seemed like torture to me! Maybe there was a time when the idea of putting on pantyhose seemed grown up and like a treat, but that time is long ago and far away! Now I find that any excuse not to wear pantyhose is a good excuse (and my mom has shed her pantyhose as well - except for special occasions). So what clothes do I like? Well I definitely would be a candidate for What Not To Wear (a show where people with dreadful taste in clothing are given an opportunity to be guinea pigs for style consultants Stacy and Clinton - quite entertaining!). When I am not traveling for work, my go-to cold-weather uniform usually involves a pair of black stretch leggings and some type of oversized comfy shirt make of a soft material like fleece or cotton (nothing itchy please!). On warm-weather days I am now turning to a new uniform...overalls!!!!! I had this vision that I just couldn't get out of my head - overalls with tank tops! So onto ebay I went to purchase a week's worth of bib overalls that I could get paint and ink on and be comfy in all day long! I love the idea of no tight waistbands and lots of pockets for walking the dog! There may be some days where it is just too hot outside for overalls, but on any day when the temp is favorable, you will find me hanging out looking like Farmer Brown :) It's important to find a uniform that suits you and allows you to be you! :)
Today's mini book was made to match the thank you card I shared earlier this week. I am loving the combination of Coastal Cabana, Crisp Cantaloupe (yum!) and Baked Brown Sugar (double yum!)! I love making these mini books to record thoughts, lists, notes and in this case, sweet, sweet moments! The sentiment is from Happy Days and the other supplies were listed in my post earlier this week. Here's a look at the book lying flat. I use recycled paper for the inside and just add a small stamped image to hide some of the printing on the pages. I hope you like it! P.S. Don't forget to leave a comment on my blog this week telling me what you do to keep your craft space clean! I will be choosing one lucky winner on Sunday to receive a free subscription to the month of July for Craft Project Central! Good luck!

Wednesday, July 24, 2013
Naturally Summer Garden Gift Set by Candy Rattray

Summer is here, and this set of projects brings the sunshine of summer gardens and the beauty of nature into a lovely handmade gift complete with coordinating gift bag and card. Use the mini album for your summer photos or as a perfect gardening journal. Would you like all of the instructions for how to make this garden gift set? Just head on over to Craft Project Central and register for membership for the month of July! If you become a member for July, you will receive instructions for this project as well as all of the other projects featured for July at Craft Project Central! Or, check back later this week and learn how you can win a free membership for the month of July!
Tuesday, July 23, 2013
Four Frames Thank You Card

I love creating because it allows me to be adventurous! :) I show up in the craft room and stare at a blank piece of card stock and begin to wonder what would happen if I combined colors I don't normally combine, or try things I don't normally try. Sometimes in life we hold back and don't try things because we don't want to be embarrassed or we don't want to fail. The craft room is a wonderful place to fail and embarrass yourself...because you're the only one watching! If you create something that makes you want to throw up, so what! You can recycle it or cover it up or claim that your dog made it! :) Or, you may find that you don't fail at all! Maybe by taking that risk it leads you to a discovery that turns into one of the most wonderful things you have ever made. So give it a try! No one is watching :)
For today's card I began with a Crisp Cantaloupe card base (am I the only one who can't mention Crisp Cantaloupe without salivating?!) I decided to pair the color with some Coastal Cabana (now I'm hearing waves :) which I ran through the Big Shot with the Honeycomb embossing folder. I thought the colors looks great with this pattern from the Venetian Romance designer series paper (can you tell that I am LOVING this paper?! I am using it on everything!!!!). I then stamped some handmade washi tape (did you watch my video on this? It's so easy to do!) using the Tape It stamp set and added it to the card. Next I stamped the little bird frame from Four Frames using Coastal Cabana ink and the sentiment from Express Yourself with Baked Brown Sugar (why are all of these color names making me hungry?!). I punched the label out with the Decorative Label punch and added it to the card with dimensionals. Finally, I used the 7/8" scallop circle punch to punch a piece of Crisp Cantaloupe card stock and layered an In Color Boutique Detail on top of it. The piece was then added to the card with a dimensional. I hope you like it!
Monday, July 22, 2013
Creating Pretty Cards - Sketch Challenge #25 & Chance To Win!!!!!

I got busy in the craft room this past weekend - trying to dig out from the explosion of creativity that had been taking place in there! Combining a hectic travel schedule with bursts of creativity makes for an impossibly messy craft room! So, I spent time clearing and cleaning and now, every time I pass by the doorway to the craft room and look inside, I smile! I forgot how refreshing it is to see a clean and tidy space! It's so inviting! It also allows my mind to be come and creates space for new creative ideas to take hold. When I created this card on my clean craft table, I made sure to put everything back in its place - clearing my desk definitely clears my mind!
Today's card is for this month's Creating Pretty Cards Sketch Challenge #25 over at Craft Project Central! I am in love with the new Smoky Slate color and thought it looked quite elegant with this pattern from the Venetian Romance designer series paper! I added the floral image from Happy Day, stamped with Smoky Slate ink. I layered the stamped panel onto some Crisp Cantaloupe card stock for some added depth. Next I punched two labels using the Decorative Label punch. I sponged the edges with Smoky Slate ink. Then I stamped the Label Love stamp set and punched it out with the Artisan Label punch. The sentiment from Pennant Parade was stamped onto Very Vanilla card stock and punched out with the 1" circle punch. I layered and glued the labels together and added them to the card with dimensionals. For some bling, I added a rhinestone to the center of a Vintage Faceted designer button and then added that to the label with glue dots. Some knotted Natural Trim finishes the card. I hope you like it!
Make a card of your own and post it to the Craft Project Central site and you might win a free one-month subscription to Craft Project Central! Of, if your creative juices aren't quite flowing, feel free to leave me a comment here...telling me how you manage to keep your craft space clean...and you will be entered to win a free subscription to the month of July over at Craft Project Central! I will be announcing the winner on Sunday, July 28!!!! Good luck!!!!
Sunday, July 21, 2013
Dry Erase Memo Board by Chris Galbraith

To get all of the step-by-step instructions for this project, as well as all of the other projects featured for the month of July on Craft Project Central, go HERE and purchase a membership for the month of July! Or, check back this week when I will be giving away a free membership for the month of July to Craft Project Central! :)
Saturday, July 20, 2013
Gift Bag Decorations


If you saw my craft room right now...well, good thing you can't see my craft room right now and no, I won't take a picture and show it to you because I am quite embarrassed by the state of things in there right now! Actually, I've been quite embarrassed about it for awhile...but that hasn't stopped me from creating!!!! I've decided that I need to make it work when I get the urge to create and things aren't as neat and tidy as I would like them to be (quite the understatement)! Sometimes, even in the midst of all the chaos and clutter, you can find a small space on a table, a tiny place to sit, a few supplies and you can just make it work. So that's my lesson for today (and likely for the next few days as I begin to dig out from the piles in the craft room...I just need to make it work :)
Today I am sharing with you a few items that I have made for the gift bags for my niece's upcoming party! My sister-in-law and I collaborated via Facetime and hopefully everything will come together beautifully :) The little welcome signs will go on the front of the bag - which she has already decorated with some adorable pink and white striped paper. One of the items that will be going in the bag is an adorable eye mask. Unfortunately the adorable eye mask came in some "not-so-adorable" wrapping. So, we are taking the tag at the top of the eye mask bag off and replacing it with these bag toppers! The font I used was Upper East Side and I printed the sentiment onto Whisper White card stock. I then layered it onto Basic Black and Pretty In Pink (retired) card stock. The stars were punched from silver glimmer paper and attached with dimensionals. I put sticky strip on the underside of the bag toppers so that they will be easy to attach to the eye mask bags. The "sweet dreams" tags are for the guests and the "thanks for helping" tags are going to be added to the bags my sister-in-law will give out to all of those who have helped her put this party together. Hopefully these small touches will add to the overall festive feel for this wonderful party for my niece! I hope you have a beautifully creative weekend. I'll be trying to dig out from the craft room...just trying to make it work! :)
Friday, July 19, 2013
Undefined Stamp Carving Kit!!!!!
Stampin' Up! just announced a wonderful new product that I am VERY excited about!!!!! Bring your own unique touch to your stamped creations by making your own stamps!

*Add a sheet of Clear-Mount Cling Foam to create your own clear-mount
stamps. Mounting your stamps on the cling foam allows you to make
stamps any size you want, not just what will fit on the blocks in the
kit.
Included in the Stamp Carving Kit:
Item #
|
Description
|
|
133402
|
Undefined Stamp Carving Kit $19.95 | |
134808
|
Undefined Refill Kit $9.95 | |
124236
|
Clear-Mount Cling Foam* $10.95 |
Included in the Stamp Carving Kit:
- 2 carving tools
- 3" x 4" rubber
- 3" x 4" foam
- 4 wood blocks (various sizes)
- 1 Island Indigo Stampin' Write Marker
- 3 postcards
- Instruction sheet
- Stamp image templates
Thursday, July 18, 2013
Card File Box Set by Christy Fulk

Label Love Birthday Gift Tag

Buddy and I were on our walk this morning and for some reason I had the urge to take a left and turn down a street - a different course than our normal route in the morning. I decided to follow the urge. So, we turned left, walked about 4 steps and all of a sudden there was a hummingbird about 5 feet above us and in the center of the road. He hovered there and then flitted a little to the right...then a little to the left...then back to center - all the while singing a high pitched song. It honestly felt like he was putting on a show for us! After another encore performance he flew off. I don't know if it is common where you live to see hummingbirds, but for us, it is quite rare. And to have one stay and hover in the air and just watch us, was unbelievable! Now I know why I was meant to turn left and I encourage you to turn left when the urge strikes :)
Today I needed to put together a quick tag to add to a bag containing a birthday gift. The bag was black, white and raspberry colored, so I took out my Rose Red and Basic Black card stock and got to work! I cut the Rose Red card stock into a label shape and then added a strip of Basic Black card stock and then a strip of silver glimmer paper. I stamped the background of the tag with an image from the Happy Day stamp set using Rose Red ink. Next I stamped the sentiment from Label Love with Rose Red ink onto Whisper White card stock. I then punched it out with the artisinal label punch and added it to the tag with dimensionals. Finally, I punched a hole with the crop-a-dile and threaded organza ribbon through to attach the tag. I hope you like it!
Wednesday, July 17, 2013
Papillion Potpourri Birthday Card

I was pretty tired by early evening today. I had just completed my ensemble for my guest designer spot for Craft Project Central for this month (which I will be sharing with you soon!) and I didn't seem to have the energy to begin another project. So I did what I try not to do which is to turn on the tv. I am always conscious of how precious our moments are and am pretty sure I don't want to spend many of those moments staring at a tv screen. However, tonight seemed to be an exception. What made it worse - or maybe more hysterical - depending on your perspective...is that I turned on a movie that was absolutely ridiculous. I'm willing to admit to you what it was...but please don't think less of me! It was called The Watch - with Ben Stiller and Vince Vaughn. Even the listing on HBO only gave it one star! And I got sucked in - while totally laughing at myself for watching the darn thing! What became the most entertaining part for me was thinking about how much fun the actors must have had making this ridiculous movie! I can just imagine them cracking up trying to keep straight faces while battling aliens as part of a self-created neighborhood watch group. And now here I sit, having just gotten through the entire movie and I have to admit...sometimes a ridiculous movie is just what you need! (But please don't take that as my recommendation that you go out and watch it too!) :)
This card was inspired by this card by Kristina Werner. I love how the simple wash of color creates so much interest to the background! I began by stamping the butterfly from Papillion Potpourri using VersaMark ink and then heat embossed with white embossing powder. I then used an Aqua Painter to apply Strawberry Slush and Crisp Cantaloupe to the card (I made things a little wet, so watch how much water you use or you will warp the card). I then wiped off the butterflies so that the white embossing stayed white :) I wrapped some linen thread around the card and then added some circles of Strawberry Slush and Crisp Cantaloupe card stock. Next I heat embossed the greeting from Postage Collection using VersaMark ink and white embossing powder onto Strawberry Slush card stock and then punched the card stock out using the elegant butterfly punch. I hope you like it!
Subscribe to:
Posts (Atom)