For this week's Four Ways Friday I decided to play with the adorable Furry Folk stamp set!
Let's begin with a clean and simple card! I love that you can create little scenes with this stamp set! Here I stamped the trees onto the Whisper White card stock using Always Artichoke ink. Prior to stamping, I colored the trunks of the trees on the rubber stamp with my Chocolate Chip marker. I stamped the bear in Early Espresso, with a Basic Black nose, onto a scrap of Whisper White card stock and cut him out. Next I stamped the greeting from Petite Pairs onto the card with Jet Black Staz-On and then popped the bear up on a couple of dimensionals.
A number of the stamps in this set are the perfect size for making adorable little tile magnets! Here is a video to show you how to make some magnets of your own!
Why stop at a small tile when you can make a bigger one!
I thought these adorable little guys would look great on a welcome sign! To create the sign I began by stamping the letters from the Contempo Alphabet (retired) using Jet Black Staz-On onto a white tile. Next I stamped each of the critters, also using Staz-On. The last stamped image was the Woodgrain background stamp for the bottom of the tile, also stamped with Staz-On. I then began adding small drops of ink to a little bit of Crystal Effects and painted each of the critters and the woodgrain. Once all of the Crystal Effects was dry, I sprayed the entire tile with an acrylic sealer, just to ensure the Staz-On would not come off. Finally, I drilled two holes into the tile and added the wire, beads and the touch of ribbon!
I decided to try heat embossing on glass with the adorable owl in this stamp set. This was my first attempt at heat embossing on glass and I got better the more I practiced! You can see some of the stray grains of embossing powder that got heated to the glass - if you use enough powder from your embossing buddy, you can prevent these stray grains from sticking to the glass! I sandwiched a piece of Flirtatious designer series paper in between two pieces of glass. I collaged a few words from a book to the designer paper before sandwiching it between the glass and soldering the pieces together. This is what the back of the necklace looks like:
Here is a video to show you how to heat emboss on the glass!
I hope you've enjoyed this week's Four Ways Friday! I hope it inspires you to play with your Furry Folks stamp set or to try stamping on tiles with VersaMark or heat embossing on glass! I hope you have a wonderfully peaceful and creative weekend!!!
Today's Lesson From The Craft Room: You Can Turn Your Day Around!
It began as a good day - at least it felt that way. I got up and did some journaling and then took Buddy for a walk. I've been pretty determined to not start my day in front of my computer and journal instead. I got home and ate breakfast and then began doing some creating until I ran into a bit of an issue with something I was making. So I took a lunch break and it was while I was eating that a migraine decided to start to visit. My migraines historically are pretty classic. They begin with a visual aura - where I see spots/holes in whatever I am looking at. Next comes the numbness in one of my hands that then travels up to my face and mouth. Just writing about it makes me nauseous! And yes, the nausea and head pain then shows up. This time I didn't have much head pain (so grateful for that!). What I did have were thoughts about what a wash the day was going to be. I started feeling angry at my body - angry that I wasn't going to have the day I envisioned. My internal chatter began to call the day a waste - a total wash. And then I started to consider that. Why was I giving up on the entire day when it wasn't even mid-afternoon? Why was I resigned to throw away the rest of my day? So I took a few aspirin and rested a bit and then, when I felt a little bit better, I made my way back into the craft room. It was slow-going, but at least I wasn't sitting on the couch resigned to let the day slip by. I went on our evening walk with Buddy - figuring that the fresh air might help - and it did. By the time I got back from the walk, my head felt better and so did my disposition. I realized that I had plenty of time to enjoy of my day so I headed back into the craft room before dinner and made some progress. This day serves as an example to me - proof that you can turn your day around. Don't give up on your day early - don't call an entire day a "wash." Recognize that each day is lived moment by moment and while one moment may feel a bit of a waste, the next moment could be the moment you've been waiting for! :)
I wanted to share with you the project that I was working on during the day I described above. I wanted to make a necklace for my niece Avery using my stamps. I worked on a piece of clay-covered masonite as my base - I almost worked on a piece of card stock and a Scrabble piece instead, but went with the masonite. I painted the surface with a shimmery watercolor paint and then stamped the letter from a retired SU! set (the letter was the perfect size) using Jet Black Staz-On. Next I stamped the floral image from the Tiny Tags stamp set and added some color by dabbing on ink (Old Olive and Rich Razzleberry). I sanded the edges and ran the tile over the Rich Razzleberry stamp pad. Once everything was dry, I covered the masonite tile with VersaMark ink and clear embossing powder and heat embossed. I repeated this step 2 more times to get a nice coating of embossing powder. Before the embossing fully cooled, I pressed in a few tiny crystal rhinestones. To make the tile into a necklace I added a bail with crystal effects and then strung it on ribbon. I hope you like it! :)
Today's Lesson From The Craft Room: The primary benefit of practicing art, whether well or badly, is that it enables one's soul to grow." -Kurt Vonnegut, Jr.
I'm not sure if you have had this experience, but I find that when people walk into my craft room they inevitably end up asking me what I am doing with all of the things I create - specifically if I'm going to sell them. It's an interesting question and one that is also a little curious to me at the same time. I get the impression that if my response was that I have absolutely no plans for my creations those same people would wonder why I'm bothering in the first place. I mean, why would you make something if you don't have a specific plan for it - a plan to make money on it or give it away or decorate your home? For those of us that make art, the secret lies so much deeper than the product of our efforts. We realize the truth in Kurt Vonnegut Jr's words - that the primary benefit of practicing art isn't about financial gain or home decorating - the primary benefit is that it enables our souls to grow. With each creative act you engage in, you are nurturing and growing your soul. Whatever you eventually choose to do with your art, know this - you are doing exactly what you need to do just by creating it.
I went out on a whim again with my tile paint! This time I chose to make a baby gift for a friend. Here's the process I went through to create the tile. I began with a blank tile and printed the baby's name on the computer. I used tracing paper to get the outline of the letters onto the tile:
Next I used special paint that you can bake in your oven to outline and fill in the letters and add circles to the tile:
Then I used the same special paint to paint some of the circles:
The tile was then left for 24 hours to dry before being baked in the oven. Once the tile had cooled, I drilled holes into the tile and created the hanging wire with beads and wire. I hope you like it :) If you do, you will definitely want to check back on Friday since I will share with you a similar sign I created using my Stampin' Up! supplies! :)
Today's Lesson From The Craft Room: Are You Listening To What They Are Trying To Sell You?
I'm not sure why I was paying attention - usually I tune out during commercials when I'm watching tv. But for some reason, I was paying attention to the two commercials that came on the other day. The first was for Campbell's Soup. And do you know what that commercial said?! Let me quote, "Nothing brings you together like chicken noodle soup from Campbell's!" Really?!?! Are we supposed to believe that! That there is nothing that can bring a family together like that product????? It got better - next came the commercial for Overstock.com. (and I actually have to admit to having purchased something from O.co prior to seeing this commercial). I started laughing when I heard what that commercial said. Let me quote again, "You'll find everything you need for a healthier, happier year!" Really?!?! Everything I need for a healthier, happier year!!!! Hmmm - let me see what would be on my list - health for my family, peace in the world - or at least a tolerance for one another, regular exercise, a positive attitude toward what life will bring me in the coming year...do they really sell that on Overstock.com?! I don't think so! So how have commercials become so ridiculous? Or maybe we have become a bit ridiculous by believing that a product, whatever it is, can bring us together like nothing else or can be everything we need for a healthier, happier year. As long as you're listening, here's what I'm selling...I'm selling the belief that our connection, health and happiness is not achieved through something we can buy on-line or in a store. It is found, instead, within ourselves and in our relationship with others. (ps. I want to thank you Doris for your amazing comment yesterday - it means so much to me and really supports today's lesson - I so appreciate the relationship you are sharing with me - it is a part of what is creating my healthy, happy year!).
Here is a video to show you how I created this foam fortune cookie with a stamped fortune! They look good enough to eat! (but please don't...how's that for a legal disclaimer :) Enjoy!!!!
Today's Lesson From The Craft Room: Cut It Out, Don't Cut It Down!
When I was walking Buddy the other day, the song Colors Of The Wind from the Disney movie Pocahontas came rushing into my head. Don't ask why, but they did. (And I apologize if my mentioning it now means that you will have the song running through your head all day :) Anyway, there is a line in the song that goes like this, "How high does the sycamore grow? If you cut it down then you'll never know." These words kept playing over and over in my head as I walked. Then I realized why they were nagging at me - it was a very clear message to myself. I know I have told you this before and here I am telling you this again - I have self-talk that is not always the most supportive or helpful. I have a tendency to cut myself down quite a bit. Somehow I'm not good enough or creative enough or _________ enough and my internal self-talk likes to harp on that and I am, well, sick of it!!!!! So these lyrics came to me as a message - to remind me that if I keep cutting myself down I will never know how high I can grow! If I can cut it out and stop cutting myself down, then I will be able to realize my potential. So that's today's lesson from the craft room: Cut it out; Don't cut it down!!!! (ps It is kind of embarrassing to share that I have yucky self-talk. Somehow I think that I'm the only one who might be walking around the planet like that...but I think I might be wrong. If you have similar negative chatter in your mind, just think of how much you could grow if you would release that chatter!).
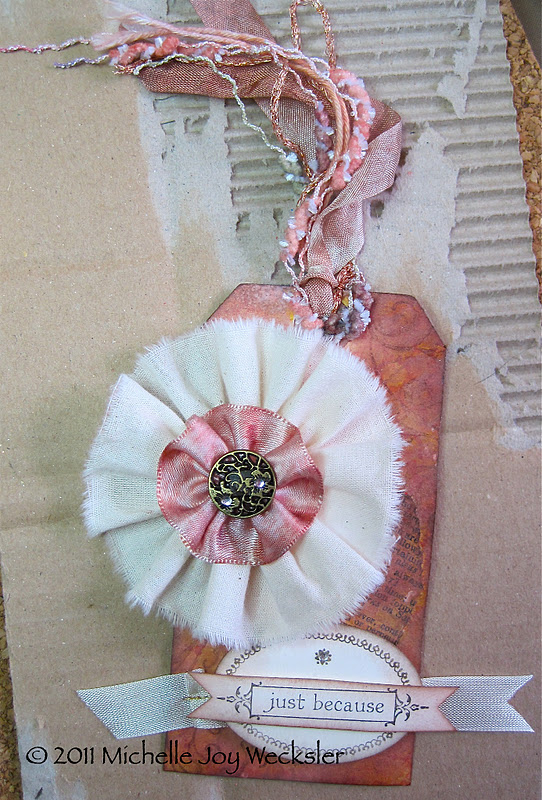
Today's tag accompanied a recent gift to a friend. I began with a vintage tag that I added some torn pieces of dictionary too. Then I sprayed and stenciled and stamped the tag. Then I gessoed it to tone-down some of the writing and sprayed and stenciled and stamped some more! I created the flower using ribbon and some muslin. (I'll show you how I made the muslin part in a video tomorrow!). I sprayed the ribbon flower with a mixture of water and ink so that it would match the tag. The seam binding ribbon used at the top of the tag was also sprayed. The large oval from Notably Ornate was stamped (I only inked up part of the image so that I didn't get the words or the lines that are on the stamp). I punched it out using the large oval punch and adhered it over some seam binding ribbon that I had sewn to the tag using gold metallic thread. I then added a "banner" of sponged card stock that I had stamped with the greeting from Notably Ornate.
Here is a look at the back of the tag (this may ruin the surprise to the person I just sent this too - oops! I edited out her name just in case she hasn't received it yet)! I decorated the back of the tag as I had the front. The only addition is that I took a piece of transparency/window sheet and cut it to fit most of the back of the tag and then I adhered it to the tag in 2 of the corners using mini glue dots - they are pretty invisible! I was then able to use a Sharpie marker to write on the transparency. I love that this allows the collage underneath to show through! I'm also not too disappointed by my sloppy sewing (my sewing machine got stuck and being the unskilled sewing machine operator that I am, this was the best I could do :). I like how you can see the bunches of threads. Playing with tags has really been a lot of fun for me - a nice change from standard cards. I hope you like it!