Friday, July 01, 2011

Work In Progress

Today's Lesson From The Craft Room:  I, Like My Art, Am A Work In Progress!
Four Ways Friday will be back next week.  This week I've been trying to bust through the limits I have set for myself and my art.  Consequently, I have been spending time making art other than cards.  What I am learning through this experience is that I continue to be a work in progress - just like my art making! :)  I am learning to be patient with myself as I play with new and different materials; as I work with new and different shapes and sizes; as I work with a different rhythm and flow.  I have been enjoying the journey - it has taken me out of my comfort zone and into the unknown.  I am not a finished work of art and neither is this piece I am sharing with you today - we both have a long way to go! :)
Today's collage-in-the-making was inspired, once again, by my favorite place on earth - the backyard!  We have blue jays that come to visit almost every day.  They have trained us very well!  When they arrive in the afternoon, they announce their arrival with loud cawing and then wait for us to respond by going outside and bringing them peanuts and seed :)  I love that this gorgeous bird has been able to domesticate us! :)  I began with a primed canvas and added flexible modeling paste using sequin waste as a stencil.  I then added gesso and strips of paper to the background.  Next came some embossed foil that I ran through the Big Shot with the Petals-A-Plenty embossing folder.  I then painted the foil with gesso and sanded it and then snipped it into little strips and added it to the canvas using gel medium.  Next came the addition of the stick.  The flowers were made quite awhile back - I guess they knew better why I was making them!  The minute I looked around the craft room and saw them I knew they were meant to be on this canvas!  The flowers were made with die cut metal and bottle caps colored with alcohol ink.  They were attached to the canvas with gel medium.  The bird began as a laser printed picture of a blue jay.  I cut it out and then covered it with tissue paper and then a coating of gesso.  Next I used acrylic glaze to turn it blue and followed that with some charcoal pencil and black pan pastel to add details and dimension.  He was adhered to a plastic piece and then adhered to the canvas.  I am not sure what I will do next...in my own life or with respect to this piece! :)  It is the unknown that is actually welcoming me - inviting me to play!  I'll share the finished piece with you once it unfolds!  Have a beautiful, creative, fulfilling weekend!!!!!!  (p.s.  Don't forget!  You can start ordering from the new Stampin' Up! catalog today!!!!!  Yeah!!!!!)

Thursday, June 30, 2011

'What's Left' Collage Inspired By Charlotte Lyons

Today's Lesson From The Craft Room:  Be Present With What Is Unfolding.  - Merle Rosen
This piece was inspired by an article I read in a free ebook I downloaded from Cloth Paper Scissors.  The article was entitled "What's Left" Collages and featured collages by Charlotte Lyons.  The article was enough to send me running into the craft room to play!  This collage, like the others I am sharing with you this week, was not done in one sitting.  Rather, it has grown over the course of a number of days - sitting within sight on the craft table - and slowly built...little by little...until it reached a point where I felt it had unfolded.  Being present with what is unfolding can feel challenging at times.  Our inner critic pipes up and tries to discourage us.  Our own internal messages around time and productivity can strangle our creative freedom.  Allowing ourselves to leap these tall "buildings" - these obstacles that try to block our creative way - in a single bound is our way to be our own superhero!  Why not try being present with something as it unfolds - you may be surprised at your own super powers!!!! :)
This collage began with an 8"x10" canvas board and grew from there.  I added fluid acrylics, gesso, stenciling, fabric, and all kinds of bits and pieces that were hiding in the craft room!  Bottle caps, die cut letters, rub ons, keys, buttons, fortunes, tiny playing cards, cardboard, beads, designer paper, book pages, ribbon, string - oodles and oodles of fun!  I have a feeling I will be playing around with more of these collages in the future.  I love the challenge of being present and watching what unfolds!  Hope you like it!

Wednesday, June 29, 2011

Mourning Dove Mixed Media Collage

Today's Lesson From The Craft Room:  Keep Going!  You Can Always Paint Over It!
I am continuing my breaking of limits by working on collage and setting aside cards and most of my Stampin' Up! products for the week.  One of my favorite times of spring is when the mourning doves return to our backyard.  They have been coming back each year.  Sometimes they are fewer in number, sometimes greater.  I love their beautiful cooing sound and the sound made by the beating of their wings as they less-than-gracefully propel themselves into the air :)  This collage was all about honoring these gorgeous birds.
Would you believe this collage started out as a blue-painted canvas?!  Hard to believe, I know.  Yes, I decided I didn't like the color so instead of starting over I just kept on going - kept painting over layers - again and again until something seemed to emerge that I liked.  This is a lesson I continue to learn about art making.  The ability to keep going when the inner critic starts getting loud and obnoxious.  Just keep going!  You can always paint over it!!!!!
What did I use to make this collage?  A better question might be, "What didn't I use?!"  Let's see:  canvas, modeling paste, parchment paper, bird photo, sewing machine, parchment paper (which nothing will stick to!), feathers from walks and the backyard, sticks, beads, clock parts, burlap, paint, marker, charcoal, more paint, painted tissues, gel medium (matte), bubble wrap, sanded styrofoam colored with ink....I think that covers it....although I reserve the right to add more to the list at a later date!  How long did this collage take me?  Hard to say - I had to allow different stages of modeling paste and paint to dry.  I left the canvas on the craft table as I worked on it so that I could keep walking by it and continue to add to it as I was inspired to do so.  I guess it came together over the course of 3 or 4 days.  It's been really enjoyable busting out of my self-proclaimed limitations and now I'm just going to keep going!!!!!

Tuesday, June 28, 2011

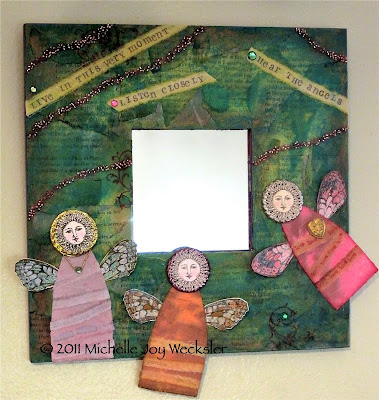
Collaged Mirror

Today's Lesson From The Craft Room:  Let Your Art Go Beyond The Limits You Have Set For It!
One of the struggles that I face as a Stampin' Up! demonstrator is the sense that I need to always be creating cards with the latest and greatest products we sell.  I realize that this is a limit that I have put on myself and I am ready to go beyond this limit!!!!!  So today I am sharing with you a project that uses very few current Stampin' Up! products and a whole lot of other miscellaneous craft and art supplies that I had in the craft room.  What a freeing experience!!!!!!!!  I am contemplating spending the rest of the week focusing on creating art that goes beyond the limits I have set for myself.  This may mean that I won't always be posting finished art pieces for you, since creating beyond my limits means allowing for art projects that don't happen in 10-30 minutes - they may take days or weeks...or, gasp!, even months! :)  What limits can you go beyond in your own art work????
So, what Stampin' Up! products did I use?  You can probably find the Staz-On ink used with the Calendar Alphabet & Numbers stamp set on fabric.  You can also see some old retired SU! sets hidden in there as well (look at the dresses on the angels).  Ooh - do you see the Baroque Motifs stamp?  And then there were all kinds of other art/craft supplies:  chipboard, bottle caps, rhinestones, fabric sprayed with SU! inks, alcohol inks, beads, Crystal Effects, paint, old book pages, a mirror and yes, some SU! card stock.  This mirror is by the back door of the house so that I can see it every time I head outside - a reminder to live in this very moment.  Maybe I need to make a second mirror to remind myself to continue to go beyond the limits I have set for myself in my art making! :)

Monday, June 27, 2011

Broadsheet Alphabet Bookmark

Today's Lesson From The Craft Room:  Pay Attention To Your Natural Rhythm
I have been traveling quite a bit for work in these past few months and I find that when I travel my "pace" seems to be "full speed ahead!"  I am the one who is almost race-walking through the airport once I arrive at home, believing that moving a bit faster will get me home a bit faster...and every second counts when it comes to being home!  I have been home for just over a week now and my body is finally returning to what I believe is my natural rhythm.  When I am at home long enough to decompress I find that the rhythm I enjoy is one of slow contemplation - the ability to sit in the backyard and weed the garden slowly.  Walking the dog at a pace that is recognizable as slow and steady - not hurry and get it done.  I feel so much more at peace when I am attune to my natural rhythm.  I wonder how I can bring this peace to my pace when I travel.  I know it begins with my inner dialogue.  I wonder what I can whisper to myself that will remind me to just "be?"  To let myself flow at my own right pace.  To be respectful of my body and its rhythm.  What is your natural rhythm?  How do you encourage yourself to respect your own pace?
Today's project was one of a number of quick bookmarks that a friend came over to make for a family reunion she was going to over Father's Day.  We used card stock (in this case a combination of brushed silver, whisper white, early espresso and sage shadow- retired).  The white was run through the Big Shot with the Perfect Polka Dots embossing folder.  The letters were stamped using the Broadsheet Alphabet and Chocolate Chip ink.  The ribbon was sewn on with the sewing machine.  I hope you like it!