

Tuesday, July 16, 2013
Birthday Cake Explosion by Amanda Corbet
Monday, July 15, 2013
Supporting Other Artists


When you support and honor the creative energy and output of others, I strongly believe this, in turn, honors the creative energy within you. You are letting the Universe know that you value creativity - that it is a gift to be expressed. Over the 4th of July weekend I went to the Cherry Creek Arts Festival here in Denver. I had a budget so I, unfortunately, needed to pass by a few pieces that I would have loved to have brought home. I was beginning to think that a piece of art would not make it home with me, but at the second to last booth I stopped at, I found this amazing vessel! Both the shape and the color of the glaze initially attracted me. It connected with me. And then I stood there trying to logically decide what I would/could do with it. Somehow I began to envision it outside (in the warm weather only...so it won't crack!) serving as a bird bath :) I haven't found an appropriate stand for it yet - maybe a wood stump will find me - I think that would be perfect! For now it is sitting in my kitchen, making me smile every time I glance at it. This gorgeous vessel was created by Anderson Bailey. You can check out Anderson's work at his website HERE. Maybe he'll be headed to a town near you sometime soon! :) Find someone's art you enjoy and then support their creativity - whether it be by visiting their blog/website or purchasing a piece of their work, you will not only be supporting them, but blessing the creativity within you :)
Saturday, July 13, 2013
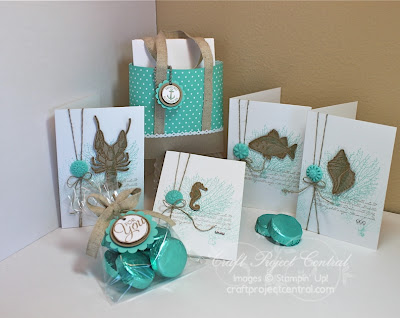
Epic Day Gift Ensemble by Monika Davis

Friday, July 12, 2013
Six-Sided Sampler Birthday Card

My final arrival time back in Denver was yesterday morning at 5 a.m. I was exhausted! When I was a lot younger I could stay up late and get up early and somehow be coherent and energetic. That's not the case now! I slept for about 2 hours once I arrived home, but my body clock was all upside down. So I got up and walked Buddy and then spent most of the day on the couch. Then my body decided it was time to go on strike and I began to have my classic migraine systems. My body was letting me know that I had not shown it the respect it requires and I was paying the consequences. I was in bed, with lights out, by 8 pm last night. I slept almost 10 hours and am feeling a lot better today! I'm still taking things slowly but expect that by tomorrow I will feel like myself again. Time in the craft room is definitely a relaxing way to spend the day!
I began with a Chocolate Chip card base and stamped it with the Chevron background stamp and Illuminate ink. Next I added a torn piece of Venetian Romance designer paper and a crumpled piece of Very Vanilla card stock. I stamped the six-sided image with half-strength Chocolate Chip ink and punched it out with the Hexagon punch. Next came a stamped greeting from Teeny Tiny Wishes onto Pistachio Pudding card stock cut into a small banner. I added a neutral button with a glue dot. Next I stamped some lines from Gorgeous Grunge onto the card and finished with some Early Espresso baker's twine. I hope you like it and I hope you have a wonderful and creative weekend!!!!
Wednesday, July 10, 2013
Home Sweet Home...not really :)
I am very pleased with myself. I am sitting on the floor in Dulles airport with a flight that continues to get delayed. I am pleased because I am keeping a very positive attitude and have set up a little space for myself - drinking tea and watching a crafting DVD :) I even discovered some amazing art - pictures of Mars!!!! Can't wait to try to recreate some of the color and texture in my art journal!!!! I guess today's lesson from the craft room is make the most of whatever experience you find yourself in :) Here are some pictures if my little camping spot and a few if the Mars photos - Enjoy!!!!


Summer Garden Party by Tara Bourgoin

Monday, July 08, 2013
A Few Days Away From The Blog...
I will post in a day or two...sorry for the brief absence. Hope your week gets off to a great start!
Saturday, July 06, 2013
Craft Project Central Projects For July!
Hi Everyone! I hope you are enjoying a beautiful weekend wherever you are! Craft Project Central has asked me to participate as a guest designer for the month of July, so I will be sharing my project, as well as the projects created by the other designers as the month of July marches forward!
 First I want to share this incredible By the Tide Beach Bag Gift Set by Julie Beltramo! You can learn more about Julie on her blog HERE. – If you are ready for summer, this sweet little Beach Bag is comfortably packed with four By the Tide note cards! It would make a great little gift to get anyone in the mood for summer! Or host a class and invite some friends to come over and make the set with you! Project also includes instructions for the tag to put on a candy favor!
 Next up is this adorable Mini Travel Album & Suitcase Cover by Regina Andari. Check out more of Regina's creations at her blog HERE! A mini travel album is the perfect way to save photos and memorabilia from a special trip and to keep special notes and give a written account of the events about the trip! There is plenty of space for photos and journaling in this mini album, and there are pockets to hold memorabilia. One thing that's needed for every trip is a suitcase, and this mini travel album has its own suitcase cover, which would be a perfect way to present the album to someone who is getting ready to take a special trip. Several of these suitcases could be placed on a shelf and there's plenty of space on the closed end of the cover to attach an identifying label!
 Wondering how to store your twine and washi tape???? These Gift Box Organizers by Niki Toll can help! The new Tag a Bag gift boxes are great for gifts and treats but are so versatile that you can use them for many other things! For this project the gift boxes are turned into organizational boxes to organize your Baker's Twine and/or Washi Tape! This project is a great class project as well! Everyone will want to fill their boxes with new Twines and Tapes!
To get full step-by-step instructions for all of these wonderful projects...and all the other Craft Project Central projects for the month of July, register HERE for a subscription to the month of July at Craft Project Central! Also, keep an eye out for a free giveaway later this month for a FREE subscription to the month of July! :)


To get full step-by-step instructions for all of these wonderful projects...and all the other Craft Project Central projects for the month of July, register HERE for a subscription to the month of July at Craft Project Central! Also, keep an eye out for a free giveaway later this month for a FREE subscription to the month of July! :)
Friday, July 05, 2013
A Day Of Rest :)

The title of this post is a bit of a misnomer :) I have actually been incredibly active in the craft room - working on all kinds of fun projects - some with Stampin' Up! supplies, some with all kinds of different art supplies. It's like someone unleashed a creative whirling dervish in my craft room! :) Yes, the craft room definitely looks like a disaster area waiting to be condemned...but what's funny is that in the midst of all the piles and supplies and projects, I still seem to manage to clear a little corner where I can sit and create. What I am realizing again, as I sit for hours and work on projects, is that I am happy and at peace when I am creating. My breathing slows. My mind clears. I am alert and focused and totally "in the moment." Time spent creating is among my most precious time...as precious as time spent with the two furry ones in the picture above. Buddy and Loki are getting along now - though there is still a bit of jealousy on Buddy's part :) Yes, family and creating - my most wonderful moments :) I hope you have a wonderful and peaceful weekend! I hope to share some of what I have been working on over the past few days in the coming week! Stay tuned!!!! P.S. There is also a big arts festival, The Cherry Creek Arts Festival, that is in town this weekend. I plan on spending some time there - getting inspired and supporting other artists!!!!! If I purchase anything, I'll be sure to share it in a post next week!!!!
Thursday, July 04, 2013
Handmade Washi Tape: A Video!!!!!

Earlier in the week I kept telling myself that I needed to go for a swim. With all of my work travel lately, I have totally gotten out of the exercise habit and I hadn't been in a pool for weeks. Michael reminded me that I would feel better afterwards, so somehow I motivated - put on my bathing suit - and headed to the gym. And, it was GREAT! It was so nice to be back in the water - the sound of my own breathing - the movement of my arms and legs. I'm really glad I went...and I'm planning to go again! :) Sometimes the best time to jump in the water is when you don't want to! And it's nice to know that you actually have the freedom to do so! Happy 4th of July!!!!!
Today I want to share a video of a quick and easy way to make your own washi tape! Enjoy!!!!
Wednesday, July 03, 2013


Tuesday, July 02, 2013
Make A Dress Thank You Card

When I travel to visit my mom, one of my favorite things to do is take a look inside her closet! Actually, she usually has a pile of clothes waiting for me - things she no longer wears or wants that might fit me. So it is usually a fun fashion show at mom's house :) And I often find a few things to bring home with me. This time I managed to get a few fun fleece jackets - something I love to wear in the air conditioning and in the cool air in Colorado :) So I thought I should make her a cute thank you card to reflect our recent closet clothes shopping event :) Do you share what's in your closet?
I decided to practice my sewing skills a bit more with this card. I took out my Orchard Harvest fabric (now on the CLEARANCE RACK!). I then sketched a simple dress onto a piece of chipboard (a great use for old cereal boxes!).


Monday, July 01, 2013
Handmade Zipper Purse!

I walk by a beautiful garden on my morning walk with Buddy. Over time, the beautiful iris garden is beginning to turn into a field of long grass and weeds. The woman who used to tend the garden has passed and her children have been unable to maintain the garden. It is difficult to watch. Today though, I realized that the garden, like our creativity, needs tending to or it will become overgrown with other things. I have felt that way this past month - with so many days on the road for work. My creative garden was definitely missing me! This weekend was all about tending to my creative garden! At times I was working on 4 projects at once!!!! I was sewing, art journaling, painting and playing with clay! It felt WONDERFUL!!! :) How can you tend to your garden????
Today I wanted to share with you a project I created a few weeks ago. I finally was motivated to take some of the fabric I had made when I took a marbling class with Jo Fitsell. I wasn't sure how I was going to use my unique fabrics, but when I came across instructions for a small zippered purse in the book Sew Wild by Alisa Burke, I knew what I would do!!!! After a lot of cutting, sewing, ironing...and my first ever zipper...I had a purse that I could use! :) What am amazing sense of accomplishment! I'm already excited for the next one! Here are a few more photos...I even did some journaling on the lining of the bag - just a permanent marker and the flow of my thoughts. I hope you like it!!!!


Sunday, June 30, 2013
Dress Up Wardrobe by Amanda Corbet

Remember to get the instructions to make this bonus project, subscribers for the month of June to Craft Project Central just need to meet one of the criteria for bonus projects! Either subscribe to two or more months in a row, put the CPC badge on your blog, or refer a friend and when your friend subscribes, let CPC know! I hope you've enjoyed all of the projects I have shared with you this month from Craft Project Central! Thank you for sharing my first experience with them as a designer - it's been fun!!!! :)
Friday, June 28, 2013
Typeset Alphabet Congrats Card

I arrived home last night after midnight. Another late flight, another difficult night of sleep due to time zone changes and cramped legs from travel. I have been on the road every week this month and I am absolutely pooped! So I am admitting it - I am out of gas (figuratively speaking). I wanted to make sure to share some creativity with you today though :) It seems I always have a bit of gas left in the tank to do that! This is a card that I made for my cousin. Please let me know if you have questions about any of the tools/supplies that I used for the card...I have to say that I am a bit too pooped to write down all of the instructions...but check out that cool washi tape!!!! Love it!!!! :) I hope you have a restful and creative weekend! I am planning on doing the same ;)
Thursday, June 27, 2013
Birthday Basics Party Pack by Anjii Rempel

Also there is still time to submit a card for the Creating Pretty Cards Sketch Challenge! If Craft Project Central has at least 10 submissions a name will be drawn on Friday for a free subscription!! Click here and then scroll down to the Creating Pretty Cards Sketch Challenge post to submit a card!
Pennant Parade Birthday Card

Each time you create you are taking a risk. You are taking the bull by the horns and announcing to yourself that you are willing to try - you are willing to make an attempt at making external that which is living inside of you. You are admitting that you have something to say - something to share. Yes, creativity takes courage and you, my friend, are courageous!!!!!
Today's card was also created using the bouncing brayer technique. I just bounced my brayer with Midnight Muse ink, up and down along the piece of card stock until I had a look I liked. I then stamped a pennant from Pennant Parade multiple times using Midnight Muse and Crushed Curry ink at full and half strength. I punched out the pennants and then used my paper snips to cut some of them down. I adhered the toothpicks to the card with glue and then attached the pennants with a combination of glue and dimensionals. I also removed the prongs from some brads and added them to the pennant tops with glue dots. The stitched satin ribbon was knotted once and then adhered to the card with some sticky strip (I hid the ends around the back of the card panel). The sentiment was punched out and added to two larger circles and then placed on the card with dimensionals. I hope you like it!
Wednesday, June 26, 2013
From My Heart Friendship Card

Have you ever not done something because you didn't want to get your hair wet? I may have been guilty of this a time or two - not wanting to go for a swim because it might mess my hair. Not wanting to go for a walk in the rain because my hair might frizz. Not venturing into heat and humidity because I might come back looking like I had put my finger in an electric socket. I used to think about it a bit, but when I lived in Oregon that all seemed to change. There was often a mist/drizzle that accompanied the days during my time in Oregon and it was during those years that I seemed to become more comfortable in my skin. I actually stopped wearing make up and worried less about my hair - it was a time of peeling back and feeling free. I am happy to report that I have carried those lessons with me...sometimes forgetting them for brief periods...but mostly remembering that I need to jump in and not worry about getting my hair wet!
Today's card is a simple example of how to create interest with a background. I used the bouncing brayer technique to create the background and then just stamped over it with early espresso ink and the stamp from From My Heart. a piece of natural trim tied in a knot adds a textural touch. I hope you like it!
Tuesday, June 25, 2013
Magnetic Memo Board by Jen Arkfeld

Monday, June 24, 2013
Wetlands Birthday Card #2

The changing of the seasons. The rising and falling of the sun. The waxing and waning of the moon. All of these are rhythms that we come to depend upon. I have been going through a bit of a crazy travel schedule and it is making me aware of how important rhythm is for me. I recognize that when I hit turbulence the rhythm of my heart changes. When I try to fall asleep in a strange bed in a hotel, the rhythm of my breath changes. When I walk through airports and office buildings, the rhythm of my steps change. The collective effect is that I feel out of tune. When I am home, there is a rhythm to my life that allows me to breathe fully and deeply; to walk in step with my inner drummer; to gently drift into dreams. What are the rhythms of your life? Recognize their importance.
Today's card was another take on a clean and simple card using the Wetlands stamp set. Something about the color combination of Smoky Slate and Soft Sky is very soothing to me. I stamped the image and the sentiment using Staz-On ink and adhered the panel to a Basic Black panel. I then wrapped some embroidery floss around the card and knotted it, before adhering the panel with dimensionals. I hope you like it!
Subscribe to:
Posts (Atom)