This beautiful Teacher Appreciation Flowers and Frame was created by Buffy Cooper for Craft Project Central for the month of September. You can find out more about Buffy on her blog HERE!
With this project you can send flowers to a teacher that will last all year! Create an adorable vase and floral bouquet with a coordinating frame for a class photo, and let those teachers know how much you appreciate them! Find out all the details and instructions for this project by becoming a subscriber to the month of September at Craft Project Central!
Wednesday, September 04, 2013
Tuesday, September 03, 2013
Hot Pad Redux :)
Today's Lesson From The Craft Room: If At First You Don't Succeed...Try, Try, Again!
Yesterday I shared my first hot pad attempt and a few of the many lessons I learned in the doing of it. Today I am sharing attempt #2! I used hand-dyed fabric again and this time I used two layers of batting and sewed around all of the corners! You can teach an old dog new tricks!!!! :) I played a bit with my free-motion stitching - definitely a work in progress! I am, however, much happier with the result! Yes, if at first you don't succeed...try, try, again!!!!!
Monday, September 02, 2013
Hand Dyed Fabric Hot Pad
Today's Lesson From The Craft Room: There Is So Much To Be Learned By Doing
It started with trying to cut a 7"x7" square of my fabric. Somehow it kept coming out wrong...and then I realized that I was lining things up on my cutting board at the 1" mark and not at the 0" mark! Lesson learned! I also should have cut the batting smaller than the full square so that the edges didn't get so bulky. Or maybe I should have put 2 layers of batting on the inside before sewing the pieces together - that would have made it thicker. Oh, and when it comes to having to turn something inside out after sewing it? It might be best not to do your turning at a corner, but rather to finish all the corners and leave the space to turn the piece inside out along a straight edge. This was my first hand dyed and machine/hand sewn hot pad. It was intended as a gift for a friend's birthday dinner. I didn't want to go empty handed and the usual bottle of wine didn't seem personal enough. So instead I gave some love and creativity a try. And I learned. I learned so much that I decided I needed to give it another shot. I did. I will share the result with you tomorrow :) Hopefully she will benefit from my love, creativity, and lessons learned :) There really is so much to be learned by doing.
Sunday, September 01, 2013
Witches Brew Halloween Home Decor by Julie Beltramo
It's September and that means it's time for a new month full of projects at Craft Project Central! Today I am sharing this Witches Brew Halloween Home Decor created by Julie Beltramo. You can learn more about Julie and her project here! This trio of canvases makes for a fun and festive wall hanging for the upcoming Halloween happenings! It’s a great project to make for your own Halloween décor. But don’t forget to make a second one, along with the coordinating card, and give it as a gift! You can get full instructions for this project and the other September Craft Project Central projects I will be sharing this month by subscribing as a member for the month of September! Click here to learn more!
Friday, August 30, 2013
Altered Sweet Tin Project for Paper Crafter's Library
Today's Lesson From The Craft Room: Take The Ordinary And Make It Extraordinary!
Today's project started out as an empty can of water chestnuts :) I created this project, along with videos and written instructions for Paper Crafter's Library and wanted to share it with all of you! It's easy to go from trash to treasure with a little imagination and a bit of work! Some Modern Medley designer series paper, a few clay roses, a bit of crochet trim and a touch of stamping took this poor ordinary empty can out of the recycle bin and onto the coffee table. I can imagine filling it with little sweet treats :) If you want access to the full instructions and videos, check out becoming a member of Paper Crafter's Library where you will have access to tons of Paper crafting techniques and tutorials! I hope you have an amazingly creative and peaceful weekend! Try taking the ordinary and make it extraordinary!!!!!
Thursday, August 29, 2013
Embossed Clay Wedding Cake Card
Today's Lesson From The Craft Room: Don't wait. It may be days, weeks, or even months before you can set aside a long block of uninterrupted time for creativity, so don't put off your art-making waiting for one. - Jenny Doh interviewing Karen Michel in the book Art Saves
This is one of those lessons I really need to pay attention to. I frequently tell myself that I could be much more creative if I only had a week, a month or a year free and clear to create art. All this does is discourage me from taking the moments that I do have and putting them to good art-making use!!!! So now I am working on using what I have - whether it is 5 minutes, a few hours or a few days! I am becoming more comfortable with "works in progress" - willing to start a project, walk away, and then continue to come back to it. The Wabi-Sabi Workshop book that I am still enjoying has helped a lot because quite a few of the techniques involve glazing liquid. If you don't allow enough drying time and try to march ahead to the next layer, you end up with mud! So I am learning patience and putting my 5 minutes of art-making time to good use!
Today's card was inspired by some pieces of Simply Pressed clay that I embossed. They were sitting on my craft table and all of a sudden they looked like wedding cake to me! It is so easy to cut dried pieces/sheets of Simply Pressed clay so I just turned the pieces over, drew a shape in pencil on the back of the clay pieces and cut the pieces out with my paper snips! So simple! Making the cake was a lot of fun! Adding some molded clay flowers and leaves made the cake even more elegant. Hmmm, I better end this post, I'm staring to salivate!!!!! :) The cake stand was paper-pieced with hand cut and altered punched brushed silver card stock. The sentiment is from Petite Pairs. I hope you like it!
This is one of those lessons I really need to pay attention to. I frequently tell myself that I could be much more creative if I only had a week, a month or a year free and clear to create art. All this does is discourage me from taking the moments that I do have and putting them to good art-making use!!!! So now I am working on using what I have - whether it is 5 minutes, a few hours or a few days! I am becoming more comfortable with "works in progress" - willing to start a project, walk away, and then continue to come back to it. The Wabi-Sabi Workshop book that I am still enjoying has helped a lot because quite a few of the techniques involve glazing liquid. If you don't allow enough drying time and try to march ahead to the next layer, you end up with mud! So I am learning patience and putting my 5 minutes of art-making time to good use!
Today's card was inspired by some pieces of Simply Pressed clay that I embossed. They were sitting on my craft table and all of a sudden they looked like wedding cake to me! It is so easy to cut dried pieces/sheets of Simply Pressed clay so I just turned the pieces over, drew a shape in pencil on the back of the clay pieces and cut the pieces out with my paper snips! So simple! Making the cake was a lot of fun! Adding some molded clay flowers and leaves made the cake even more elegant. Hmmm, I better end this post, I'm staring to salivate!!!!! :) The cake stand was paper-pieced with hand cut and altered punched brushed silver card stock. The sentiment is from Petite Pairs. I hope you like it!
Wednesday, August 28, 2013
Embossing Clay Easter Card
No, you're not seeing things. Those are Easter eggs! I know, I know, Easter is months away. But I couldn't help myself! I was playing around with embossing Simply Pressed clay and the idea of creating decorated Easter eggs just couldn't be avoided. I figured I would share the card with you now because maybe it will inspire you to start your Easter cards early or to take the idea and run with it! Maybe you'll make embossed candy corn or jack-o-lanterns (hmmm, why didn't I think of that sooner?). Anyway, I hope you enjoy the card even if it is "off-season" :) Maybe today's lesson is to do whatever it is you want to do, even if other's might think it's "off-season!" Hmmm...maybe I'll wear white shoes in December.... :)
Tuesday, August 27, 2013
Stamped Simply Pressed Clay Thank U Tag
Today's Lesson From The Craft Room: Sometimes It Takes A Bold Step
Getting on a plane. With all of my work travel, getting on a plane is often the last thing I want to do. And, there are times, when it takes a bold step to do what you feel you need to do. I have a friend who has been dealing with an illness for almost the past year. It took her awhile to share her news with me and I am so grateful she finally felt comfortable to confide in me and allow me to add my prayers and positive energy toward helping her feel better! The minute she told me, I told her I would be getting on a plane to come and see her beautiful face! It's funny how the last thing you want to do becomes the exact thing you want to do when the situation changes! I am really looking forward to spending time with her and being a part of her healing journey. Sometimes it takes a bold step!
Today's tag incorporates a stamped Simply Pressed clay embellishment that I created using an image from the Pennant Parade stamp set. I started with a piece of Soft Sky card stock and cut it into a tag shape. The little bee from Postage Collection was stamped multiple times with Basic Black ink. I sponged the edges with Soft Suede ink. Next I adhered a piece of Basic Black card stock before adding a touch of ribbon and the clay embellishment. I hope you like it :)
Getting on a plane. With all of my work travel, getting on a plane is often the last thing I want to do. And, there are times, when it takes a bold step to do what you feel you need to do. I have a friend who has been dealing with an illness for almost the past year. It took her awhile to share her news with me and I am so grateful she finally felt comfortable to confide in me and allow me to add my prayers and positive energy toward helping her feel better! The minute she told me, I told her I would be getting on a plane to come and see her beautiful face! It's funny how the last thing you want to do becomes the exact thing you want to do when the situation changes! I am really looking forward to spending time with her and being a part of her healing journey. Sometimes it takes a bold step!
Today's tag incorporates a stamped Simply Pressed clay embellishment that I created using an image from the Pennant Parade stamp set. I started with a piece of Soft Sky card stock and cut it into a tag shape. The little bee from Postage Collection was stamped multiple times with Basic Black ink. I sponged the edges with Soft Suede ink. Next I adhered a piece of Basic Black card stock before adding a touch of ribbon and the clay embellishment. I hope you like it :)
Monday, August 26, 2013
Stamped Simply Pressed Clay Fish Card
Today's Lesson From The Craft Room: Reach Out And Let Someone Know You Appreciate Them
I am happy to report that my willpower seems to be working and I haven't checked CNN, People or the local news since I last wrote that I was going to do my best to stop wasting precious moments with senseless surfing :) In case you are worried that I have my head in the sand, it seems that any piece of news I need to know is brought to me in some other way. It's been wonderful triumphing over this addiction and one of the nicest benefits is that the time I was spending senselessly surfing is now being put to much better use. Yes, I have been using some of those moments to create and I have been using some of the moments to appreciate what I experience. I wrote Serena Barton an email after being so inspired by her book Wabi-Sabi Workshop. I wrote the corporate offices of Salata to let them know how much I appreciated the amazing service provided to me by their employee Nicholas in their Ft. Worth location (and I let Nicholas know I was going to send the note). I emailed my swimming coach to let her know how much I appreciate all she puts into our lessons and how motivated I am as a result. And, I have sat in the park with Buddy - not in a rush to do anything else - and we have just appreciate our time together and the activity of the squirrels in the park :) One lesson I am learning as I try to beat this addiction is the power of reaching out and letting someone know you appreciate them. The energy you get back when you take the time to do this is incredible! I highly recommend it! :) Psst...for those of you reading this...I appreciate you!!!! Thank you so much for your comments and your support!!!! :)
Today's card resulting from my experimenting with stamping into Simply Pressed Clay. I've been playing around with stamping, coloring and combining to create embellishments for my cards. This fish was stamped, the background colored and then I added a cut out stamped fish face (yes, those are grid lines that you are seeing - I just cut up an image that I stamped off onto grid paper). The fish face was then glued to the clay embellishment. I'll be sharing a few more of my experiment results with you this week and if you want to be able to watch videos on the techniques I'm sharing this week (Stamping Simply Pressed Clay, Embossing Simply Pressed Clay, Coloring Simply Pressed Clay, and a few others), head on over to Paper Crafter's Library and look into subscribing! I am a Designer/Educator for them and continue to add videos, projects and step-by-step directions to their amazing papercrafting library!
Friday, August 23, 2013
Reinker Glaze Art Journal Page Inspired by Serena Barton
On one of my recent trips through the Denver airport, I stopped in a shop on concourse B called Mosaic. The shop carries art created by many different artists - jewelry, pottery, glass - and they also have a section in the back with books. Since I had time before my flight, I started looking through the books and came upon one called Wabi-sabi Art Workshop by Serena Barton. I was immediately attracted to the title since the Wabi-sabi philosophy was something I had recently been investigating. It didn't take long to decide that I was going to purchase the book and take it with me on my trip! I am still only half-way through the book and I am bursting with inspiration and motivation!!!!!! In the book, Serena presents a wonderful technique of combining glazing fluid with reinkers to create beautiful landscapes. As soon as I got home this week, I decided to give it a try in my art journal! It started out slow, but I followed her step-by-step instructions and improvised a bit and this was the result! I am sooooooo happy with how it turned out and I can't wait to begin work on a canvas or panel that I can hang in the house! Thank you Serena for the amazing inspiration! You can check out Serena's blog HERE! And for those of you fortunate enough to be going to Art and Soul in Portland in September, I wish I could join you! Serena will be teaching a few classes that I would LOVE to take!!!!! And maybe one day I will because after all...if you put your mind to it, anything is possible!!!!! Have a wonderful and creative weekend!
Thursday, August 22, 2013
By The Tide Mini Notecard
Today's Lesson From The Craft Room: Sometimes It Takes Extreme Measures!
I have to confess that part of what has driven the lack of daily posting has been my travel schedule of late. I'm hoping to get back on a regular posting schedule - I just couldn't make it happen yesterday! We'll see if I can finish out this week strong and get back to normal by next week! :) Anyway, I was on the plane and wondering about what, other than my travel, was getting in my way of creating every day and guess what reared its ugly head again? The darn internet!!!!! Yes, I have fallen victim once again to the senseless compulsive checking of sites like CNN, local news, People - what has happened to me???? The iPhone has not helped since all it takes is the tapping of a few buttons and I'm at it again! So on the plane (without the distraction of technology), I began to consider what measures I might take to rescue myself from this time-sucking habit! I came up with an extreme measure that actually got me excited...Parental Controls! Maybe I could block these sites on my desktop, my laptop and my iPhone!!!! That would be AWESOME! Then, I wouldn't be able to visit and, in the event of an emergency I could access the news by inputting the parental control code. I was laughing at myself for how ridiculous this extreme measure sounded. At the same time, it seemed like it would work for me. So, when I arrived home, I went to work to find out how I could do it (since I had never set up parental controls before). Well, it's not so easy...because your "child" has to have a separate account without administrator access and, if I followed instructions other than the parental control option, it looked like it would be much too complex to try to access the sites if I ever needed to. So much for extreme measures! So now I am back to the most powerful weapon I have...willpower!!!!!!! I have made it through almost one full day as I am typing this and yes, I am proud! I'll take it one day at a time and hopefully I can break the senseless habit and get back to what matters - creating art!!!!!!
Today's mini-card was a ton of fun to make and it definitely went through its awkward stage! I started out with Marina Mist ink and an aqua painter and painted some ink onto the card base. Then I stamped the script stamp from By The Tide with Marina Mist ink and yes, I stamped it before the other ink was dry, so the ink dissolved and ran....but it looks beachy to me! Next came Soft Suede ink and the coral stamp and then restamping the same stamp using Tangerine Tango. Some Crystal Effects was added to the bottom of the card so that I could adhere some play sand. Once that was dry, I used the aqua painter with some Crumb Cake ink to add a bit of color to the sand. The shell was stamped on Sahara Sand card stock with Wisteria Wonder ink. I used the blender pen with a few different colors of ink to add a bit of dimension to the shell and then added a touch of Crystal Effects around the upper edges. The anchor stamp was the final touch - stamped and punched and then adhered to the front of the card. I hope you like it!
I have to confess that part of what has driven the lack of daily posting has been my travel schedule of late. I'm hoping to get back on a regular posting schedule - I just couldn't make it happen yesterday! We'll see if I can finish out this week strong and get back to normal by next week! :) Anyway, I was on the plane and wondering about what, other than my travel, was getting in my way of creating every day and guess what reared its ugly head again? The darn internet!!!!! Yes, I have fallen victim once again to the senseless compulsive checking of sites like CNN, local news, People - what has happened to me???? The iPhone has not helped since all it takes is the tapping of a few buttons and I'm at it again! So on the plane (without the distraction of technology), I began to consider what measures I might take to rescue myself from this time-sucking habit! I came up with an extreme measure that actually got me excited...Parental Controls! Maybe I could block these sites on my desktop, my laptop and my iPhone!!!! That would be AWESOME! Then, I wouldn't be able to visit and, in the event of an emergency I could access the news by inputting the parental control code. I was laughing at myself for how ridiculous this extreme measure sounded. At the same time, it seemed like it would work for me. So, when I arrived home, I went to work to find out how I could do it (since I had never set up parental controls before). Well, it's not so easy...because your "child" has to have a separate account without administrator access and, if I followed instructions other than the parental control option, it looked like it would be much too complex to try to access the sites if I ever needed to. So much for extreme measures! So now I am back to the most powerful weapon I have...willpower!!!!!!! I have made it through almost one full day as I am typing this and yes, I am proud! I'll take it one day at a time and hopefully I can break the senseless habit and get back to what matters - creating art!!!!!!
Today's mini-card was a ton of fun to make and it definitely went through its awkward stage! I started out with Marina Mist ink and an aqua painter and painted some ink onto the card base. Then I stamped the script stamp from By The Tide with Marina Mist ink and yes, I stamped it before the other ink was dry, so the ink dissolved and ran....but it looks beachy to me! Next came Soft Suede ink and the coral stamp and then restamping the same stamp using Tangerine Tango. Some Crystal Effects was added to the bottom of the card so that I could adhere some play sand. Once that was dry, I used the aqua painter with some Crumb Cake ink to add a bit of color to the sand. The shell was stamped on Sahara Sand card stock with Wisteria Wonder ink. I used the blender pen with a few different colors of ink to add a bit of dimension to the shell and then added a touch of Crystal Effects around the upper edges. The anchor stamp was the final touch - stamped and punched and then adhered to the front of the card. I hope you like it!
Tuesday, August 20, 2013
Gorgeous Grunge Love Mini Card
Just a quick post today with a quick idea! I love to put together quick little mini cards that I can leave around the house when I travel! This one was quick and easy with the Itty Bitty Banners and Gorgeous Grunge stamp sets! I used Smoky Slate card stock and ink and added a touch of washi tape as well! What quick little mini cards can you create????
Monday, August 19, 2013
Canvas Creations Bookmark
Today's Lesson From The Craft Room: Follow Your Path Of Questions
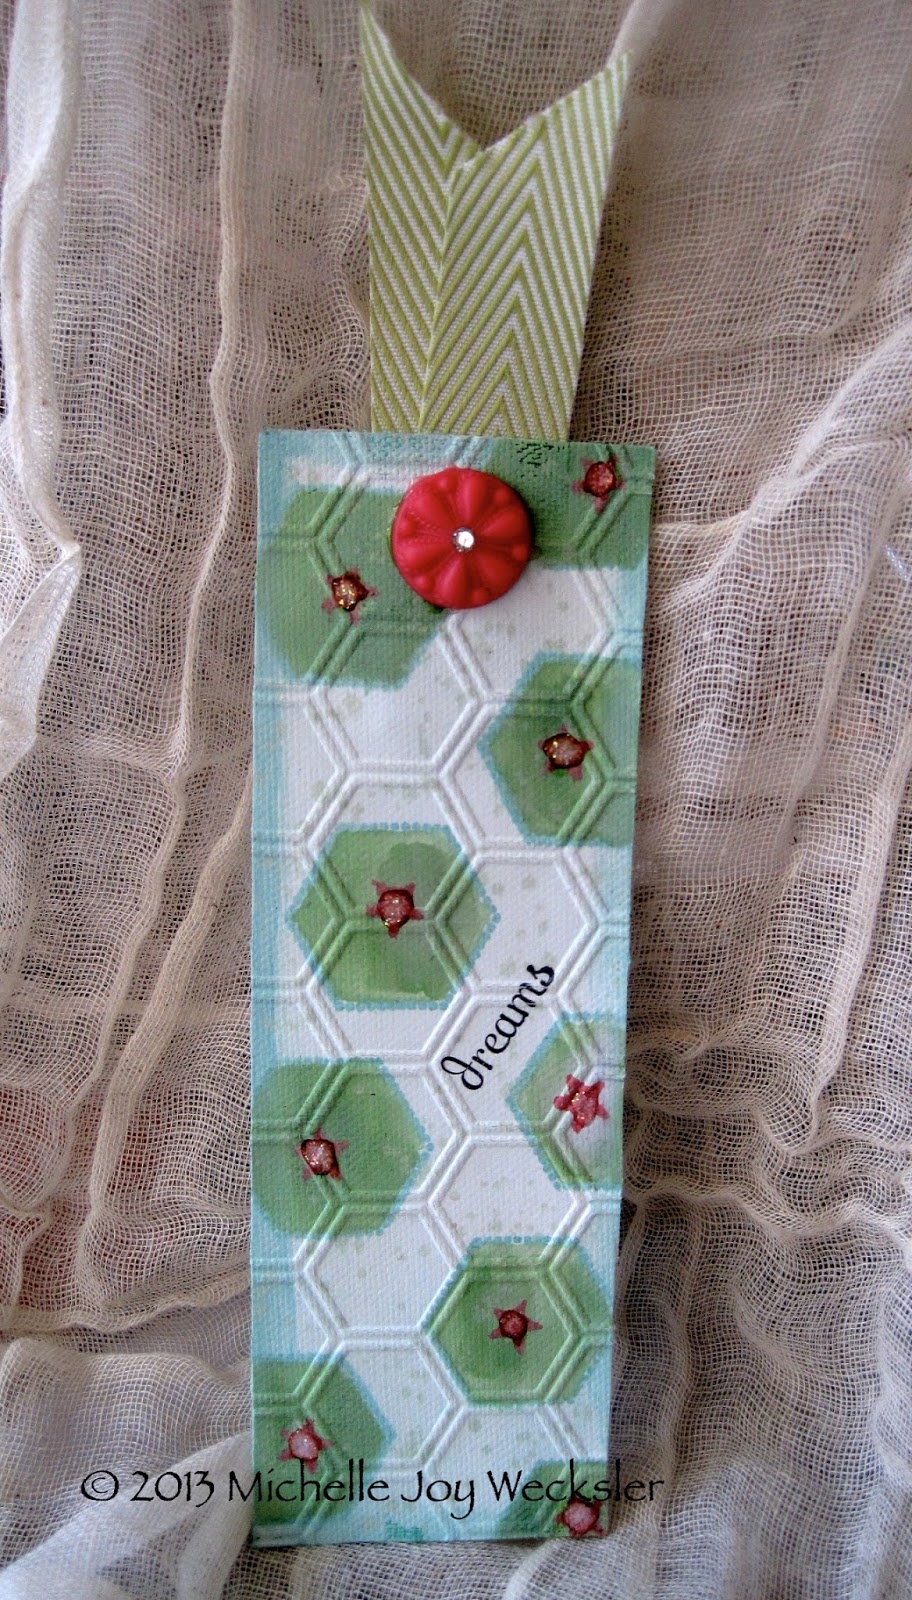
I have had the Canvas Creations canvas sheet sitting in my craft room for...well....forever! So, I decided to take it out of the package and create something. I wasn't sure what I was going to do, but I started by painting the canvas with gesso. As I was doing that, I noticed the Honeycomb embossing folder on my craft table and I immediately began to question whether you could emboss the canvas. Well, I decided to follow my path of questions and this bookmark was the result! Other questions that arose during the creation process were, "Can I use adhesive sheets to adhere the canvas to another piece of canvas?" and "Can I watercolor on the canvas?" I am happy I followed my path of questions and now I have more questions I need to pursue! :) I may have to buy another canvas creations sheet! :)
Friday, August 16, 2013
New Photopolymer Stamp Set: Another Thank You
We have another new photopolymer stamp set called Another Thank You!!!! Yeah!!!! Another Thank You (item 133454, $13.95) is an exclusive, versatile set for any occasion that calls for a thank you. Check it out!
Tuesday, August 06, 2013
In Need Of A Little Break...
Just wanted to let you know that I'll be taking a little bit of a break for the rest of the week. Lots on my plate right now and I figured I should take a little bit of the pressure off :) Hope you have a wonderful, creative, and peaceful week :)
Monday, August 05, 2013
Gingham Garden Happy Birthday Card
Today's Lesson From The Craft Room: We All Have A Need To Be Seen
I went swimming yesterday. I am still learning - working on my strokes - getting back to feeling comfortable in the water. There was one other man in the pool - swimming in the lane next to me. At one point I was resting at the end of the pool and he asked if he could give me a little bit of advice on my stroke. My first reaction was to say, "Thanks, but no thanks" since I am currently taking lessons from an instructor and already have a lot floating in my head when I swim (there's a lot to think about!). But instead, I paused and the man continued, "I taught the Red Cross swimming program for over 50 years." I told him that I was taking lessons and that I would also like to hear what he had to say. He shared his advice and I said thank you and the next time I was at the end of the pool he told me that those last few strokes looked better :) I'm not sure I really did anything different - maybe I did - what I do know is that I allowed him to be seen. This man who was unknown to me when I got in the pool was able to define himself as someone who had something to contribute - someone who had accomplished a lot with the Red Cross in his years. What I did was allow him to have his dignity and I could then choose to do what I wanted to with the advice he shared We all have a need to be seen. How can you recognize someone today?
Today's card was quick and easy with the Gingham Garden designer washi tape. I stamped the pedestal portion of the cake image from Make A Cake with Pacific Point ink. Next, I tore strips of washi tape and layered them one on top of the other to form the layers of the cake. The butterflies from Make A Cake were then stamped using Daffodil Delight. Next, with the help of the stamp-a-ma-jig, I stamped the sentiment from Express Yourself on top of the sentiment from Bring On The Cake using Melon Mambo and Wild Wasabi respectively. The final touch was to add Dazzling Details on the layers of the cake for some bling! I hope you like it!
I went swimming yesterday. I am still learning - working on my strokes - getting back to feeling comfortable in the water. There was one other man in the pool - swimming in the lane next to me. At one point I was resting at the end of the pool and he asked if he could give me a little bit of advice on my stroke. My first reaction was to say, "Thanks, but no thanks" since I am currently taking lessons from an instructor and already have a lot floating in my head when I swim (there's a lot to think about!). But instead, I paused and the man continued, "I taught the Red Cross swimming program for over 50 years." I told him that I was taking lessons and that I would also like to hear what he had to say. He shared his advice and I said thank you and the next time I was at the end of the pool he told me that those last few strokes looked better :) I'm not sure I really did anything different - maybe I did - what I do know is that I allowed him to be seen. This man who was unknown to me when I got in the pool was able to define himself as someone who had something to contribute - someone who had accomplished a lot with the Red Cross in his years. What I did was allow him to have his dignity and I could then choose to do what I wanted to with the advice he shared We all have a need to be seen. How can you recognize someone today?
Today's card was quick and easy with the Gingham Garden designer washi tape. I stamped the pedestal portion of the cake image from Make A Cake with Pacific Point ink. Next, I tore strips of washi tape and layered them one on top of the other to form the layers of the cake. The butterflies from Make A Cake were then stamped using Daffodil Delight. Next, with the help of the stamp-a-ma-jig, I stamped the sentiment from Express Yourself on top of the sentiment from Bring On The Cake using Melon Mambo and Wild Wasabi respectively. The final touch was to add Dazzling Details on the layers of the cake for some bling! I hope you like it!
Friday, August 02, 2013
Six-Sided Sampler Hello Card
Today's Lesson From The Craft Room: Stillness Leads To Miracles
I was sitting on the porch yesterday - just being still - relaxing - enjoying the sound of the breeze. Then I noticed a quick, darting motion out of the corner of my eye! It was a beautiful, tiny hummingbird. He was so curious! He hovered over one of the fountains in the yard and then he decided it was the perfect size for a bath! I sat there on the porch and watched this amazing bird take a bath and then sit on a branch and primp and preen. It was amazing! Sometimes stillness leads to miracles!
Today's card began with some leftover 1" and 3/4" Crumb Cake circles that were sitting on the craft table. I decided to adhere them to a Very Vanilla card base - all in a row. Next I tied a piece of Early Espresso Baker's Twine around the card and tied it in a bow. The final touch was to stamp one of the Six-Sided Sampler images with Crumb Cake ink onto Whisper White card stock. I added the sentiment from the same stamp set with Early Espresso ink and the help of my stamp-a-ma-jig. I punched the image with the Hexagon punch and added it to the card with dimensionals. I hope you like it and I hope you have a wonderful weekend filled with stillness and miracles!!!!!
I was sitting on the porch yesterday - just being still - relaxing - enjoying the sound of the breeze. Then I noticed a quick, darting motion out of the corner of my eye! It was a beautiful, tiny hummingbird. He was so curious! He hovered over one of the fountains in the yard and then he decided it was the perfect size for a bath! I sat there on the porch and watched this amazing bird take a bath and then sit on a branch and primp and preen. It was amazing! Sometimes stillness leads to miracles!
Today's card began with some leftover 1" and 3/4" Crumb Cake circles that were sitting on the craft table. I decided to adhere them to a Very Vanilla card base - all in a row. Next I tied a piece of Early Espresso Baker's Twine around the card and tied it in a bow. The final touch was to stamp one of the Six-Sided Sampler images with Crumb Cake ink onto Whisper White card stock. I added the sentiment from the same stamp set with Early Espresso ink and the help of my stamp-a-ma-jig. I punched the image with the Hexagon punch and added it to the card with dimensionals. I hope you like it and I hope you have a wonderful weekend filled with stillness and miracles!!!!!
Wednesday, July 31, 2013
Simply Pressed Clay Roses Pocket Card
Today's Lesson From The Craft Room: See The Running Horse In The Pattern
Our friend and artist, Mario Rivoli, told us a wonderful story the other day. He said that when he was a child his mother used to sit him on the kitchen floor and tell him to find the running horse in the patterns created by the marble-like surface of floor. He would spend hours looking at the patterns in the floor and then drew the animals he found. It's no wonder he grew up to become a wonderful artist - able to see things where others see nothing. Mario shared this story as he showed me some of the paper pieces he had kept from our marbling class. As part of the class, we used newsprint paper to clean the marbling tray. These "clean up" sheets have become magical in Mario's hands! He looks at the patterns created by the stray paint and sees birds and dragons and people. He has put his pens to these papers and the works of art that are emerging are phenomenal. I hope I can begin to look at what is in front of me differently - to see the running horse in the pattern.
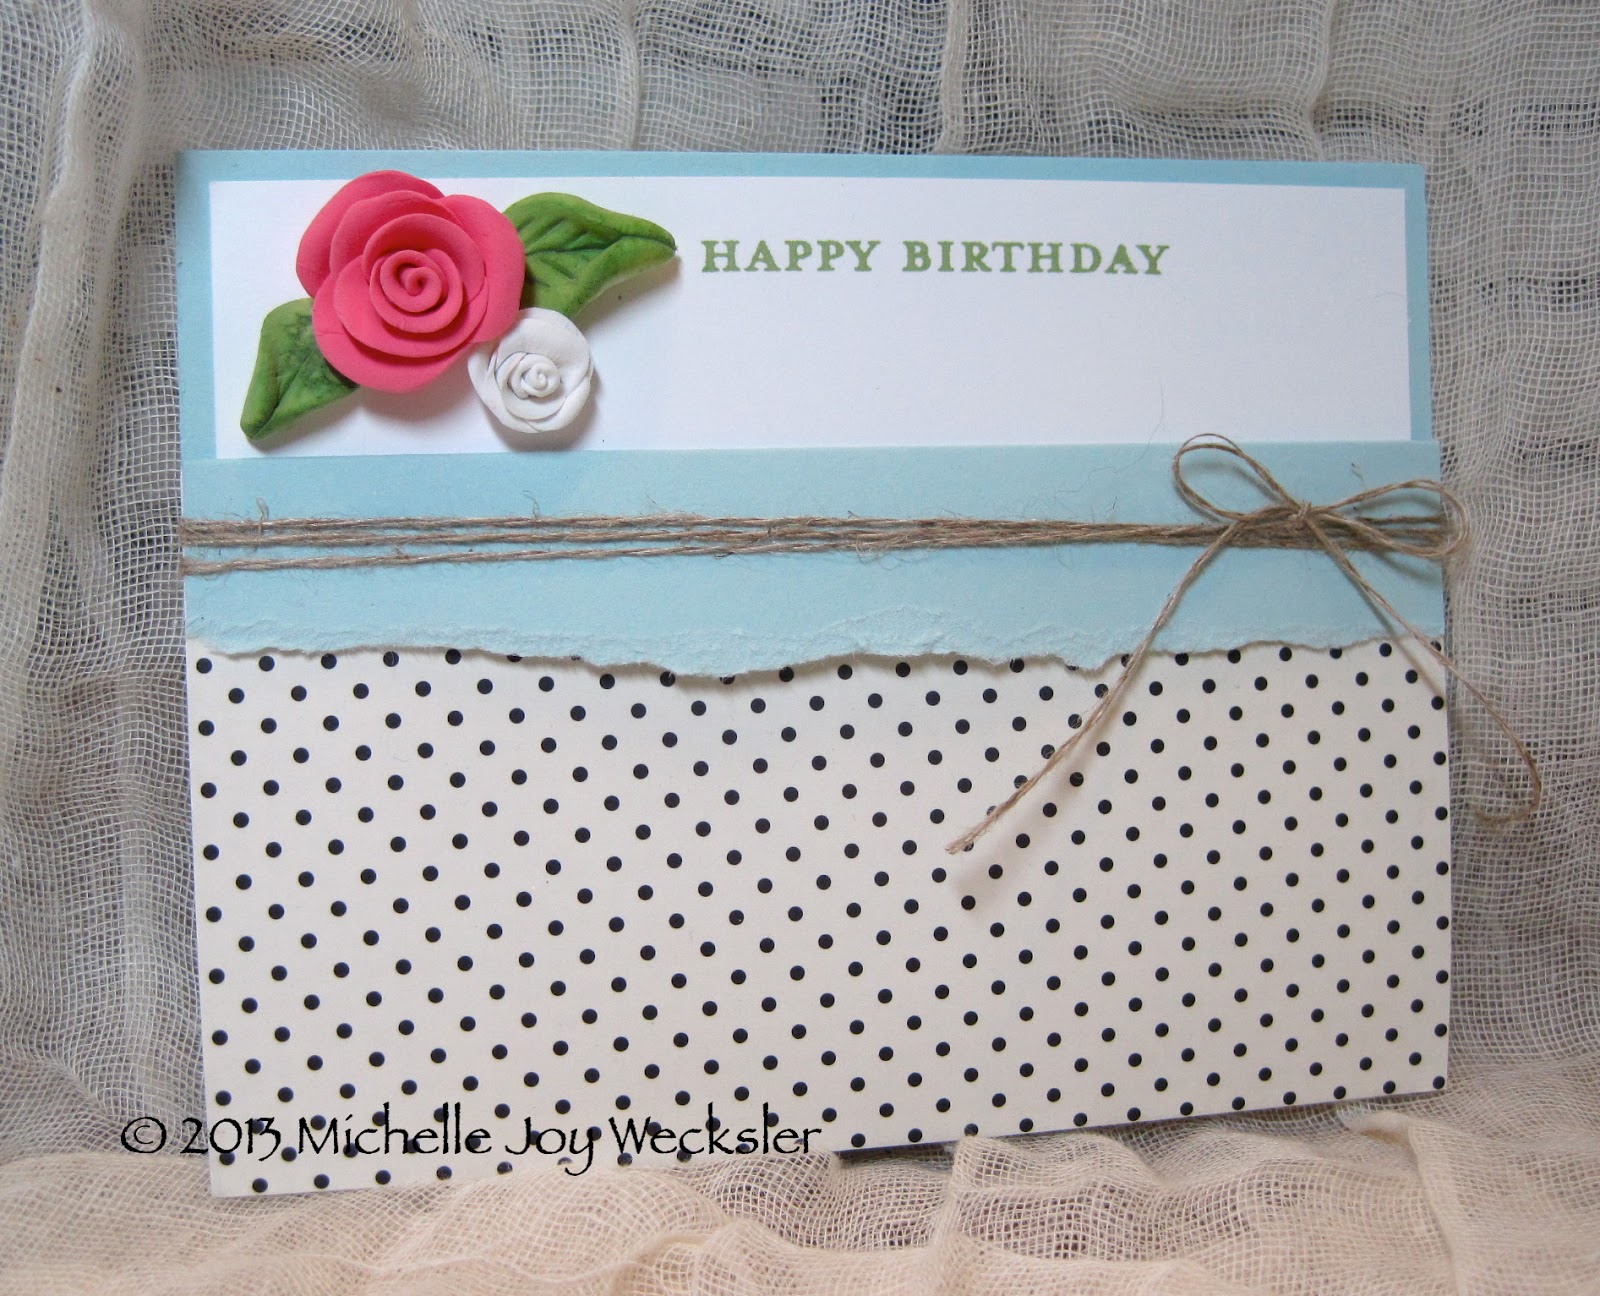
Today's card was created for Michael's mom's b'day! I decided to put some of the Simply Pressed Clay roses to use and, since this card is getting mailed with a gift, I was able to have the card be bulky - without the need for an envelope. I created a pocket card with Soft Sky card stock and then added a piece of Modern Medley designer paper and some linen thread. The inside card was stamped with the sentiment from Morning Meadow using Wild Wasabi ink. The roses and leaves were added to the card with Crystal Effects. I hope you like it! :)
Our friend and artist, Mario Rivoli, told us a wonderful story the other day. He said that when he was a child his mother used to sit him on the kitchen floor and tell him to find the running horse in the patterns created by the marble-like surface of floor. He would spend hours looking at the patterns in the floor and then drew the animals he found. It's no wonder he grew up to become a wonderful artist - able to see things where others see nothing. Mario shared this story as he showed me some of the paper pieces he had kept from our marbling class. As part of the class, we used newsprint paper to clean the marbling tray. These "clean up" sheets have become magical in Mario's hands! He looks at the patterns created by the stray paint and sees birds and dragons and people. He has put his pens to these papers and the works of art that are emerging are phenomenal. I hope I can begin to look at what is in front of me differently - to see the running horse in the pattern.
Today's card was created for Michael's mom's b'day! I decided to put some of the Simply Pressed Clay roses to use and, since this card is getting mailed with a gift, I was able to have the card be bulky - without the need for an envelope. I created a pocket card with Soft Sky card stock and then added a piece of Modern Medley designer paper and some linen thread. The inside card was stamped with the sentiment from Morning Meadow using Wild Wasabi ink. The roses and leaves were added to the card with Crystal Effects. I hope you like it! :)
Tuesday, July 30, 2013
Floral Bedroom Ensemble by Me :)
Today I want to share with you this Floral Bedroom Ensemble that I created as the July Bonus Project for Craft Project Central! I was so excited to start playing with my Simply Pressed Clay that I couldn't stop!!!! :) A bedroom is a special place for rest and relaxation. This Floral Bedroom Ensemble adds a romantic touch to your serene space. This ensemble features a decorated frame, a light switch cover, an altered CD doorknob sign and a beautiful card for presenting this set as a gift! Any one of these projects, individually, would make for a wonderful creative session for yourself or a small class or stamp camp to share with others!
To qualify for all the instructions for the bonus projects, readers must subscribe to July at Craft Project Central and then meet one of the bonus project requirements of subscribing to two or more months in a row, putting the CPC badge on their blog or referring a friend and when they subscribe, letting Craft Project Central know!
I am also excited to report that Craft Project Central has asked me to join them as a regular member of their design team! I am very excited!!!! Starting September I'll be sharing more fun projects with you!!! :)
To qualify for all the instructions for the bonus projects, readers must subscribe to July at Craft Project Central and then meet one of the bonus project requirements of subscribing to two or more months in a row, putting the CPC badge on their blog or referring a friend and when they subscribe, letting Craft Project Central know!
I am also excited to report that Craft Project Central has asked me to join them as a regular member of their design team! I am very excited!!!! Starting September I'll be sharing more fun projects with you!!! :)
Monday, July 29, 2013
Simply Pressed Clay Roses: A Video!!!!
Today's Lesson From The Craft Room: We May Live Far Apart, But We Are So Close Together!
My friend Helen put a huge smile on my face on Friday! I had been having a lot of fun making Simply Pressed Clay roses and she and I exchanged a few emails and each mentioned how much we were enjoying playing with the clay - that it is meditative and a great tension reliever! When she sent me some pictures of what she had been creating, I cracked up! Here are Helen and I living thousands of miles apart and yet we both had been making clay flowers! We each made roses and Helen made a gorgeous calla lily (something I definitely need to learn!)! I was once again amazed by the fact that we may live far apart, but we are so close together! I feel that way towards those of you who visit my blog or leave comments. It seems that no matter where we live, we create a close community through our love of creativity!
Today I wanted to share a video with you so that you can also create Simply Pressed Clay roses where you are! :) Enjoy :)
My friend Helen put a huge smile on my face on Friday! I had been having a lot of fun making Simply Pressed Clay roses and she and I exchanged a few emails and each mentioned how much we were enjoying playing with the clay - that it is meditative and a great tension reliever! When she sent me some pictures of what she had been creating, I cracked up! Here are Helen and I living thousands of miles apart and yet we both had been making clay flowers! We each made roses and Helen made a gorgeous calla lily (something I definitely need to learn!)! I was once again amazed by the fact that we may live far apart, but we are so close together! I feel that way towards those of you who visit my blog or leave comments. It seems that no matter where we live, we create a close community through our love of creativity!
Today I wanted to share a video with you so that you can also create Simply Pressed Clay roses where you are! :) Enjoy :)
Subscribe to:
Posts (Atom)