Monday, February 07, 2011

Broadsheet Tags For Treat Bags

Today's Lesson From The Craft Room:  Dance With Your Art
I have been working on a birthday present and I find myself working on the present and then stepping away...and then coming back and doing a little bit more and then getting stuck and then walking away...and then stepping back in.  It feels like a dance to me - first this way, then that - almost like a waltz (although not with defined steps).  Sometimes it seems that creating feels more like the twist than the waltz, but either way I'm dancing with my art :)  (Hopefully I'll be able to share the finished creation in tomorrow's post...)
I made these small tags to attach to bags of popcorn wrapped in cello and tied with ribbons.  They are for my niece's birthday party.  So far I've made the peach jelly bean treat bags, these tags, medallions and tags for the gift bags and belly bands for the water bottles...phew, I'm tired just listing them all out :)  For these tags I used a die to cut the tags and then stamped them with a harlequin stamp from Looks Like Spring (retired) and the "j" from the Broadsheet Alphabet.  I added a bit of bling and did some sponging.  I hope you like them! :)

Sunday, February 06, 2011

Walking In A Winter Wonderland!

I just had to share this photo with you!  I decided to take my camera with me on my morning walk with Buddy.  Our walk was just like walking in a winter wonderland!  The snow from last night was the perfect snow for sticking to trees and making the world look so peaceful.  Here is a view from our walk.  And here's Buddy, nosing in the snow :)  His nickname is "Snowdog!"

Friday, February 04, 2011

Four Ways Friday #35 - 1 3/4" Circle Punch

This week's Four Ways Friday is all about the 1 3/4" circle punch!
I've been busy making treat bags for a party in Georgia...so, of course, peaches needed to be a part of the bag (and peach jelly bellies are the perfect treat)!  You can make this adorable peach using your 1 3/4" circle punch.  I found the instructions on one of my favorite punch art sites created by Ellen Kemper!  She is an amazing artist and does the most incredible things with punches!  This particular peach was created by her upline, Jenifer Lange.  You can find the instructions here.
Of course you can also choose to use your 1 3/4" circle punch in the simplest way.  Here I used it to layer a punched greeting for this masculine card.  It forms the perfect border for your 1 1/2" circle punches :)  The greeting here is from Afterthoughts and the circle background is from the Apple Blossoms hostess set, stamped repeatedly using the stamp-a-ma-jig for alignment.
Just in case you thought I was over my 3-D flower addiction...I'm not!  Here is a flower that I created using three 1 3/4" circles.  I did some crimping, cutting and fluffing...oh, and a little dazzling diamonding :)  I may try to put together a video to show you how I made it.  My guess is that if you take a pair of scissors, your imagination and a few 1 3/4" circles, you might be able to come up with all kinds of cool flowers!
The 1 3/4" circle punch can also be combined with other circle and scalloped circle punches to create adorable little signs!!!!  Here I used the Lovely Letters alphabet and punched the letters out with the 1 1/4" circle punch.  I then matted the letters onto 1 1/2" and 1 3/4" circle punches and finally onto the large scallop circle punch.  I hot glued the letters to a piece of ribbon and added a ring at the top and a bit of crochet thread at the bottom.  Here is a close up of one of the letters...
I hope you've enjoyed this week's Four Ways Friday!  Have a wonderful and creative weekend!!!!!

Thursday, February 03, 2011

Broadsheet Alphabet Sweet Box

Today's Lesson From The Craft Room:  Go On A Creative Excursion
I am helping make decorations for my nieces' 13th birthday party and I found myself in a craft store today.  I decided to just walk up and down the aisles and see what caught my eye.  I even stopped at the magazine rack and glanced through some magazines that I don't normally look at.  When you are receptive, it is amazing what ideas will come to you.  Over the next few days I will be working on the decorations and will hope to share them with you next week...hopefully the inspiration will turn into a great reality!  When was the last time you went on a creative excursion?
Today's project was a box that I submitted for publication...but I guess it didn't make the cut...I'll keep trying :)  In the meantime, I wanted to share it with you!!!!!!  I made the box by using a large matchbox holder as a template and cutting the card stock to match that template.  The letters were stamped with the Broadsheet Alphabet (I LOVE this alphabet!!!!).  I stamped using a combination of soft suede, chocolate chip and early espresso.  Of course I had to sponge them too and then added some champagne glass glitter (another addiction of mine) using crystal effects.  I embossed the Pretty In Pink card stock with the Vintage Wallpaper embossing folder.  The bow is a faux box (I have a video to show you how to make these bows if you've never tried them before - easy peasy!).  And yes...I guess I went a bit nutso and decided I needed to make some polymer clay truffles to adorn the box :)  Playing with polymer clay makes me fell a bit like being back in kindergarten :)  I adhered them to the box with glue dots.  Now I just need to fill it with some yummy chocolate and give it to my sweetie for Valentine's Day :)  I hope you like it!!!!

Wednesday, February 02, 2011

Fun Foam Balloon Medallions

Today's Lesson From The Craft Room:  You Can Still Sing Outside In The Cold!
The temperatures in Denver for the past 2 days have been brrrrrrrrrrrrrrr!!!!  When we looked out the window into the backyard it seemed very still this morning.  Usually our backyard is filled with activity - birds and squirrels gathering, burying and eating seeds and nuts.  Surprisingly, even in the freezing cold, it didn't take long for a robin to show up at the bird bath.  Then came the magpies and blue jays, followed by the flickers and sparrows - it was a party AND there was singing!  We started hearing the most beautiful bird songs even in the frigid temperatures.  Looks like the birds have taught me a lesson again - no matter what the weather, it's still worth singing! :)
Today I spent time working on decorations for my niece's upcoming 13th birthday!  The colors are purple and silver.  These medallions are going to be placed on the balloon strings - the strings will be adhered between the 2 medallions.  I found great self-adhesive glittered fun foam at the local craft store and it worked great in the Big Shot!  I love how you can cut so many different materials with the bigz dies in the Big Shot!  I used a combination of dies - the scallops #2 die, the scallop circle die, and the clear circle die.  I punched holes through the card stock with my crop-a-dile and then tied the silver and white ribbon (also from a local craft store).  I will do some more experimenting tomorrow - need to design some treat bags too :)  Stay warm and whether you are inside or out, take a moment to sing :)
I decided to add the card I made for the SCS sketch challenge to this post too...here it is!
 
I began by distressing an old book page by crumpling it and then sponging the edges and the entire crumpled page with a combo of soft suede, chocolate chip and early espresso ink.  I adhered it to the spritzed and sponged crumb cake card stock using tombow mono multi glue so that I would not flatten out the crumpled page.  I stamped images from Define Your Life and Artistic Etchings using chocolate chip ink onto the pink pirouette card stock.  I then cut a piece of ribbon and pulled some of the threads to give it a worn look and then sewed it to the pink pirouette layer with my sewing machine.  I stamped the brad with an image from the Artistic Etchings stamp set using black staz-on ink.  I love how you can customize the large brads this way!  The "amour" was stamped in Early Espresso onto the matchbox die label (1 of 3 labels that are a part of the matchbox die for the Big Shot) and then I distressed and sponged the label and added a small pearl.  I hope you like it! 

Tuesday, February 01, 2011

It's Cold Outside!!!!

 I decided to share a second post with you today since it's not every day that you wake up to your window in the craft room looking like this!!!!  brrrrrr!  It's -9 degrees outside so I'm staying in! :)  I've already been productive and made this card for the color challenge on SCS - river rock, whisper white, and basic gray.
 I stamped the basic gray cs with the en francais background stamp and basic gray ink.  I distressed and sponged the edges.  I sewed a piece of crumpled seam binding onto the panel.  I stamped 3 of the fifth avenue flowers with versamark and heat embossed with clear embossing powder.  I then used my versamarker to color in certain petals to make them a shade darker.  The centers were punched using the flower from the trio punch and then rhinestones added to finish the centers.  The label is from the matchbox die.  I sponged the edges with river rock ink and then stamped the greeting from Sincere Salutations in basic gray.  I hope you like it!Stay warm wherever you are!

Simple Friends Furever Valentine

Today's Lesson From The Craft Room:  Don't Text While Driving
I only caught the tail end of Extreme Makeover:  Home Edition the other night, but the message was powerful enough to share with you today.  I have to admit that I am not one to text while driving...or even text while doing anything else since I have one of those archaic phones that was made prior to the texting revolution.  But I have dialed a number while driving, which is as distracting as texting.
I think sometimes it's easy to think that we have been driving for so long that we can do almost anything while driving - eat, talk on the phone, read a book (have you seen these crazy people reading while driving on the highway?!), put on makeup.  We have to admit to ourselves that no, we are not superhuman and we, like everyone else, are distracted and our driving skills are negatively impacted when we do anything else other than drive while we are driving.  The family on Extreme Makeover learned the "don't text while driving" lesson the hard way.  Their daughter was texting while driving and when she didn't make it back to school, her mom went out to look for her.  She found her daughter before anyone else did.  The car was off the road and the daughter had been ejected from the vehicle and her daughter died as a result of the accident.  There was not another car involved in the accident - just a phone and her daughter.  So please, think about whether that phone call, that sandwich, that book or that made-up face are worth dying for.  And remember, it's not just about you taking your own life in your hands - you are on a road where other people are driving too.
Today's card is a quick and easy (and too cute) Valentine's card!  I made a horizon line with a marker and then used the stamp-a-ma-jig to place the greeting from Teeny Tiny Wishes and the dog and bowl from Friends Furever above and below the line.  I colored in the collar and bowl and then added a bit of dazzling diamonds to give the collar some bling :)  Finally, I glittered a small piece of Melon Mambo card stock and punched it out with the heart to heart punch.  If you have 5 minutes, you can make this card!  What a fun way to say "I love you" to someone for Valentine's Day!

Monday, January 31, 2011

A Few Masculine Cards

Today's Lesson From The Craft Room:  Creativity Creates Community
I had a Valentine's stamp-a-stack at the house yesterday and I am still smiling!  It's wonderful to watch a group come together and laugh and share stories and create.  What I realize is that creativity makes me feel a part of a community - whether that community is sitting in my home creating, or whether I'm connecting to people on-line/virtually.  I know I really don't know many of you who visit my blog - most of the time I don't even know you're here - other than to look at the scrolling information in the right-hand column that tells me someone has visited from Japan or London or New Jersey.  It's just amazing knowing that you are out there and that you take the time to come and connect with me - even by just stopping by or by taking the time to leave me a comment.  Thank you for being a part of a community that I cherish and am grateful for everyday!
Today's card is a card that I did for a SCS challenge last week.  I used the Bring On The Cake hand image over and over to create the background on the card and combined that with the fleur-de-lis image from Friends 24/7.  Chunky glass glitter adds a pop of dazzle, while still allowing this card to be appropriate for a guy (it actually became my brother's belated birthday card :)  Here is another, very simple, masculine birthday card that I did for a sketch challenge on SCS about a week ago.
I ran the background Soft Suede textured card stock through the crimper in one direction and then turned the paper around and ran it through in the other direction to create a grid pattern.  It adds a ton of texture!  I kept on adding texture by spraying a Riding Hood Red piece of card stock with water and then crumpling, uncrumpling and recrumpling the paper and then letting it dry.  I attached the eyelets with the crop-a-dile and then wrapped linen thread around the panel and attached it to the card using dimensionals.  The greeting, from Afterthoughts, was stamped in Elegant Eggplant.  I hope you like the cards and I hope they inspire you to try making a card that you feel would be great for a guy in your life!

Friday, January 28, 2011

Four Ways Friday #35 - 4 Ways To Say "I Love You"

For this week's Four Ways Friday I have decided to share with you 4 ways to say "I Love You!"  I'll be back next week with four ways to use a particular product :)  I hope you enjoy!
For this first card I used my letterpress plate to deboss the background.  I sponged the edges with Chocolate Chip ink.  The decorative label was also sponged and stamped with 2 of the stamps from the Artistic Etchings stamp set.  I added a small love tag using the Tiny Tags stamp set and tag punch.  Can you see the tiny pearl jewel?  It adds the perfect romantic touch!
You can use your Bingo Card stamp to make an adorable card for Valentine's Day or just to say "I love you!"  Here I stamped the image using Early Espresso ink and added some more stamped images from the Tiny Tags stamp set.  The "love" hearts are from the I Heart Hearts stamp set and are popped up with dimensionals.  Inside the card there's more fun...
Inside the card I created a holder for this adorable bookmark.  The "things i love" stamp is from the Things I Love stamp set.  I used the Two Tags die to make the bookmark and the "U" is from the Lovely Letters alphabet.  I used the dotted line jumbo wheel to make the lines on the bookmark.  Here you can write all of the things you love about the person you give the card to!
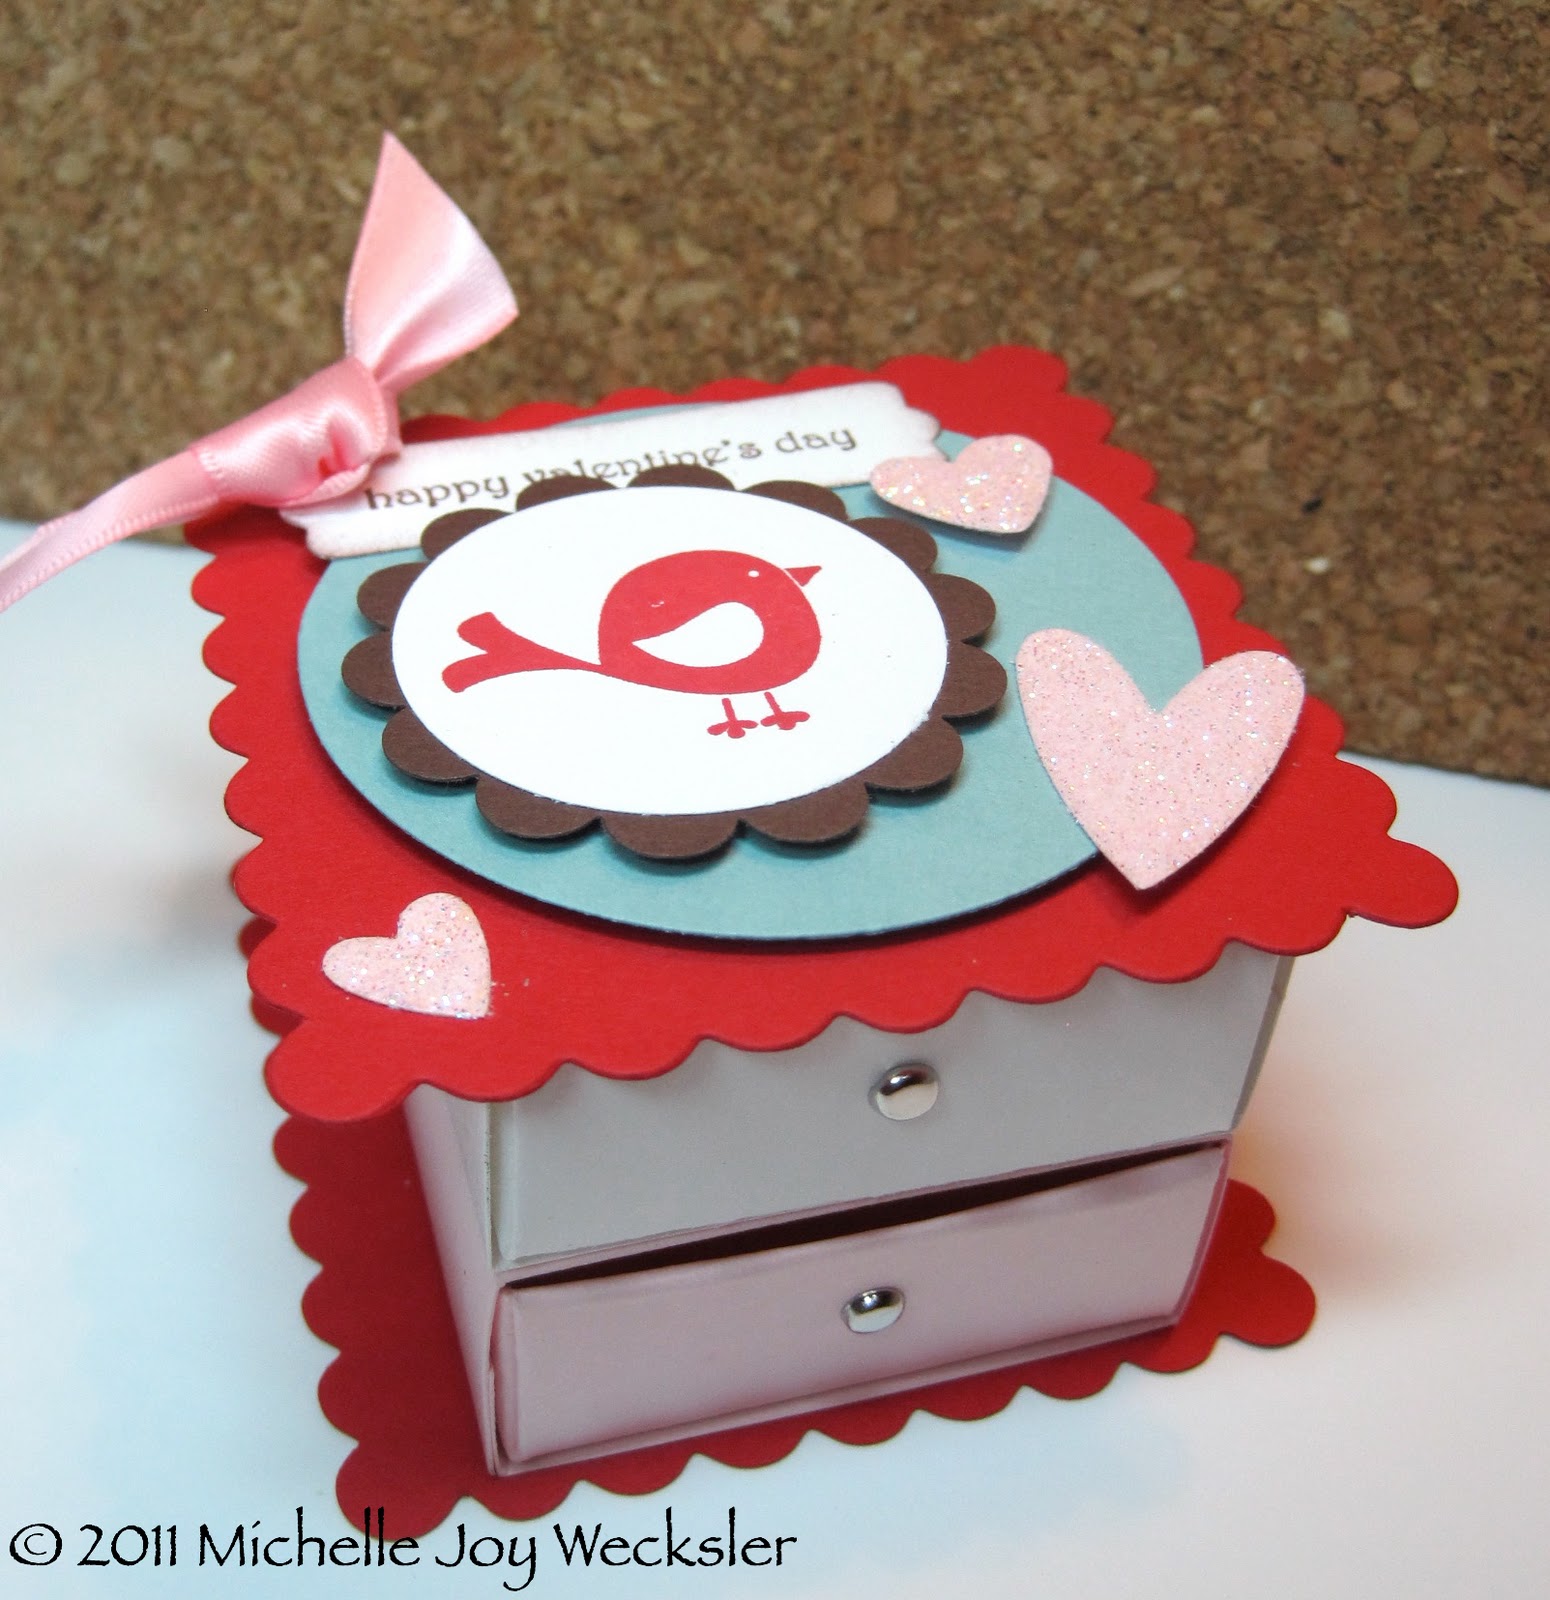
This little treat holder is a great way to say "I love you!"  I adhered two matchbox die cuts together to form this little dresser and then used the scalloped squares die for a top and bottom.  I can't wait to fill this with cinnamon hearts and those little hearts with all the sayings!  Here is a close-up of the top.  I used the Cheep Talk stamp set for the bird and the greeting is from Teeny Tiny Wishes.
 Last but not least is this simple candy cone!  Inside is a small cello bag with chocolates and a couple of lollipops!  To make this cone you only need a 6"x6" sheet of designer paper.  I think I have some more videos to make!!!
I hope you've enjoyed these 4 ways to say "I love you!"  Have a wonderful weekend!!!!!  Don't forget...it's Sale-a-bration!!!!!  For every $50 in merchandise that you purchase, you earn a FREE Sale-a-bration item!!!!!!  You can view the Sale-a-bration catalog at the top of my blog (right-hand column) or CLICK HERE to shop now!!!!

Thursday, January 27, 2011

Eastern Blooms Thank You

Today's Lesson From The Craft Room:  A Little Exercise Can Turn Your Mood Around!
For whatever reason I was feeling a little punky yesterday.  Not really in a physical way, but in an emotional way.  I'm not sure what was behind the mood.  What I did know is that I did not want to go to the gym for my scheduled appointment with the trainer.  But, since the appointment was scheduled, I got in the car (albeit a few minutes late) and made my way to the gym.  I think I frowned the whole way through the workout, but even with my frowning, I did the workout and, being on the other side of the workout, I can honestly say my mood changed.  I just started feeling better.  Sometimes a little exercise can really turn your mood around!  I think I may even do my 40-10 tonight - I have challenged myself to do 40 crunches and 10 push ups (even if they are on my knees) everyday.  What to join the challenge?
This is a quick and easy 4x4 card that I made to accompany a gift.  I love how much texture the petals aplenty embossing folder gives to a card!   I stamped one of the flowers from Eastern Blooms repeatedly with Baja Breeze ink, both on the scallop circle I punched out of Whisper White card stock and on some scrap Whisper White card stock.  I cut out the ones on the scrap paper and then added a dash of dazzling diamonds in the center.  I popped them up on dimensionals after adding the Short & Sweet greeting to the scallop circle.  I hope you like it!  Now go and give me 40-10!!! :)

Wednesday, January 26, 2011

Animal Stories Baby Card

Today's Lesson From The Craft Room:  Do the clothes really make the woman?
I just watched another episode of What Not To Wear...do you watch that show?  I am usually smiling by the end, watching these women come into their new style and finding their inner beauty at the same time as discovering how beautiful they can look on the outside.  And then I look down at myself.  A typical day consists of jeans, a t-shirt of some sort covered by a very large fleece overshirt or jacket.  And the hair?  Well, most of the time in some type of put-it-up-quick bun.  Not the picture of fashion or style...unless you're into "schlep" as a fashion statement! :)  I wonder why I dress this way.  Is it because when I am home I am usually not seeing anyone other than my family and the neighbors?  Is it because I find myself in the craft room and nice clothes and the craft room don't mix?  Or is it something deeper than that?  What am I really saying with the clothes that I'm wearing?  I know comfort is important and yet I wonder if comfort can also look good.  I guess I'll just need to do some pondering on this...I'll let you know if I find an answer (and yes, feel free to nominate me for What Not To Wear - I am in need of Stacey and Clinton!).  In the meantime we can both imagine that I am in a gown (not my nightgown) while typing this post, with beautiful diamond earrings and my hair coiffed by whoever does Sandra Bullock's hair :)  Got the picture?
This card was quick and easy - an accompaniment to a baby gift.  How easy to just stamp the whale from Animal Stories and add a greeting from Teeny Tiny Wishes.  A few punches and the background Baja Breeze card stock run through the Big Shot with the Perfect Polka Dots embossing folder.  And finally, a touch of dazzling diamonds on the spots on the back of the whale.  I hope you like it!

Tuesday, January 25, 2011

Fun & Fast Notes Birthday Card

Today's Lesson From The Craft Room:  Adopt A Niece :)
I have a lifelong friend who has a little girl who just turned 9.  She calls me Aunt Michelle :)  She sent me the cutest letter the other day...you'll learn quite quickly that she knows I love to stamp!  Her letter had a very specific request - to make her a card with a cake that had 9 candles and blue and pink icing and that said, "Happy B'day Amanda" on it!  Good thing for me the Fun & Fast Notes cake had 9 candles!!!! :)  I hope she's okay with it saying "Happy Birthday Amanda" :)  I used some stickles for the icing, although you can easily color the icing in with your markers and then use crystal effects and dazzling diamonds for a similar effect.  I'm really happy Amanda adopted this Aunt :)
Don't forget, Sale-A-Bration starts today!!!!!  For every $50 you purchase you get a Sale-A-Bration item for free!!!!!!  This is in addition to any regular hostess benefits you receive for your order.  Now is a great time to stock up on essentials and buy some new items :)  Click on the Sale-A-Bration icon in the right hand column to learn more!  Sale-A-Bration runs from today until March 31, 2011!!!!  Yeah!!!!!

Monday, January 24, 2011

Canvas Art

Today's Lesson From The Craft Room:  Pay Tribute
I don't even know where to begin with today's post, but I'm hoping that if I just begin that the words will come.  There was a man, named Charlie, who was always at the park.  I would call him the Pied Piper of the park because he would come to the park with his 2 dogs, and sometimes his 2 young boys as well, and he always had a pocket full of treats!  Buddy, our dog, would invariably end up sitting at Charlie's feet, waiting for a special treat :)  Well, I hadn't seen Charlie in awhile and that seemed strange.  And when Buddy and I walked by his house one day we saw a "for sale" sign.  It seemed strange to me that Charlie wouldn't have mentioned the house sale to us and so I continued on my walk with a question mark in my mind.  Well, I asked other people in the park if they had seen him and his dogs and I keep getting the same response - yes people knew him, had said "hi" to him, let their dogs play with his, but no one seemed to know what had happened.  Fast forward a few months - I know, it's pretty sad that months can go by and you leave the question mark in your mind.  Well, at the end of last week I found out what I wish I hadn't.  One person spoke to another and they said that they had heard Charlie had committed suicide.  It is even difficult for me to type those words - I wonder if they will ever not feel shocking and life-changing.  I was in total disbelief so I got home and looked up the address of the house and then looked up property records and then compared that with obituaries and, I am so sorry to say, I found and read Charlie's obituary.
I still don't know how to manage the feelings and the sorrow.  I cried.  I still cry.  I wondered if there was anything I could have done differently to have helped him with his pain - pain I had no idea he even had.  I guess you really never know when people are in pain - especially when you are "park friends."  But Charlie is missed and I hope he is looking down and seeing that he has touched so many people and that we miss him.
I didn't know a better way to manage my feelings than to sit down in the craft room (it took me 3 days to actually sit down with intention) and pay tribute to Charlie.  What came out was this piece of art - it is mounted on a small canvas frame and, I believe, it was exactly what I needed to do.  If you have read this far, thank you for learning about Charlie - if you would have known him, he would have made you smile.  Please know that we never know the depth of someone's pain - all we can do is try not to add to it in our daily encounters.  Charlie, may you be at peace - Amen.

Friday, January 21, 2011

Four Ways Friday #34 - Nature Walk Stamp Set

This week's Four Ways Friday is all about the Nature Walk stamp set in the Occasions mini catalog.  I am in love with this set!!!!!  I know I shared a card with you yesterday that used this set...but I figured it couldn't hurt to show you more ways to use it!!!!
I received one of these adorable post-it note holder awhile back.  I don't know who came up with the idea originally (if you happen to know, please let me know so that I can credit that person).  I decided to use the Nature Walk designer paper along with a bee that I stamped in chocolate chip onto Very Vanilla card stock.  If you look at the "notes" label, you'll also see that I stamped the floral image from the stamp set at half strength.  Here is a look at the inside of the notes holder (I used 1/2 a pad of post-it notes).
I have a feeling I'll be posting a video next week to show you how to make these adorable note holders!
 For my second card I just used basic black ink with the stamp set to make a monochromatic background with the bird and "no. 147" stamp.  The greeting is heat embossed (I used versamark, black ink and clear embossing powder...I've never been good at keeping black embossing powder where it needs to be, so this is a great solution!  Stamp first in Versamark and then onto your black ink pad and then pour on the powder and heat).
For this third card I stepped it up a bit by using my markers to color in the stamped images.  You can use black Staz-On or the Basic Black classic ink pad with coloring.  I used the classic ink pad, let it dry and then colored and didn't have any smudging issues.
For my last project, I had an odd sized piece of Whisper White card stock on my craft table, so I decided to score it so that there was a bit of the back half showing through on the edge.  I stamped the bird and floral images in basic black and the eggs in Going Gray.  I combined coloring and leaving the images alone and I really like the combination.  The love greeting and the hearts were part of an experiment that I was doing with the Lots of Love letterpress plate.  I embossed a piece of wax paper and then ironed it against glossy card stock.  I then brayered the piece with Melon Mambo ink and cut out and punched the card stock for the pieces you see here.  When you iron the wax paper, any images on the wax paper (including creases) will act as resist areas when you layer on the ink.  I'll have to play with the technique some more - I like the distressed look of these pieces.  I hope you have a wonderful weekend!!!!!  I'm finally feeling better (yeah!) so hopefully I'll be 100% by Monday!!!!!

Thursday, January 20, 2011

Nature Walk DIY Background Paper

Today's Lesson From The Craft Room:  Other People Are As Nutty As You Are :)
We had a small snowstorm move through late this afternoon, but that doesn't deter us from walking our dog.  I guess we're like the postal service in that way - rain, snow, sleet or hail, he's getting his walk :)  As we walked up to the park I wondered if there would be other nuts like us traipsing through the snow to get their pooches to the park.  And, sure enough, the usual suspects were there, freezing their toes off, while the dogs played and rolled in the snow.  It's nice to know I'm not the only nut out there :)
The Nature Walk stamp set lends itself beautifully to creating your own background papers (I'll be sharing a few more of the papers I created in future posts).  Here I stamped the butterfly, the leaves and the "no. 147" stamp multiple times onto Whisper White card stock.  I then used my markers to color in the images and finally sponged over everything with some Perfect Plum ink.  A bit of dazzling diamonds, applied with a 2-way glue pen, adds some interest to the wings of the butterflies.  I made a small hole in the card with my crop-a-dile and ran a piece of chantilly lace ribbon through the hole and knotted it.  The small tag, using the Tiny Tags stamp set, adds a finishing touch.  I hope you like it! :)

Wednesday, January 19, 2011

Springtime Vintage Fabric Bookmark

Today's Lesson From The Craft Room:  When Was The Last Time You Sewed Something?
I went to a local craft store looking for a particular magazine.  You know, one of those magazines that you hope holds the secret to finally organizing and uncluttering your craft room :)  Well, they didn't have the holy grail magazine, but I couldn't leave empty handed.  So, I looked at the other magazines on the rack and chose one I had never read before - Sew Somerset (Winter 2011 issue).  I am not very adept at sewing, so it seemed like quite a stretch.  But I thought that stretching can be a very healthy thing.  So, home I went with the new magazine in hand.  Well let me tell you...I started reading it in bed at night and got to p. 14 and that magazine rocked my world!!!!  On pages 14 & 15 there was a project shared by artist Joy Gabler.  She had bins of fabric and decided to figure out a use for them.  Her idea was to make bookmarks and they are beautiful!!!!!!  (You can check out some of Joy's beautiful creations on etsy - her seller name is thevintagerabbit).
So when I woke up this morning it was time to dust off the sewing machine (I was afraid I had forgotten how to use it and thread it since it has been months and months since I last played around with it).  I pulled out the gorgeous Springtime Vintage fabrics and went to town!  I also decided to breathe new life into a few retired items - the ribbon and the Rough Type stamp set.  I am so pleased with the result!!!!!  Thank you Joy for the amazing inspiration!!!!!!  Maybe it's time we all thought about sewing something...I'm also wondering what awaits me beyond p. 15...I better keep my sewing machine out...just in case :)

Tuesday, January 18, 2011

Lots Of Love Letterpress

Today's Lesson From The Craft Room:  Things Come Easier With Repetition
In today's world of instant gratification and instant information, it can be easy to expect that you can do things well the first time around.  We need to be a bit more patient with ourselves.  Just as a seedling does not grow into a tree overnight, so too, we need time to grow and learn.  I've been making a lot of paper flowers in the craft room (I decided to take a break for today's post, but don't worry, more are on the way).  What I am discovering is that the first one was hard - I needed to write down what I was doing and experiment.  Now, with certain flowers, I can just sit down and do them without even thinking.  It's coming easier and easier.  Sometimes things come easier with repetition and some patience :)
For today's card I pulled out the Lots Of Love letterpress and the Big Shot.  You can use the letterpress with or without ink for different looks.  Here I used the letterpress to create a debossed look and then sponged the edges.  I also stamped on the twill tape - I love how you can customize ribbon this way!  I hope you like it!!!!

Monday, January 17, 2011

3-D Scallop Circle Punch Flowers Video!!!

Last week I posted a card with these adorable flowers and now I'd like to show you how to make them!!!!  No Big Shot required.  You just need the 1 3/4" scallop circle punch.  Enjoy!!!!

Friday, January 14, 2011

Four Ways Friday #33 - 1 3/4" Scallop Circle Punch

This week's Four Ways Friday is all about the 1 3/4" scallop circle punch!  I hope this inspires you to use your punch in some fun new ways!
For this first project I made the scallop circle into a frame!  I took a piece of Baja Breeze card stock and first punched a 1 1/4" circle and then punched around that circle with my scallop circle punch to create the frame (this is also easier to do than trying to center a circle punch after you've already punched the scallop circle).  I stamped the image from Every Little Bit and punched it out with a 1 1/2" circle punch and then used pieces of dimensionals to attach the frame to the stamped image.  Crystal effects on the scallop circle give it the appearance of a frame.
You know I've been going crazy with 3-D flowers lately and today is no different!  As a matter of fact, the next three projects use the scallop circle to create different types of flowers.  I have a feeling more videos will be coming next week to show you how to make them all :)  For this card I punched the scalloped circles from Daffodil Delight card stock.  A bit of cutting of the petals is required to make the scrunched up flower.  A large brad fills in as the center of the flower.
For this small card (finished size is 3 3/4" x 3 3/4") I scrunched the scallop circle again.  However, this time I combined scrunching and crunching and mushing with a bit of water and a spritz of champagne mist shimmer paint and some pearls :)
For the last card I created flowers inspired by my 3-D paper roses.  You can use your scallop circle punch to create these wonderful flowers in different sizes.  Yes, I do believe a video will have to made and posted next week to show you how ;)  I am sorry to not post a video today, but I'm trying to let my voice rest from this cold.  Hopefully next week I'll be able to record a video without sounding like Elmer Fudd! :)  I hope you've enjoyed this week's Four Ways Friday.  I hope it inspires you to look at your familiar punches in new ways!  Have a great weekend!

Thursday, January 13, 2011

3-D Paper Roses Video!!!!

Today's Lesson From The Craft Room:  Sometimes A Blessing Comes In Strange Packaging!
I'm still sick!  Can you believe it?!  I have been doing all I can to take care of myself - eating right, drinking plenty of fluids, taking it easy and getting plenty of rest...and spending a lot of time in the craft room making paper flowers :)  I guess that's the blessing in this weird package called "a cold."  If not for the cold I would probably not be eating as well, resting as much, or enjoying creating for as many hours.  So I'll enjoy the blessings and hope they serve as a reminder that once the strange packaging has been sent away, what I found inside the package can definitely remain!
Here's a video for how to make these 3-D paper roses!  I hope you enjoy making them as much as I have!  I have a feeling more videos will be on the way - showing you how to make different 3-D paper flowers with other tools you might have in your craft space.  Have fun!