Thursday, November 04, 2010

Timeless Type Monogram Notes

Today's Lesson From The Craft Room:  Allow Your Body Time To Rest
The soreness is starting to fade a bit and I can feel myself wanting to run again.  However, all that I have read suggests taking a week off of running after completing a marathon.  I think I'm just dealing with a bit of fear right now - after all of the running I am afraid that if I stop I will not start again.  I'm afraid of the old adage, "a body at rest tends to stay at rest."  I don't want to fall back into old habits and, at the same time, I want to be sure to allow my body time to rest so that I don't injure myself.  So, to try to keep my body in motion I am starting a new challenge tomorrow - and I'm starting in a realistic way.  I'm calling it my 40/10 challenge - 40 sit ups and 10 push ups every day.  I think I can do it...and maybe I'll even be able to increase the amount after a little while - we'll see.  All I know is that I'm going to do my best to keep this body in motion!
Today's card is part of a set of 8 personalized note cards that I made for a friend for her birthday.  I used the scalloped rectangle sizzlit in the Big Shot and the Timeless Type sizzlits for the monogram.  The Friends 24-7 stamp set provided that great design on the background and on the envelope.  I also used the Wonderfully Worn background stamp to add a bit more interest...along with some sponging.  I created a faux button with card stock and the 1/2" circle punch and added a bit of twine.  I hope you like it!

Tuesday, November 02, 2010

I Did It!!!!!

Today's Lesson From The Craft Room:  By Changing Yourself, You Change The World
I am home and I did it!!!!!!  (That's me with my hands up just before the start of the race).  8 months ago I decided on a goal - to run 26.2 miles on Halloween day in the Marine Corps Marathon in Washington, DC.  Now, here I am, sitting in Denver (with very sore legs I might add) and I accomplished that goal!  What an amazing feeling!  To know that 8 months ago I couldn't run a block.  And to know that 2 days ago, I ran 26.2 miles and finished the race.  It really is amazing what you can do when you decide to make a change.  It's amazing that by changing yourself, you change the world.

Monday, November 01, 2010

Define Your Life - Simple Gratitude Card

This is a quick and easy card that I made to say thank you to a friend for a wonderful birthday gift :)  I began with a basic Very Vanilla card and then added some flocked paper (this is not Stampin' Up! paper - it was actually part of the gift that my friend gave me so I felt I needed to use it on her thank you card :).  I used a piece of sticky strip across the top of the flocked paper and then folded and adhered the Very Vanilla satin ribbon as I went along.  The antique brad, attached with a glue dot, adds that vintage flair.  The greeting is from Define Your Life - stamped in Early Espresso ink onto Crumb Cake card stock and then punched out with the extra large Decorative Label punch.  I sponged the edges with Early Espresso ink and then added a few floral images from the Tiny Tags stamp set (some at full strength and some at half strength).  I hope you like it!!!!!  (p.s. I arranged for this post to appear automatically before I left for the marathon...I'm hoping that by the time you read this I will have made it to the finish line and will be on my way home, back to the craft room!).

Friday, October 29, 2010

Altered CD

Four Ways Friday will return next Friday!  Today I've decided to share an altered CD with you instead - I hope you don't mind :)  I love that you can turn an old disc into something spectacular with a bit of adhesive, paper and ink!
This is one side of the CD.  I used Mod Podge to adhere the Garden Gala designer paper to the disc and then used a gold leaf marker to add a touch of gold around the edge.  The letters are from various alphabet and regular stamp sets and one word was cut out of a book :)  I hope you notice the little butterflies!  I used the butterfly embosslit with vellum card stock and then sponged them with classic ink and let them dry.  A bit of glass glitter creates their bodies :)  Did you know that your Crop-a-dile can cut through a CD like butter?!  What a great way to make this altered CD into an ornament.  Here is the reverse side:
I die cut the letters using the Timeless Type dies and added a bit of embossing with the floral image from Eastern Blooms.  Define Your Life provided the wonderful definition of "create."  I added more vellum butterflies and the wonderful basic pearls jewels!  I hope you like it!  Now go get an old CD that you would normally discard and see what you can do!  I would love to see your creations!!!!!  PS...I'm off to run the Marine Corps Marathon in Washington, DC...wish me luck!!!!!! :)

Thursday, October 28, 2010

Lovely As A Tree Acrylic Block Stamping

Today's Lesson From The Craft Room:  Count On Your Preparedness!
It's hard to believe that my 8-month journey is about to reach it's pinnacle!  The Marine Corps Marathon in Washington, DC is something I have been training for for the past 8 months.  It's even harder for me to believe that 8 months ago I couldn't even run a block, let alone a mile...or 26.2!  I have now done what I can to be in shape to make it the full 26.2 miles on Sunday.  Now I just need to maintain my confidence!!!!!  If you find yourself needing something to do on Sunday, feel free to send a bit of positive energy my way! :)
I wanted to share another acrylic block stamping card with you.  For this one I used the size D acrylic block with an image from Lovely As A Tree and the greeting from the Curly Cute stamp set.  A touch of dazzling diamonds on the leaves finishes the look.  I hope you like it!

Wednesday, October 27, 2010

Card Play #14 - Apple Blossoms Acrylic Block Stamping Video!

Today's Lesson From The Craft Room:  Life Works In Mysterious Ways!
I had a number of things to do for work today and, I have to admit, I really wanted to spend time in the craft room!  And I guess the Universe heard my cry since one of my work calls was moved to tomorrow...so off into the craft room I went!  Life works in mysterious ways sometimes - and I love it when it's both mysterious and wonderful!!!! :)
I am loving stamping with my acrylic blocks!  It's like getting a new toy to play with!  Here's another video of a very simple and elegant card that will take you no time to make!  Enjoy!

Tuesday, October 26, 2010

Card Play #13 - Acrylic Block Stamping Video!

Today's Lesson From The Craft Room:  Creativity Relieves Stress!
I'm no doctor and no, I don't have any scientific research that I have collected to support this claim (although I have a feeling that data is out there)...what I do have is personal experience and I am here to tell you, creativity relieves stress!!!!!  I had a stressful call for work the other day and when I hung up the phone I immediately knew that I needed a timeout in the craft room!  And, it worked!!!!  I was able to lose myself in the process of creativity and I walked out of the craft room a changed woman!!!!!  So, when you find yourself stressed out, give yourself a creativity time out!  It's wonderful medicine!!!!

Today I wanted to share more acrylic block stamping with you.  Here's a video on how I created this card.  Enjoy!

Monday, October 25, 2010

Acrylic Block Stamping

Today's Lesson From The Craft Room:  Shop With A Friend!
You may find this strange, but I'm really not a fan of shopping...except, of course, in craft stores!  When it comes to shopping for clothes or shoes my enthusiasm goes right out the door.  That all changed yesterday!  I went shopping with a friend and it made the whole experience fun!  I loved having someone with me who would tell me her honest opinion and also just bring me stuff to try on so I didn't have to keep getting dressed and heading out of the dressing room over and over!  If you're like me and find clothes shopping to be a drag, try heading out with a friend.  It may totally change your perspective!!!!

Did you know that you can apply ink directly to your acrylic blocks and then stamp onto card stock with them?  You get a wonderful rectangle that you can then stamp on or embellish with punched out pieces!  I began with Pink Pirouette on Whisper White card stock and stamped the acrylic block 3 times.  I used post-it notes to mask the edges and stamped the floral image in Basic Gray.  Next came the big hearts and finally the punched hearts coated with Crystal Effects.  I hope you like it!

Friday, October 22, 2010

Fifth Avenue Floral & Copics

Today's Lesson From The Craft Room:  Color (Inside or Outside of the Lines)!
I received some Copic sketch markers for my birthday yesterday and decided I needed to give them a try!  I haven't had this much fun coloring since I was little!!!!!  I stamped this flower image from Fifth Avenue Floral multiple times onto Whisper White card stock using Staz-on Jet Black ink.  I then colored to my heart's content :)  These colors are so vibrant and fun to play with - I'm already thinking about what colors I want next :)  I am looking forward to actually learning how to use the markers and, at the same time, just taking out the markers and coloring without having a clue, was a lot of fun too!  I added a bit of dazzling diamonds to the center of the flowers using my 2-way glue pen.  The greeting is from Curly Cute, stamped with Basic Black ink.  I mounted the floral panel onto Poppy Parade card stock and then onto a Whisper White card base.  I hope you like it!  What can you color today?

Thursday, October 21, 2010

YIIIIPPPPPPEEEEEEEEEEEEEEEEE!

I am sooooo excited!!!!!!!  I just received an amazing birthday gift!  I was just contacted by Paper Crafts Magazine and they have accepted one of my projects to be published!!!!!!  YIIIIPPPPPPEEEEEEEE!!!!!!!  And how crazy is this....this was my first attempt to be published and magic happened!  So that means you have no excuse!  If you've ever wanted to be published, don't wait for the perfect project or a time when you feel like you "deserve" to be published...just give it a shot!!!!!  You never know what might happen!!!!!!  Check out the Paper Crafts magazine website to see the most recent call for submissions!  (click on "magazine" and "reader submissions").  Go for it!!!!!

Life Happens. Love Helps!

Today's Lesson From The Craft Room:  Celebrate Your Birth :)
Yup!  Today is my birthday!!!!!  I am very grateful to be here on this incredible journey called life.  I am also grateful that while life is happening, love is helping me right along.  I am so appreciative for all of the love in my life!!!!!!  I also appreciate the love I feel toward creativity!  Today's background was made during the same "trance" as yesterday's :)  Step by step, layer of ink after layer of ink...and of course some shimmery spritz!  Today, celebrate how significant you are - how unique, beautiful and wonderful you are!!!!!!

Wednesday, October 20, 2010

Can't Even Explain It Background!

Today's Lesson From The Craft Room:  Create Something That Inspires You!

I can't even explain how I made this background!  It could be that I was abducted by aliens or put into a trance and hours later this is what emerged! :)  No matter how it came about, what I can say is that it inspires me!  Rather than make a card I chose to make a small sign that I can frame and put up in the craft room - a reminder to create art everyday - whether that is in the craft room, in the kitchen, during the work day.  Look for opportunities to create art everyday and don't forget to create something that inspires you!

Monday, October 18, 2010

Tempting Turquoise Birthday!

Today's Lesson From The Craft Room:  Set A Goal And Take Some Action!
Today I'm reflecting a lot on what a goal can do for you...and, even more importantly, what taking action toward that goal can do for you.  I sit here having run 13 miles today - now what I consider a "short" run - as the countdown for my marathon experience begins to wind down.  It is hard to believe that back in March I couldn't even run a block!  It is also such a gorgeous time to run here in Denver - the air is cool in the morning and the trees are displaying their stunning array of colors...just perfect!  Talk about a natural high!!!!!  I also made some progress this weekend on doing some organizing in my craft room and office space.  I still have a ways to go, but I took some action in the direction of my goal and it feels so much better to be moving forward than to be standing still complaining about the mess!  I was beginning to worry that I was going to end up on that show Hoarders!  (Okay, maybe my mess isn't that bad, but internally it was beginning to feel that bad).  So, set a goal and take some action...you will be amazed at how good it will make you feel!

I love Tempting Turquoise!  What a cheerful color!  I used a retired jumbo roller with Tempting Turquoise ink for the bottom of the card and then the little gift stamp from Family Accessories, stamped in Pacific Point ink, to create the background.  Of course, I had to add a dash of dazzling diamonds for some sparkle ;)  A strip of Daffodil Delight run through the Big Shot with the Perfect Polka Dot embossing folder, along with a piece of retired Rich Razzleberry ribbon (can you tell I'm trying to give some of my retired stuff some love?!) were attached to the card front.  Finally, I stamped the birthday greeting from Afterthoughts (hostess set) with Tempting Turquoise and then layered it onto Daffodil Delight, Rich Razzleberry and Pacific Point card stock.  Simple and easy!  I hope you like it!

Friday, October 15, 2010

Four Ways Friday #26 - Ornate Blossom

Thanks for stopping by for another Four Ways Friday!  Today I'm focusing on the Ornate Blossom stamp!
This bold stamp is great for the kissing technique!  For this first 3x3 card, I inked up the stamp with Bravo Burgundy ink and then pressed the En Francais background stamp against the inked stamp.  This is the "kiss."  Then I stamped the Ornate Blossom image onto Very Vanilla card stock.  You can see how the words removed some of the ink on the blossom.  I then stamped the En Francais background stamp at half strength over the card stock and image.  The tag was made from the Tiny Tag stamp set and Jewelry Tag Medium punch.
This bold stamp is also wonderful for creating backgrounds!  I inked up the image with Bashful Blue ink and stamped it multiple times onto Very Vanilla card stock.  I then inked up the image with Marina Mist ink and stamped again over the card stock...multiple times!  I stamped the greeting from the Curly Cute stamp set onto Marina Mist card stock with VersaMark ink and then heat embossed with silver embossing powder.  I used the Scallop Edge Border punch to add the scallops and mounted the piece onto a piece of Bashful Blue card stock.  Some Circle Ice rhinestone brads finish the look.
For this tag I stamped the image in Pretty In Pink ink onto Whisper White card stock cut into a tag shape.  I then created a mask and covered the Ornate Blossom image and stamped the tag with the Bella Toile background stamp in Night of Navy ink at 1/3 strength (you can see the faint image in the background).  I then masked the bottom of the tag and stamped the Bella Toile image again at full strength using Night of Navy ink.  I also used the spritzer tool to spray the full tag with Night of Navy ink.  I stamped the "thankful for..." from the Thankful For stamp set in Night of Navy and then the letters to make the word "you" from the Lovely Letters stamp set.  Dazzling diamonds, applied with 2-way glue, on the letters and part of the Bella Toile image give the tag a bit of glitz.  I tied Pretty In Pink satin ribbon around the tag and then mounted the tag onto Night of Navy card stock.  Finally, I thread a piece of Pretty in Pink satin ribbon through the hole of the tag.
Okay, I've gotta admit, this last 3x3 card is a bit of a hot mess! :)  I began by inking up the image with my markers (Garden Green, Not Quite Navy and Always Artichoke).  I then sprayed the ink on the stamp with water and stamped onto watercolor paper.  Of course, I couldn't leave well enough alone!  I adhered glitter using Crystal Effects - first the aqua...then the olive...then added some pearl jewels.  And, not to be outdone in the glitter department, I made a faux button by layering 5 1/2" circle punched pieces of Not Quite Navy card stock and then covering them with aqua glitter!  The greeting is from the Curly Cute stamp set and was stamped by coloring the same three colors used on the main image onto the stamp and then stamping onto watercolor paper.  Next time I may just stop with the watercolor stamping and leave the glitter on the shelf :)
Thanks for joining me for this week's Four Ways Friday!  I hope you have a wonderful weekend!!!!

Thursday, October 14, 2010

Where's Michelle?

Today's Lesson From The Craft Room:  Some Days You Need A Break :)

Thanks for stopping by!  I don't have a project/picture for you yet today...and, there's a chance that I will skip today and focus on Four Ways Friday for tomorrow.  Some days you need to take a bit of a break.  And, if truth be told, I spent time in the craft room last night making a bunch of paper rosettes and no finished project! :)  A glue gun is a girl's best friend :)  I figured you didn't need to see a pile of paper rosettes :)  Hope to see you tomorrow!!!!!!

Wednesday, October 13, 2010

Peace Ornament...Getting Bigger!

Today's Lesson From The Craft Room:  Stick With It!
I have never had so much fun with a glue gun!!!!!!  I decided to stick with these ornaments for awhile and I am having the best time!  You definitely need to give it a try!  For this one I decided to go bigger and used the scallop circle die with some regular chipboard.  I covered it with Confetti card stock and then went embellishment crazy (I need to take a better picture when the light is better...I just couldn't wait to get this posted!).  I added rhinestone brads and some snowflakes using the Northern Frost decorative strip die in the Big Shot.  I have a feeling you'll be seeing a few more of these in the next few days :)  A girl can't part with her glue gun too quickly!  I'm sticking with it!!!!

Tuesday, October 12, 2010

Waffle Paper and Glass Glitter Ornament Video!

I decided to go ahead and make a video to show you how I made the ornament that I posted yesterday.  I had to make it in 2 parts since there was so much to share!  I hope you like it!  Let me know if you have any questions!

Monday, October 11, 2010

Waffle Paper and Glass Glitter Ornament

Today's Lesson From The Craft Room:  Clean Out Your Sock Drawer :)
This may sound very strange...I have been so preoccupied with my sock drawer for weeks!  Opening that drawer was like walking into a room full of snakes!  All these socks - matched, mismatched, holes, threadbare...Quite pathetic!  This morning I decided I had had enough!  I scooped out every last sock and began the sorting process - garbage, donate, where the heck is the other one?, perfect pairs.  Back they went into the drawer - like couples - perfectly matched :)  There are still a few that are waiting for the sock fairy to arrive...I know those matches have to be somewhere! :)

I decided to play more with making ornaments.  My new favorite thing to do is make these paper rosettes!  I need to make a video so that I can share how I've been making them.  I admit that I needed the glue gun to help me keep them together :)  I am also LOVING this glass glitter - it has the perfect amount of sparkle and charm.  An antique brad and pearl jewel add a bit more of a vintage touch.  This ornament is a special gift for someone...I hope they like it :)

Friday, October 08, 2010

Four Ways Friday #25 - VersaMark Ink!

For today's Four Ways Friday I decided to focus on using VersaMark ink (both the stamp pad and the marker).
This first card uses the VersaMark marker!  I used the marker to hand write the words "Happy Birthday" onto Basic Black card stock and then heat embossed with white embossing powder.  The marker has 2 tips - a brush tip and a marker tip and this writing was done with the marker tip.  I made a chalkboard with the Basic Black card stock by mounting it onto a piece of Crumb Cake card stock and then adding a ledge of Brushed Silver card stock for the paper-pieced eraser :)  The girl was made using the All In The Family stamp set.  I colored the stamps directly with a marker in order to create a head back (I drew in some extra hair and made sure to not stamp the face) and the back of the dress (I didn't stamped the buttons on the dress).  I love being able to use the VersaMarker for writing whatever greeting or doodles you like!
VersaMark ink is also great for creating a watermark look.  It can be an economical way to create all different colors since whatever color card stock you stamp VersaMark on, it will dry to be a shade darker than the color of the card stock it is stamped on.  Here, I just stamped the whale from Fox & Friends using VersaMark onto a piece of Pacific Point card stock.  The letters were made using the Serif Essentials and Timeless Type dies in the Big Shot.  I also ran the letters for "boy" through the Big Shot with the Square Lattice embossing folder and sponged with Chocolate Chip ink.  So cute and so easy!
I did an emboss resist technique for this card.  I started with a piece of Whisper White card stock and stamped the large image from Notably Ornate onto the card stock using VersaMark ink.  Then I heat embossed with white embossing powder.  Next, I ran the Vintage wheel over the card stock and embossed image in Baja Breeze ink.  Then, the sponging began!  Perfect Plum, Concord Crush, Pink Pirouette, and Baja Breeze - until I liked the look :)  Then I stamped the bird from Notably Ornate with VersaMark and heat embossed with silver embossing powder.  Finally, I sprayed this panel with a mix of champagne shimmer paint and alcohol in a spray mister.  The greeting border is from Notably Ornate and the greeting from Whimsical Words (retired) - the greeting was stamped in VersaMark and heat embossed with silver embossing powder.  I also rolled the Vintage wheel on the piece of Marina Mist card stock and then punched it using the Eyelet Border punch.  The En Francais background stamp was inked with VersaMark and stamped onto both the Concord Crush and the Perfect Plum card stock (difficult to see in the photo).
I LOVE, LOVE, LOVE the poppin' pastels technique!  I covered a coaster with Very Vanilla card stock and then stamped it using VersaMark with the En Francais background stamp.  I then took out my pastels and pounced both Pretty In Pink and Perfect Plum pastels onto the VersaMark image using sponge daubers.  I did them same with the Medallion background stamp on a piece of Very Vanilla card stock.  Did I mention I love this technique?! :)  I ran the coaster through the Big Shot with the Scallops #2 die.  I punched the Medallion stamped image with the large scallop circle punch - it's a great size!  Then, I used Tombo mono multi glue to add champagne glass glitter around the edges of both scalloped circles.  Silver waffle paper was scrunched and adhered to the smaller scalloped circle using Sticky Strip.  I then used VersaMark to stamp the greeting from the gorgeous Peaceful Season hostess set and heat embossed with gold embossing powder.  I added some pieces of chantilly lace and then adhered the smaller scallop to the larger scallop using dimensionals.  Finally, I used my crop-a-dile to add an eyelet and ran lace ribbon through so that I can hang this beautiful ornament!

Thanks for stopping by for this week's Four Ways Friday!  Have a wonderful weekend!!!!

Thursday, October 07, 2010

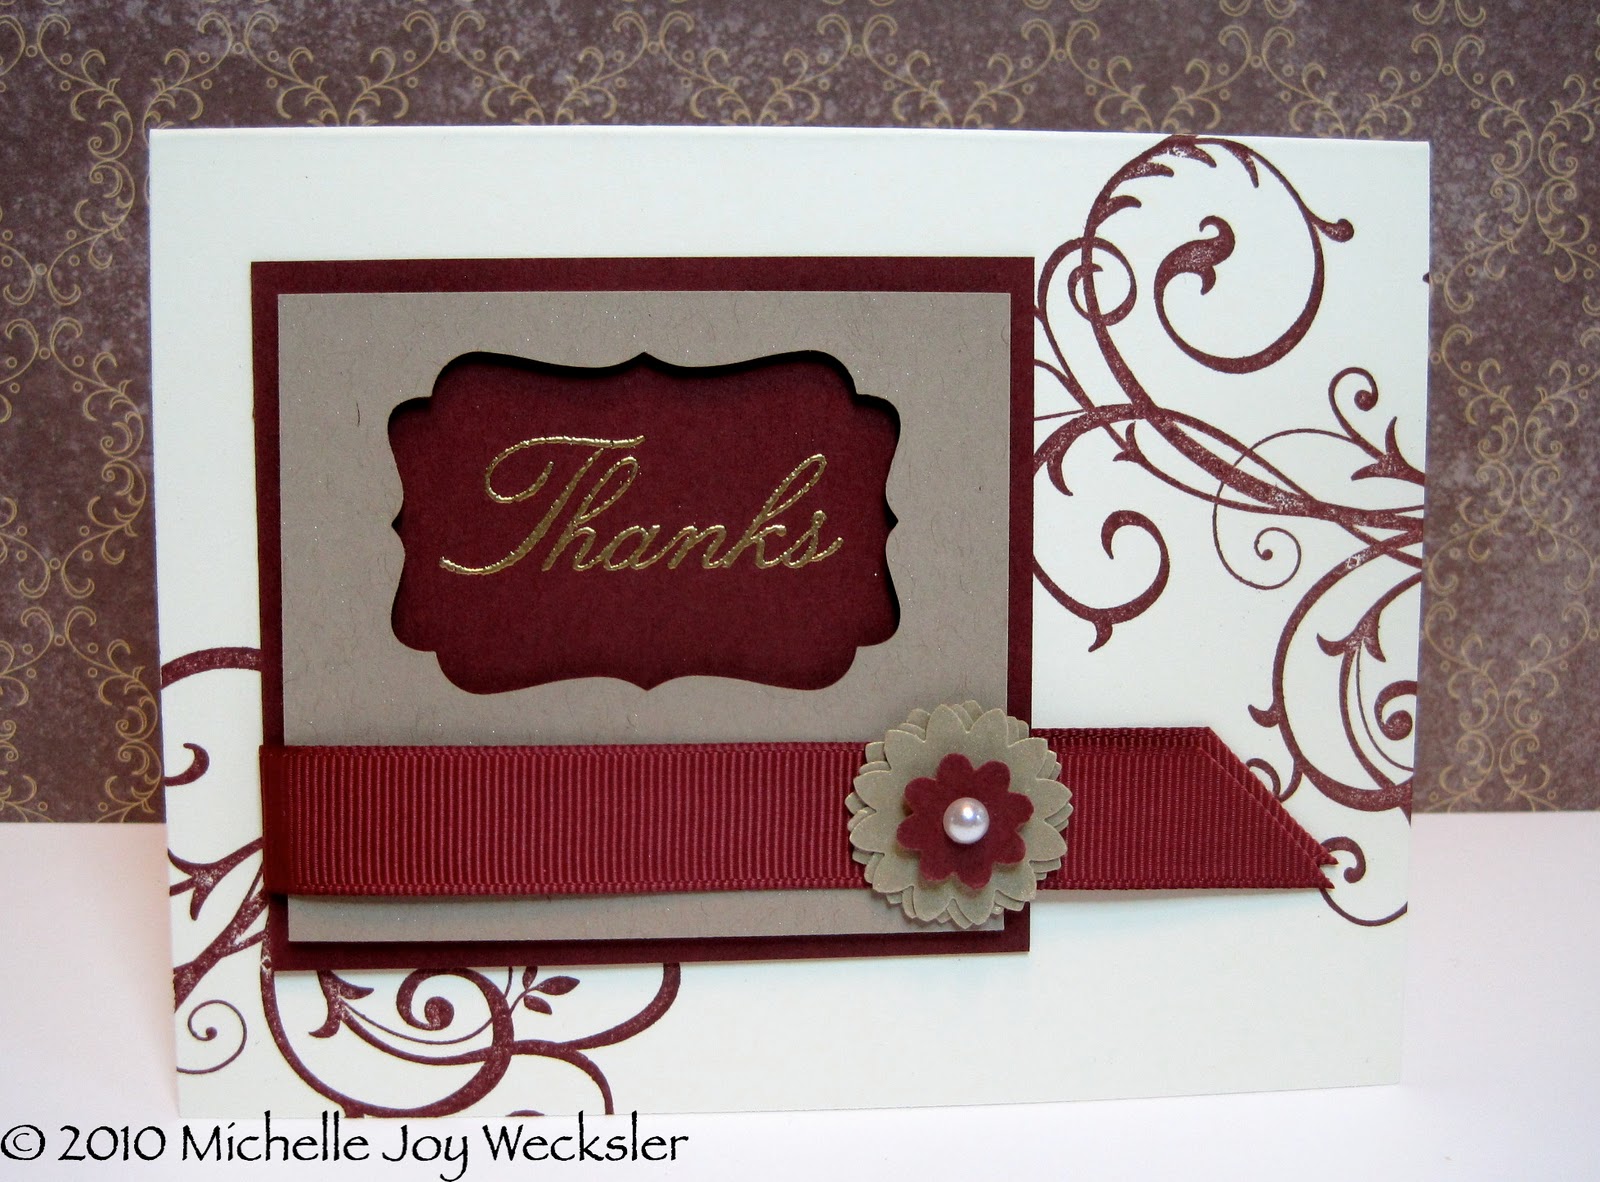
Decorative Label Punch & Baroque Motifs Thanks

Today's Lesson From The Craft Room:  Play With Your Scraps!

This piece of punched Crumb Cake card stock was unearthed from the pile on the craft table the other day and it definitely spoke to me!  I decided the extra-large Decorative Label punch makes a great window for greetings!  I stamped the greeting from the Afterthoughts hostess set, with Versamark ink, onto Bravo Burgundy card stock and heat embossed with gold embossing powder.  The Crumb Cake window was sprayed with a mix of alcohol and champagne shimmer mist paint (a great alternative for smooch spritz - it is incredibly economical and can make tons!).  I used dimensionals to pop up the window and then added some Bravo Burgundy 5/8" ribbon.  The flower was made by punching brushed gold card stock and Bravo Burgundy card stock with the Boho Blossoms punch.  I layered 3 of the gold flowers and glued them together and then added the burgundy flower with a dimensional and topped it with a pearl jewel.  Stamping the flourish image from the Baroque Motifs stamp set providing the perfect background for this unique window!  I hope you like it!  What scraps do you have lying around????