
Friday, November 04, 2011
Four Ways Friday will be here...hopefully later today!
It's been a long day! It is after 11:30 pm Thursday night as I am typing this and I just got back from a trip and I'm pooped! I am already looking forward to sleeping late and then to spending much of the day tomorrow in the craft room. I think of the craft room almost like a womb for myself - does that sound weird?! It's a place where I am so comforted and "at home." It is my peace. I hope to put together a few things to share with you by later in the day on Friday. Thanks so much for stopping by and I hope to see you again in a little bit :)


Thursday, November 03, 2011
More Chipboard Shapes & Sizes :)

Today's Lesson From The Craft Room: We Are Not Sent Into This World To Do Anything Into Which We Cannot Put Our Hearts
This John Ruskin quote began as the inspiration for this art piece that is still "under construction." I truly believe that we are each sent to this planet to do that which speaks to our hearts and I wanted to make a piece of art that I can hang in the craft room that will continually remind me of this truth. What a wonderful measure for us to test if we are doing what we are meant to do - to ask ourselves if we can put our heart into it.I began by taping strips of copper tape to a large piece of chipboard. I then used metal stamps to stamp into the copper tape to create the quote. I cut out the chipboard pieces and coated each of them with black acrylic paint and then wiped most of the paint off. The heart was created like the crown I made yesterday - relying on my ability to draw a heart :) I drew the heart on a piece of scrap chipboard and cut it out and then covered it with aluminum hardware tape and a few piece of copper tape before embossing it and covering it with black acrylic paint (and then wiping the paint off). These pieces will be joining the crown and this canvas:

Wednesday, November 02, 2011
Playing With Chipboard

Today's Lesson From The Craft Room: Trust In Your Ability!
I'm not sure when it started, but I began to believe that I couldn't draw/create shapes on my own :( Somehow the Big Shot, and the amazing shapes it creates, had an impact on me I hadn't expected. I began to believe that if I wanted to add a shape to a card or paper project I needed just the right die to do it! This came to light when I started to play with today's project and I wanted a crown made out of chipboard. But, lo and behold, I don't have a crown die for the Big Shot and I thought I was sunk. Then I remembered...I can draw a crown!!!! (I know, not a miraculous thought...but at that moment it really was miraculous since I had forgotten about my own abilities). So I pulled out a piece of chipboard and I drew a crown on it with a pen. I then cut it out with scissors and ta-da - I had the shape I needed. I then covered the crown with aluminum tape from the hardware store and started to decorate the crown with various metal working & embossing tools that I had on the craft table. Here is the crown in progress:

Tuesday, November 01, 2011
Beautiful Butterflies and Simple Alphabet Sign

Today's Lesson From The Craft Room: Some Days You Can See So Clearly!
It was amazingly clear yesterday. On our walk, Buddy and I could see forever and the mountains were vivid and sharp in the distance! Creativity is like those mountains for me. Some days I sit down to create and in my mind I know exactly what I want to do. I sit down and start to bring to life the image that is in my head and heart. And then there are those days when you can't see so clearly. You still show up to create - you just don't know what is going to appear! This sign has been like that for me. Last week I shared with you where I began - it looked like this:
Monday, October 31, 2011
Bigz Beautiful Butterflies Masked Card

Today's Lesson From The Craft Room: If You Make It With Your Heart, Whatever You Create Has Significance
I truly believe that whatever an artist creates is imbued with the spirit of the artist. We can be so hard on our creations sometimes - judging them, critiquing them. We need to be kind to the works we create - recognizing that our heart and spirit are a part of that creation. In this way, everything we create has significance - it has us.Today's card began as a desire to use a butterfly as a mask. I die cut a piece of chipboard using the Beautiful Butterflies Bigz die and the Big Shot. I then put temporary adhesive on the back of the butterfly and placed it on the Very Vanilla card. I sponged around the butterfly with So Saffron ink and some champagne. Next I repeated these steps over and over until I was happy with the base of the card. By now, the chipboard butterfly was inky and sparkly and I decided I couldn't let it go to waste! So, I stamped the greeting from Charming using Jet Black Staz-On and then stamped the butterfly with an image from Friends 24-7. I stamped the Charming words on a scrap piece of paper and cut some of them out and sponged the edges with So Saffron ink. I added a few to the card with dimensional pieces and also added a word as the butterfly body. The butterfly was adhered to the card with dimensionals. I hope you like it :)
Friday, October 28, 2011
Four Ways Friday #67 - Boho Blossoms Punch
This week's Four Ways Friday is all about how you can use the Boho Blossoms punch in fun and exciting ways!
 Of course, you can always use your punch in the usual way :) Here I punched out a bunch of the smallest flowers using Very Vanilla and Basic Black card stock. I then adhered them to the Very Vanilla card base using glue. I then added the adhesive pearls to the flower centers. Finally, I stamped the greeting from Sincere Salutations using Staz-On Jet Black ink and the stamp-a-ma-jig.
 For this second card, I took a piece of Rich Razzleberry card stock and used the punch to punch out "windows" of flowers in the lower right hand corner. I then backed the Rich Razzleberry card stock with a piece of Very Vanilla card stock to create the impression that the flowers were Very Vanilla in color. I added a few punched out flowers to the piece and then added adhesive pearls to the the flower centers. I then adhered the piece to a piece of Pretty In Pink card stock and adhered the entire panel to the Rich Razzleberry card base using dimensionals. Next I punched out a decorative label and then adhered a piece of Old Olive satin ribbon behind it using a piece of tape. I then layered circles onto the label using my 1 3/4", 1 1/2" and 1 1/4" circle punches. The final 2 circles were attached to the largest circle using dimensionals. I then added a small flower to the upper right-hand corner. The last touch was the add a strip of designer paper that I punched with the scallop edge punch.
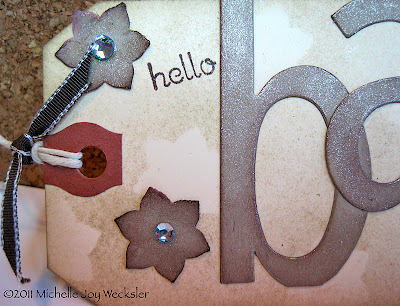
 Punched shapes make great masks that you can use in so many different ways! For this tag, I began with a plain tag and then adhered a number of punched flowers using temporary adhesive.
 Next, I sponged the tag using Crumb Cake ink and then removed the masks. I die cut the letters using the Alphabet Simple Letters dies and Crumb Cake card stock and sponged the edges using Chocolate Chip ink. I then used my finger to apply champagne shimmer paint to all of the letters and adhered them to the tag. A few of the flowers were also punched out of Crumb Cake card stock, sponged, brushed with a bit of shimmer paint, and embellished with adhesive rhinestones. I then adhered the flowers to the tag and added a small piece of Early Espresso ribbon. Here's a close up so you can see the masking more clearly:
 I also love to layer punched shapes and use them to make magnets or push pins.
 For this last project I punched quite a few of the largest flowers and a couple of the middle sized flowers from Baja Breeze card stock. I then sprayed them lightly with water and crunched them and let them dry. Then I uncrumpled them and sponged them with Marina Mist ink. I also punched a 1 1/4" circle and sponged the edges. Next I layered all of the flowers on top of one another and used my paper piercer to make a center hole. I then pushed through a rhinestone brad and adhered the entire flower to the circle using crystal effects. Here is a close up of the flower:
 I then used the crystal effects to adhere a magnet and also adhered a smaller circle to the back side of the magnet so that it can be used on metal surfaces without scratching.
I hope you've enjoyed this week's Four Ways Friday! I hope these ideas inspire you to use your Boho Blossoms punch in new and exciting ways!!!! I wish you a wonderfully creative and peaceful weekend! (I will hopefully be doing some more house painting...I'll try to take more pics so you can see the progress!).


I hope you've enjoyed this week's Four Ways Friday! I hope these ideas inspire you to use your Boho Blossoms punch in new and exciting ways!!!! I wish you a wonderfully creative and peaceful weekend! (I will hopefully be doing some more house painting...I'll try to take more pics so you can see the progress!).
Four Ways Friday will be here later today!
Hi! I just got back from a trip yesterday and was too tired to stamp, so Four Ways Friday will be coming a bit later today! Hope you stop back by!
Thursday, October 27, 2011
Butterfly Sign...In Progress!

I don't know why I've had an aversion in the past to showing you works in progress and why I have felt the need to always share completed projects. Do you know why that is? Do you come here expecting to see something in its completed state? I realize that just showing you completed projects and videos of completed projects doesn't really share the truth of my creative process. I have a lot of "ongoing pieces" in my craft room. Some wait for days...or months...or, yes, years...waiting for my return to move them forward. I am very much like these projects - a work in progress. I am never completed - I am always changing, building up, taking away. We are all works in progress - just like our art. So today I'm going to show you a work in progress and we can enjoy the journey together (and yes, I promise to share how this piece transforms...whether that be a day from now, a month from now....or maybe even a year!).
Today's piece started out much like my "create art" sign. I began with die cutting chipboard - time time using the Bigz Beautiful Butterflies die and the Simple Alphabet dies. I then adhered the pieces to the base using glue. This time I decided to start adhering metal tape from the home improvement store and adding a bit of sequin waste that I adhered with matte medium. I want to thank RachO113 on YouTube for this inspiration. If you haven't watched any of her videos and want to be absolutely inspired, you need to go and watch her at work with her art in her videos - she is truly amazing to watch! Thank you Rachel for the inspiration! Here are a few pictures of the process unfolding:


Wednesday, October 26, 2011
Create Art Sign - Continued!

Today's Lesson From The Craft Room: Delayed Gratification Can Help You Appreciate What You Receive
In today's world of instant everything, I find that I can forget to really appreciate that which I receive. We have learned that we can get what we need at the click of a button - be it information; something new we buy on the internet; a message we receive from a friend through instant messaging, texting, or email. It seems to train us to believe that everything comes quickly and it also seems to train us to not stop and really marvel at what we receive. If things seem to appear automatically, we can begin to take them for granted. So thank you for coming back by today for a little delayed gratification! I hope you didn't mind the wait...and if you did, ask yourself why you minded and whether you can slow down your desire to have it all "right now!" I am trying to teach myself this same patience and this same appreciation to allow things to come at their own time.When we left off yesterday, I shared with you the sign covered in masking tape. The next step was to sponge Soft Suede ink to the entire piece. Next came some Chocolate Chip ink sponged in some places and then some Basic Black ink, sponged particularly around the letters to give them a bit of definition. I then used my fingers to apply Champagne Shimmer Mist paint to the entire panel, right over all of the ink. In person this sign has some great sparkle and shine!!!! The paint also acts to "seal in" the ink. I then stamped the word "create" from one of the stamps in the Charming stamp set. I used my Soft Suede marker and Very Vanilla card stock and then cut out the word and sponged the edges with Soft Suede ink. The word was applied to the sign using glue. The brass hand was something I had in the craft room - it came in handy :) I attached it using matte medium. Next I stamped a brass metal tag using Staz-On ink and the Calendar Alphabet & Numbers stamp set. I attached it to the sign using an antique brad. Finally, I adhered the entire panel to a piece of Basic Black card stock and added some D-ring hangers with matte medium. I haven't decided yet if I want to hang the sign using wire or ribbon...but I know I will decided when the time is right :) I hope you like it! Tomorrow check back to see how else you can cover chipboard signs for a totally different look!
Tuesday, October 25, 2011
Create Art Serif Essentials and Faux Leather Sign

Today's Lesson From The Craft Room: It All Begins With An Idea Or An Action
Today's project started with the idea to make a sign for my craft room after I had completed yesterday's "create art" card. What I find is that most of my art begins with either an idea or an action. Sometimes I walk into the craft room and sit down and have an intention - an idea of where I want to start or what I want to do. At other times, I sit down and I am clueless! I have no idea what I am going to do or where to begin. Either way creates a beginning - a place where my art begins. You don't have to have an idea to actually get started - you can just get started :)This first photo is where I began to bring the idea to life. I cut a piece of chipboard for the base and then die cut chipboard with the Serif Essentials dies and adhered the letters to the base using glue. I then began to apply strips of masking tape, smoothing the pieces around the letters as I went along. Here are some pictures of the process I went through:


Monday, October 24, 2011
Serif Essentials Art Card

Today's Lesson From The Craft Room: Create Art
Today's card is as much a message to myself as it is a card to post. I still struggle with letting things get in the way of my creating art - my inner critic; time; needed the next supply before I can do anything - Do you suffer from any of these? If I can just sit down and clear my mind a bit, then I seem to be able to overcome those things that try to get in the way. So this weekend I spent some time sitting and, as a result, created some art...and it felt GREAT! It all began with this card - my new mantra for myself :) You may see this message again tomorrow...(hint, hint!)This card was so simple and I love the Crumb Cake on Crumb Cake effect. I ran the card base through the Big Shot with the Framed Tulips embossing folder. I actually ran it through backwards - so the card front is "debossed" - I decided to just go with it :) I then die cut the letters using the Serif Essentials dies and the Big Shot. The letters and the card base were sponged using Soft Suede ink. Next I stamped the word "create" by only inking that word on one of the stamps in the Charming stamp set. I then cut it out and sponged the edges. The letters and the word "create" were then adhered to the card using dimensionals. I hope you like it...more importantly, I hope you like the message :)
Friday, October 21, 2011
Four Ways Friday #66 - Reinkers!
Hello everyone! Thanks for stopping by on my birthday! :) It's exciting to have had the experience of another year of life and to have shared some of this past year with you! I really appreciate your stopping by and I hope you gain something, anything, from sharing your moments with me!
In this week's Four Ways Friday I would like to share four ways for you to use your classic reinkers! And yes, I am typing this with inky fingers :) That's kind of hard to avoid when you start playing with your reinkers ;)
 Let's begin with a quick and easy way to use your reinker - as a writing utensil! Here I took a piece of Whisper White card stock and my Blushing Bride reinker and I just drew lines and squiggles vertically on the card stock. When you draw with your reinkers in this way, the lines actually become a bit raised from the card stock - it's a cool textural look! I then adhered some adhesive pearls and added some additional pearl dimension by making small dots along the lines with a non-SU! product. The greeting is from Teeny Tiny Wishes and I layered a number of punches to pop up the greeting. The whole panel was then adhered to a Whisper White card base with dimensionals.
 For this second card I played with one of my favorite self-created techniques. If you have watched my videos, you have seen me create this ink blot background. I placed Tangerine Tango and Basic Black reinker onto a piece of freezer paper and then folded the freezer paper in half and squished the ink around. I then opened up the freezer paper and laid a piece of Whisper White card stock over the ink and pressed down. It creates a great ink blot transfer onto the cardstock! Next I let it dry and then sponged the edges of the piece and adhered it to a Whisper White card base with glue. The ghosts were made using the 2-step owl punch and I punched the eyes and mouths with my crop-a-dile and backed each ghost with a small piece of Basic Black card stock to highlight the eyes and mouths. I sponged the edges with Basic Black ink. The banner was sponged with Tangerine Tango ink and then the letters from the Calendar Alphabet & Numbers stamp set were stamped with Basic Black in. The banner and the ghosts were adhered with a combination of glue and dimensionals.
 I love creating ink mists with my reinkers! I just place a few drops of reinker in a small spray bottle with water, shake it up, and spray away! Here I began with a piece of Whisper White card stock. I then punched out some circles from scrap paper and placed the randomly over the card stock to act as masks. I sprayed various colors of ink, removed the first set of circles and added another set, and then sprayed more colors of ink until I was happy with the result. I used the heat tool to dry things a bit (since I'm not the best at being patient for card stock to dry!). I then added the scallop-punched Tempting Turquoise card stock and the greeting from Teeny Tiny Wishes. The animals from Fox and Friends were stamped, cut out, and adhered to the card with dimensionals. The button adds a final touch.
 If you're not afraid of cleaning up a little ink, this last reinker technique is a lot of fun. I placed some water and Rich Razzleberry reinker in a little spray bottle and then sprayed one side of the Finnial Press embossing folder. I then placed a piece of Whisper White card stock down on the ink sprayed side of the folder and ran it through the Big Shot. I helped the drying process with the heat tool and then built the card. The greeting is from Sincere Salutations which was punched out. I then used a smaller circle as a mask and did some stamping with a floral image from Tiny Tags to create a border around the greeting.
I hope you've enjoyed this week's Four Ways Friday! I wish you a wonderful and creative weekend!!!!! Thank you for sharing my birthday with me! :)
In this week's Four Ways Friday I would like to share four ways for you to use your classic reinkers! And yes, I am typing this with inky fingers :) That's kind of hard to avoid when you start playing with your reinkers ;)


I hope you've enjoyed this week's Four Ways Friday! I wish you a wonderful and creative weekend!!!!! Thank you for sharing my birthday with me! :)
Thursday, October 20, 2011
Sprayed Ink Background

Today's Question From The Craft Room: How Do You Measure Your Creative Progress?
Today's question is one that has captured my attention lately. Somewhere in my life I began to believe that progress requires completion of tasks and the faster you can complete tasks, the more successful you are. Where the heck did this belief come from and why have I given it so much weight in my life?! I truly believe it is a bunch of bunk! I have been brainwashed!!!!! True progress only requires that you are living in the present moment - in the now - with your full attention. This is my new measure for my creative progress. If it happens to result in a "completed" project that I can share with you, so be it. If, on the other hand, it results in something that is still in a state of creation - then I can share that with you too. Either way it is all a part of my creativity - my expressing myself - and maybe you will find some inspiration - a seed - to inspire you to live in your own creative moments - your "creative now."Today, my living in the moment resulted in this card. And actually, it wasn't just today - the heart on this card actually began a few days ago when I took a few pieces of wood scraps and glued them together to make a heart and then painted them and rusted them and painted them again and applied some wax metallic finish. It was the heart that then inspired the card. A card whose background began with a piece of Whisper White card stock that got sprayed and sprayed with mixtures of water and ink that I placed in little spray bottles. I then ran the bottom part of the panel through the Big Shot with the Finnial Press embossing folder and stamped the top of the panel with the En Francais background stamp and Pear Pizzazz ink. Next came a bunch of sponging and the Certainly Celery ribbon. I stamped the greeting from Short & Sweet onto watercolor paper with Tempting Turquoise ink and punched it out with the decorative label punch. Next I stamped a bit with an image from Tiny Tags and sponged the edges of the tag before adding it to the embossed panel. I hope you like it!
Wednesday, October 19, 2011
Pocket Silhouettes Best Wishes Card

Today's Lesson From The Craft Room: If You Do The Work, You Will See Your Progress!
If you have been reading my blog, you know that I have been doing the P90X workout videos. I've been very proud of my resolve to actually do the workouts - I have been sticking with it and I continue to "push play" on the DVD player on my laptop - doing each video, one by one - putting in the work. I am now almost done with week 3 and it is actually fun to think back to the first week and recognize how far I've come. There were some exercises I really struggled with that I can now do - I'm not saying they are effortless yet - but I can do them and do them proudly! There was a part of me that was a tiny bit discouraged since my body seemed to be staying the same to me - I was wanting some instant gratification. Well today, after almost 3 weeks of daily workouts - I had some gratification! I did the abdominal exercise workout for the 9th time in 3 weeks today and I actually saw some muscles in my stomach area that I had NEVER seen before! Who knew they even existed in there?! :) It felt AWESOME to see something like that appear from all of my hard work! It reminds me, yet again, that if you do the work, you will see your progress! The same is true with your creating! If you take the time and do the work of expressing your creativity, you will progress with your art and with your ability to express yourself in your own best and unique way!For today's card I went back to a clean and simple look with one of my favorite stamp sets. I started with a Whisper White card base. I then die cut a piece of Brushed Silver card stock using the clearlits scallop rectangle die. Next I cut a rectangle from Whisper White card stock. I stamped the right hand side using a floral image from Pocket Silhouettes using Sahara Sand ink. I then added a touch of dazzling diamonds to the flowers using a 2-way glue pen. Have I mentioned lately that dazzling diamonds is my FAVORITE glitter in the world?!!!!! It is so fine and sparkly and add such an amazing pop to cards in such an easy way! I stamped the greeting from Short & Sweet using Basic Black ink and then mounted the rectangle to the scallop rectangle using dimensionals. The piece was then attached to the card base using glue. The final touch was to add three adhesive rhinestones. I hope you like it!
Tuesday, October 18, 2011
Watercolor Paper Embossed Background

Today's Lesson From The Craft Room: I Get In My Own Way
It's easy to place the blame in so many different places. To say that the reason we don't create is because we are too busy, or have to cook dinner, or have to work, or have to ______ (fill in the blank). Well, today I realized another huge reason - the reason I don't create is because of me. Today (I'm writing this on Monday) I had a day that was wide open. I had one conference call that I needed to be on and then my list of responsibilities was pretty empty. So today was the perfect day for me to sit and create. I did some creating - I worked on painting layers of paint on wooden and chipboard pieces to use on my can projects. And then I found myself getting up from the craft table and wandering around - checking email, looking at my blog to see if anyone else had looked at it, walking into the kitchen to grab yet another snack. You name it, I was finding ways to distract myself and here I had a whole day open to my creativity. So now the big question is why? Why am I getting in my own way? Am I afraid to spend a whole day creating? Am I afraid I'm going to like it too much and not want to do anything else? Or am I afraid that it won't be all that I believe it can be - that the ideas will not flow or the results won't be what I want? Maybe it's a combination of both. The bottom line is I am responsible for my time and what I do with it. I can get in my way or I can get out of my way and create - the choice is mine.I got out of my way a bit to create this card. I began with a piece of watercolor paper and used the direct to paper technique to apply a layer of Certainly Celery ink and then a layer of Tempting Turquoise ink right over it. Then I ran the piece through the Big Shot with the Vintage Wallpaper embossing folder. I then did direct to paper again with River Rock ink to bring out the textured pattern. Next I used my finger to rub Champagne Shimmer Mist paint over the raised areas of the design - this card has great shimmer in person! The piece was then adhered to a piece of Whisper White card stock and then adhered to the River Rock card base using glue. I die cut two butterflies using the Beautiful Wings embosslit and Crumb Cake card stock. I sponged them with River Rock ink and then applied some Champagne Shimmer paint using my finger. I then punched a piece of River Rock card stock with the decorative label punch and stamped the piece with the birthday greeting from Sincere Salutations using Early Espresso ink. The edges were then sponged with River Rock ink. I then applied three pearls and dabbed them lightly with the paint as well. The butterflies were attached to the label using glue and the label was attached to the card using dimensionals. I hope you like it!
Monday, October 17, 2011
Busy, Busy, Busy!

Today's Lesson From The Craft Room: Rust Takes Time!
I hope you had a wonderful weekend! I disappeared on Friday - sorry about that - I just couldn't get my act together to get my posting done in time. But this is a new week...so we'll see what happens :) What I have already begun to learn this week is that rust takes time! I have found a new product (non-Stampin' Up!) that really intrigues me! I had to run out and buy it and give it a try! I got together a few cans and began my journey toward rust. First I used black gesso to coat the cans (I should have used some sandpaper to scratch up the surface a bit before adding the gesso - I'll make a note for next time!).


Ooh - look! I woke up this morning and put another coat of the rusting solution on the surface and here is what the cans look like now:

Thursday, October 13, 2011
Crimped Background Thanksgiving Card

Today's Lesson From The Craft Room: Keep Going!
I've really been enjoying the P90X program! Well, maybe "enjoying" is a strong word - it is a really tough workout! Every time I finish a workout though, I feel really good about what I've just accomplished - it's a great feeling. As you likely know by now, I travel a bit for work and it can be tricky to keep going with a regular workout or eating schedule. But I'm doing it! I have brought the dvd's with me on the road and since so little equipment is needed for the workouts, it's working for me so far. It makes me realize, yet again, that when you are really committed to something you can keep going, even in the face of potential obstacles or roadblocks. This lesson is true with our creativity as well - if you are really committed to expressing the creativity that lives inside of you, you will find the time to make it happen! Just keep going!!!!!Today's card began with my crimper and a piece of Soft Suede card stock. I crimped the paper and then used the direct to paper technique to apply Whisper White craft ink. I used the heat tool to speed up the drying process. I then wrapped a piece of Victoria crochet trim around the piece and knotted it. The panel was then attached to a Soft Suede card base with dimensionals. I took a small cello bag (I think that's what they are called - it's the bakery type bag that you would put a cookie in - it's make of a wax paper) and ran it through the Big Shot with the Petals A Plenty embossing folder. I then tore a piece of the bag and adhered it to the crimped layer using glue. Next I stamped the leaf image from Lovely As A Tree with Early Espresso ink and colored it in with Stampin' Pastels. I then cut it out and adhered it to the card using dimensionals. The final piece was to add the greeting that was stamped from Teeny Tiny Wishes and punched out with the Modern Label punch. I sponged the edges of the greeting, added a few adhesive pearls, and then adhered it to the card using dimensionals. I hope you like it!Victoria crochet trim.
Wednesday, October 12, 2011
Nature Walk & Fabulous Phrases Muslin Bookmark

Today's Lesson From The Craft Room: You Don't Have To Know What You Are Doing!
As I was making this bookmark - particularly when it came time for sewing on the beads, I kept thinking to myself, "I have no idea what I'm doing! I really don't know how to hand-sew, let alone sew on beads!" My next thought, however, kept me going..."Who cares! Just keep sewing and see what happens!" And I did. I'm not sure where I came to believe that unless I knew how to do something I shouldn't even bother trying - after all, how am I going to learn anything if I don't just try? I know that there are some activities that might benefit from a little learning at the outset - I don't think I'd jump into the cockpit of an airplane and just give it a whirl if I didn't have a bit of a clue as to what I needed to do :) However, most of the things I encounter in the craft room don't have the potential to crash and burn! :) So just do it! You don't have to know what you are doing!!!!!Today's inspiration was my laundry :) I'm serious! I took my one-millionth dryer sheet out of the dryer and thought to myself, "there's gotta be something I can do with this as opposed to just throwing it away!" I had also recently looked at the cover of the Jul/Aug/Sept 2011 issue of Somerset Life which featured Pillows & Pouches by Becky Shander that incorporated dryer sheets! Off to the craft room I went!!!! I began by die cutting a dryer sheet and a piece of muslin with the clear Circle die. I then machine sewed them together using gold metallic thread. I left an opening so that I could put in some small pieces of lace and some Confetti card stock stamped with words from the Fabulous Phrases stamp set. I stamped the words using Marina Mist ink and sponged the edges before added them to the pouch. I then finished machine sewing the pouch closed. Next I stamped the bird from Nature Walk using Basic Black ink onto Sahara Sand card stock. I cut him out and then covered him with versamark and clear embossing powder and heat embossed. I did this step about 3 times. I then, with a bit of pushing, sewed him onto the circle with the gold metallic thread (I should have used another foot on my sewing machine - it didn't like the thickness of the bird). I made small cuts around the edge of the circle just to fray the edge a bit. Next I tore a piece of muslin and then sewed a piece of Marina Mist seam binding to it using gold metallic thread. I added a bit more stitching on the edges for embellishment and then sewed the circle to the bookmark in two places. Finally, I got out a needle with the gold metallic thread and did some hand-sewing for the gold beads. I hope you like it! Remember, you don't have to know what you're doing :)
Tuesday, October 11, 2011
Large Scale Creativity!

Today's Lesson From The Craft Room: Take Your Creativity On A Large-Scale Experience!
I decided to share my latest large-scale creative experience with you today! We have decided to paint the outside of our house - we figure it's cheaper than buying a new one :) We want to give ourselves a bit of a home makeover - something fresh and cheerful. So back and forth to the paint store we go...making our house into a bit of a color quilt with all of the sample colors! This picture is after our latest paint color choices - we have already painted over a few of the "nope - can't live with a house that color!" colors :) Today we started playing around with a few browner undertones, however I'm finding myself drawn to some of the yellow colors - something I would have found surprising had you asked me if I thought we would end up going in a yellow direction. We are wanting to create an adobe-style look - maybe even with a bright blue or purple door! It's fun...and a little frightening - to take your creativity on a large-scale experience! Unlike a card or small canvas, which I can put aside if I decide it just didn't work - the house is a whole different story! I'm hoping we'll find the color that speaks to our hearts and avoid the effort of having to repaint something that doesn't work! Wish us luck!!!!! I'll be sure to share our final choice and the "after" photos...although painting is going to take us a bit of time so you'll have to be patient ;) How can you take your creativity on a large-scale experience????? p.s. - that large window to the left of the ladder is the window to the craft room :)
Monday, October 10, 2011
Flower Folds and Paper Flowers Altered Tin Can

Today's Lesson From The Craft Room: Mozart did not compose, he copied. He copied what was already written on his soul. - Marc Chagall
When I read this quote it really spoke to me; how art is so much about getting in touch with what is written on your soul. On days that I struggle to create I feel it is because my soul is buried under so many layers of day-to-day trivialities - thoughts, fears, overloaded with external stimulus. It is at these times that I need to become still - to allow space and time for quiet to settle in and for my soul to be visible again. How do you get it touch with what is written on your soul? If I just begin to create - to sit down in the craft room and just begin - no matter what is going on in my day - I often find that my soul will start to dig through the grit of everyday life and begin to breathe - begin to share with me what is written within.Today's altered can began with some leftover paint on a brush :) We are starting to play around with new paint colors for the exterior of our home and of course I couldn't let any of that paint on the brush go to waste! So I ran inside and grabbed a can that I had sitting in the craft room and painted it with a base layer of the paint. Once that dried I sponged on a few other colors - metallic acrylic paints. After this second coat was dry I did a bit of sanding to give the can a distressed look and reveal some of the silver metal. I then punched 2 holes in the can using my crop-a-dile (I love that it can punch through metal!!!!). I thread wire through the holes and wrapped it to create the handle. Next I made the "dreams" tag using the Loads of Tags sizzlit and the stamp from Fabulous Phrases and Cajun Craze ink. I attached the tag to the can with wire after sponging it with metallic acrylic paint and Cajun Craze ink. Next came the hot glue gun! I used it to attach a variety of fabric and paper flowers that I had saved from projects over the past few months. The base flowers were made using the Flower Folds die and some scrap fabric. One of the flower centers was made using the Vintage Springtime fabric. The other two flowers were made from card stock and designer paper. A few adhesive pearls were added to complete the altered can. I hope you like it :) I think these cans are adorable as holders for special little house gifts - maybe a small plant or a bunch of fresh herbs from your garden! :)
Subscribe to:
Posts (Atom)