Friday, February 03, 2012

Four Ways Friday #78 - I Love Love Jumbo Wheel

In this week's Four Ways Friday I am sharing four different ways you can use your I Love Love jumbo wheel.  Each of these projects would be perfect for Valentine's Day!
I began with a card :)  The I Love Love jumbo wheel can create a simple and easy design for your card base.  Here I cut a piece of Baja Breeze card stock and scored it twice.  I then ran the card through the Big Shot twice with the heart border for the Adorning Accents embossing folders.  I then glued the inside flap down to create a pocket and made a small Whisper White card to fit inside.  I stamped the card with an image from Short & Sweet.  To hold the small card closed I created a band using the Everyday Enchantment (Sale-a-bration) designer series paper.  I wrapped the band around the card and adhered it together with glue.  Then I began to add onto the band - first I wrapped it with sticky strip and pleated Pear Pizzazz ribbon.  Next came a punched and sponged Whisper White circle with a punched and sponged heart on top.  The Short & Sweet "love you" mini banner came next.  Finally I added some buttons and an adhesive rhinestone.  This card is perfect for holding a message and a gift card or coupon for Valentine's Day!
Candy and Valentine's Day seem to go hand-in-hand, so what better way to use your I Love Love jumbo wheel than to create a candy holder :)  Here I started with a plain old brown paper lunch bag.  I cut off the top and used the jumbo wheel with Cherry Cobbler ink to roll all four sides of the bag.  Next I added strips of Cherry Cobbler card stock to the top of the bag - I created the scallop edge with the scallop circle punch.  Notice how I used the extra little strip of Cherry Cobbler on the bottom of the bag - this is the strip that is "waste" when you use the scallop edge punch.  I then added some mini clothespins to hold the bag of sweets closed.  I stamped the heart from I Heart Hearts and punched it out with the heart circle punch.  Next I added a bit of Early Espresso baker's twine and a mini banner stamped with the Teeny Tiny Wishes "happy valentine's day."  I couldn't stop there :)  I added a large oval and another heart along with punching out a greeting I had stamped from Sweet Season.  I love how this jumbo wheel can jazz up a simple brown paper bag and make it something special!
The I Love Love jumbo wheel is also great for creating backgrounds for your scrapbook pages!  Here I repeatedly rolled the wheel over and over using Rose Red ink.  I didn't use a cartridge in the wheel, I just inked the wheel up on an ink pad and then kept rolling as the ink got lighter and lighter.  I even rolled right over where I had previously rolled.  This became a great backdrop for this 6x6 scrapbook page.  And yes, if you're wondering, that's me and my dad :)
This jumbo wheel is also wonderful to use for making banners!!!!!  I began with rectangular pieces of Crumb Cake card stock and rolled the wheel across the bottoms using Crumb Cake ink.  Next I cut out the triangles to create the banners.  I used the framelits to create the backgrounds for the letters which were die cut using the Alphabet Simple Letters dies and Melon Mambo card stock.  I punched some hearts using the Heart to Heart punch and sponged the edges with Soft Suede ink before adhering them to the banner.  You probably can't tell from the photo, but those little rosettes were made from the leftover brown paper lunch bag that I used for the second project I shared with you!  I just cut 1/2" strips of the brown paper bag and then scored every 1/4" of an inch before adhering the ends together and hot gluing the rosette in place.  I added an extra large adhesive pearl to the rosette centers for some added bling.  Finally I glued some pieces of drinking straws to the back of each of the banners and thread a piece of 1/4" grosgrain ribbon through the straws.  I then finished off the look with a couple of Crumb Cake seam binding knots!
I hope you've enjoyed this week's Four Ways Friday!  I hope it inspires you to use your I Love Love jumbo wheel to create some fun projects to express your love!  I wish you a peaceful, inspired and creative weekend!!!!

Thursday, February 02, 2012

Elementary Elegance Love Card

Today's Lesson From The Craft Room:  You Never Know What You Don't Know
Just over a year ago I shared with you the news that a man I knew from the park (he used to bring his dogs there) had committed suicide.  Our interactions were always enjoyable and I never got a sense that underneath those perfectly simple and happy interactions there was so much pain he was experiencing.  I believed, or at least tried to convince myself, that if I knew him better I would have known something was wrong.  Well, I am continually reminded that that is not the case.  That we never know what we don't know.  Today a friend shared some information with me about illness in her family that she had known about for over 2 years.  I am still in a bit of shock about the news.  This is someone I know very well - someone I interact with a lot and share quite a bit with.  I interact almost as frequently with her family member who has been dealing with this for the past 2 years.  And yet, even in this case, I did not know what I didn't know.  Learning this information from my friend changes how I have viewed the last few years - thoughts I had about why she and her family did or did not do certain things (another lesson that continues to pop up in my life - how we jump to conclusions or judgments so quickly and feel so right and that what we really need to do is to recognize our conclusions are based on very limited information).  So the next time you find yourself making a judgment or thinking you know it all - recognize that you only know what you know...and what you know can never be everything that is going on for someone else.
It's February (can you believe it?!), so Valentine's Day is right around the corner!  Get ready for a series of cards and items that can be created to express your love for those special people in your life! :)  Today's card began with a piece of Pear Pizzazz card stock.  I took a small strip of River Rock card stock and used some metal stamps to deboss the word "love" multiple times.  I sponged the edges with Chocolate Chip ink and adhered the strip to the card base.  The focal image from the beautiful Elementary Elegance Sale-a-bration stamp set was stamped onto River Rock using Early Espresso ink.  I then cut the image out with my paper snips.  I then used my curly label punch to punch out another piece of River Rock card stock and sponged the edges.  I stamped the label with the greeting from Three Little Words and the little images (key, crown & butterfly) from Elementary Elegance).  The label was popped up using dimesionals and the whole piece was attached to the card with dimensionals.  Finally I added a bow made from Crumb Cake seam binding.  It was attached with two mini glue dots.

Wednesday, February 01, 2012

Out On A Whim: Stamped & Embossed Fabric Postcard

Today's Lesson From The Craft Room:  Send Your Art Out Into The Universe
Let me be the first to admit that it is difficult for me to let go of things - especially things that I create for the first time and am pleased with the outcome.  That happened to me with this fabric postcard that I am sharing with you today as part of Out On A Whim Wednesday.  I saw a reader's challenge in Cloth Paper Scissors magazine (if you haven't ever seen the magazine and you like mixed media, you may want to check it out!).  The challenge was to create a fabric postcard and mail it to the magazine.  I had never mailed something made of fabric (have you?) and just wondering how to attach a stamp to such a marvel really got me intrigued :)  So I let the magazine sit for days...no, make that weeks...and finally sat down to create.  I had wanted to incorporate one of the birds that comes to the backyard so one day I sat and watched as the crows arrived.  I then pulled out my camera inside the house and took a bunch of photos through the kitchen window.  The crow that I have included on the postcard was sitting on top of one of the shepherd's hooks that holds a bird feeder.  I printed the photo on my computer and then outlined the shape of the bird.  I cut it out and then placed it on a piece of chipboard and cut out a chipboard template that I can now use over and over.  I used the template to cut a piece of velvet and then I embossed the velvet using the Bella Toile background stamp.  The postcard itself began as a piece of muslin that I stamped and stenciled and heat embossed with a combination of current and retired stamps, sequin waste, gold embossing powder - I just kept going :)  I pulled out some Crumb Cake seam binding and did some stamping with my Calendar Alphabet & Numbers stamp set and Staz-On ink.  All the pieces were sewn to the muslin either by hand or with the machine.  I then added some little gold sequin stars.  The whole piece was then layered - a piece of thick iron-on adhesive interfacing in between the front and the back of the postcard.  I then ironed it all together and sewed the edges with metallic thread.  And then I smiled.  I feel like there is a special part of me in this postcard - particularly since the bird is a part of life in the backyard.  I didn't want to send it out - I wanted to keep it.  And that's what makes this even more special - just as the birds fly away from the back yard and I can't "keep" them, so too, I let go of this postcard and placed it in the mail to be sent off to the magazine.  No, I didn't keep the physical piece, but what I absolutely kept was the experience of creating this piece of myself.  I know it is difficult to let go.  At the same time, if we are not willing to let it go...did we ever really, truly have it in the first place?  If we really "have it," nothing can ever really take it away from us - it will be there forever.

Tuesday, January 31, 2012

Die Cut Acetate Stencil Background & Video!!!

Today's Lesson From The Craft Room:  What does it mean to be "epic?"
I really should stop watching tv altogether!  There are times when I take television "vacations," and turn instead to books.  Now may be one of those times.  I am just frustrated by what I've been hearing lately on commercials!  Ugh!  The other night there was a Visa ad and do you know what it said?  "The Superbowl.  The most epic day in America."  REALLY???????  Are you kidding me??????  So I looked up the word "epic" - wondering if somehow I had never understood the word in the first place and here is what I found for the definition of "epic" as an adjective:  "of, relating to, or characteristic of an epic or epics."  Okay, that's not really helpful since the word is used to describe the word....so then I looked at "epic" as a noun and came up with this, "a long poem, typically one derived from ancient oral tradition, narrating the deeds and adventures of heroic or legendary figures or the history of a nation."  So how is the Superbowl the most epic day in America??????  These are the most heroic and legendary figures we have???????  I can't even continue with this!  How ridiculous!!!!!!!!!!  Yes, I need a television holiday!
For today's card I created die cut acetate stencils to make the background.  Here is a video to show you how....it's epic! :)

Monday, January 30, 2012

Nature Walk Dream Sign

Today's Lesson From The Craft Room:  For Every Action, There Is An Equal And Opposite Reaction
It is known as Newton's 3rd Law and it came to my attention when I decided to watch an episode of Oprah's Lifeclass while eating lunch the other day.  I hadn't even heard of the show, so I'm not sure what led me to watch it, but I'm glad that I did.  It's a lesson that I need to be reminded of every so often - that what we put out, comes back to us.  That the energy and emotion we release into the universe has a way of finding its way back to us.  I wonder how this impacts the things that I create.  If I get frustrated and angry as I'm creating, it is likely the piece will resist me as well.  It makes me pause to consider the energy I take into the craft room - trying to ensure that as I pass through the threshold and into the room, I take with me the intention to express my soul - to share the love for creativity that pulses through my veins.  This does not mean that every piece I create will be "beautiful" by everyone's standards or that I cannot express difficult emotions in my work.  What it does mean is that I just need to show up and be honest in my creating and the honesty I put out will bring honesty in return from the piece.  If you do not like the reaction you are receiving from the universe, ask yourself, "What am I putting out that is encouraging this to come back to me?"
I made this sign as a gift for my niece.  Butterflies hold a very special place for her and I and I try to incorporate them as a message to her in the gifts I make for her.  Here I began with a piece of clay-coated masonite.  I stamped the letters from a retired SU alphabet set.  The butterfly also came from a retired set - the letters and the butterfly just seemed to be the perfect size for the sign.  The flowers are from the Nature Walk stamp set.  All the images were stamped with Staz-On (although that's not necessary when working with this clay surface).  I sponged around the edges and into the center with ink.  I then wound some q-tip cotton on the end of a small skewer to create a tool to apply ink with to the very small spaces on the images.  I would dab the end of the skewer onto an ink pad and then dab the skewer onto the image.  It worked perfectly!  I added some crystal effects and dazzling diamonds to the flowers and some gold smooch ink to the butterfly.  I made the holes in the board with my crop-a-dile and then added a wire with beads as the hanger.  My last step was to spray seal the piece with a matte acrylic sealer.  I hope you like it! :)  Here is a close up of the flowers and butterfly:

Friday, January 27, 2012

Four Ways Friday #77 - Designer Frames Embossing Folders

This week's Four Ways Friday is all about how you can use the Designer Frames textured impressions embossing folders.
The Designer Frames embossing folders are great for creating focal points for your cards.  Here I stamped the greeting from Tagtastic onto Confetti card stock with Cherry Cobbler ink.  I then ran the piece through the Big Shot with the embossing folder.  Next, I cut around the embossed image.  Notice that you can use the embossing folders to emboss or deboss, depending on which side you choose to have facing up when you run it through the Big Shot.  The mini card is a Pear Pizzazz base with a piece of designer series paper layered on top.  The embossed piece was adhered with dimensionals.  A tiny pin and some Early Espresso baker's twine finishes the look.
If you're not in the mood to cut, you can tear!  Here I stamped the owl from Fox & Friends in Chocolate Chip on a piece of Whisper White card stock.  I then ran the piece through the Big Shot with the embossing folder - notice how this time the central image is debossed v. embossed.  I then tore the edges and adhered the piece with glue to a 3x3 Whisper White card base.  The greeting from Teeny Tiny Wishes was hand cut into a banner, a brad was added and then it was adhered to the card with dimensionals.
I also love using these embossing folders to create a frame for another focal piece.  Here I ran the embossing folder through the Big Shot with a 3x3 Perfect Plum card base.  I then stamped the tag from Tagtastic onto Sahara Sand card stock with Chocolate Chip ink.  I punched it out with the decorative label punch.  I then added a neutrals brad with a rhinestone adhered to the center.  The entire focal piece was added to the card with dimensionals.
For this final card I decided to use the embossing folder multiple times.  First I cut a piece of Crumb Cake card stock and ran the folder through the Big Shot two different times with just part of the embossing folder sandwiching the edge of the piece of card stock.  I then sponged the piece with Soft Suede ink and spritzed it with my Soft Suede marker and the color spritzer tool  Next I ran a scrap piece of Crumb Cake card stock through the Big Shot with the embossing folder and then cut out the frame.  I sponged the edges and spritzed it as well.  I then adhered the larger Crumb Cake panel to a Baja Breeze card base.  The smaller Crumb Cake panel was then added with dimensionals to the center of the card.  I then adhered a piece of pleated Baja Breeze ribbon using Sticky Strip.  I stamped the frame from Four Frames with Crumb Cake ink and punched it out with the decorative label punch and added it to the card with dimensionals.  Next came the stamped and cut out greeting from Notably Ornate.  I stamped the Young Vermillion stamp in Early Espresso and cut him out as well before popping it up on the card with dimensionals.  Finally, I created a bow with Crumb Cake seam binding and added it to the card with a few mini glue dots.
I hope you've enjoyed this week's Four Ways Friday!  I wish you a peaceful, love & laughter-filled, and creative weekend!

Thursday, January 26, 2012

Artistic Etchings Painted Tag

Today's Lesson From The Craft Room:  Don't Cry Over Spilled Paint
I got into quite the groove while I was creating this tag!  I began with a blank vintage tag and started stenciling and spraying and stamping and dripping.  It was incredibly meditative and thoughtful.  Then I had the great idea to add some Frost White shimmer paint to give the card an interesting sheen.  Well, it was a great idea...until my attention was diverted for a second and the next thing I knew I had knocked over the little jar of precious paint and it was running all over the craft table, my tag and me!  I don't know if you've seen the movie Goldfinger?  The old James Bond flick where one of the bond girls is covered in gold spray paint?  Well, I wasn't that covered, but my hands were!  I looked like Frost White shimmer girl! :)  I will confess to having had a few expletives erupt from my lips, but in a few seconds I had calmed myself down and began trying to push and scrape the precious paint back into the little jar.  I also began smearing my fingers all over the tag - which smeared and smudged the ink I had just stamped.  I kept smearing and smudging until I got most of the paint off of my craft table and hands and then I went and washed the remainder off of my hands.  When I got back to the tag I was actually struck by how interesting the surface now looked.  Of course it was nothing like I had planned...but it was perfect :)  It took awhile for all that paint to dry and, once it did, I began adding on top of this new shimmer surface.  I heat embossed and inked and dripped and once again found myself back in my meditative place.  I am actually quite pleased with how this tag turned out.  I was able to incorporate that yummy Blushing Bride pleated ribbon and a bit of the specialty paper from the Flirtatious designer series paper.  I even added a touch of pearls and lace and a scalloped edge made with the new Adorning Accents edgelits dies.  What I really learned though is to not cry over spilled paint...just go with it and enjoy the ride :)
Here is a close up of part of the tag:

Wednesday, January 25, 2012

Out On A Whim Wednesday: Lesson From The Bathroom

Today's Lesson From The Craft Room...or Bathroom to be more exact:  Walls Can Be Built And Taken Down
OK, I'm going far out on a whim today - something I can do on Out-On-A-Whim Wednesdays :)  There are some walls I have constructed in my life - walls built to protect me; walls built to create boundaries; walls built to provide me with solitude.  Our walls can serve us well and some of mine have.  Our walls may also be built for reasons that may separate us or alienate us from others and we may find that they serve their time and purpose and need to come down, for if we don't allow them to come down, we may not allow fresh air and love in.
What you are seeing in this photo is a wall in our bathroom.  We decided this wall had served its purpose and we wanted to open it up and allow access into the bedroom and closet on the other side.  It took less than a day (and in case you're wondering, we did not do the work ourselves - sometimes you need the help of others to take down your walls :) ...

It was always curious to me that this glass block window lived in a closet and how, when the wall came down, it allowed the light to flood into the room :)  So now this bathroom is much like a blank piece of card stock to me!  What do I mean by that?  Well, there are now infinite possibilities as to what we can do with the space!!!!!  It's amazing how when you take down one wall, you open up a world of possibilities.  I have a feeling this bathroom has a lot more to teach me...it will be interesting to see where we end up!

Tuesday, January 24, 2012

Distressed Faux Leather Flower & Video!!!!

Today's Lesson From The Craft Room:  What is this life if, full of care, We have no time to stand and stare.  -- from "Leisure," by W.H. Davies
For today's lesson from the craft room, I'd like to offer you an article.  It is an article that was written in The Washington Post back in 2007.  I just learned about it...and it has moved me deeply.  It will take you a bit to read, but I promise, if you do, you will be hard pressed to move forward with your day without being impacted in some way.  If you choose to read the article, you can find it here.  I would love to hear your thoughts...
Today I want to share with you how to make these flowers.  In person they have a very leather-like quality to them!  On this card I paired the flower with the greeting from Curly Cute and some hand-cut leaves.  On the original flower on the card I used Soft Suede ink and did not use my paper crimper to soften up the card stock.  In the video I used Chocolate Chip ink and the paper crimper.  I like both looks and will leave it up to you to decide which look you like :)  I hope you enjoy the video!  Don't forget, SALE-A-BRATION starts today and runs through March 31st!!!!!  Get free products for every $50 in merchandise you purchase!!!!!  Click HERE to shop or to view the sale-a-bration brochure!!!!! :)

Monday, January 23, 2012

Stamped & Embossed Key Chains

Today's Question From The Craft Room:  Are We Becoming Numb?
I was in the checkout line at a store and the woman in front of me decided to make a call on her cell phone.  As we neared the checkout stand, she kept chatting to her companion on the phone.  Then it was her turn at the counter and the woman behind the counter greeted her and asked how she was doing.  The woman on the phone said nothing and instead, kept chatting on her phone.  Ugh - I was not happy!  Of course, I could hear every word she was saying to whoever she was talking to on the phone and it wasn't a conversation about a dire medical emergency or any such thing.  But on and on she went with her call, totally ignoring the person completing her transaction for her.  Can you tell this is a pet peeve of mine!  When I got up to the counter I apologized to the woman on behalf of the cell phone-talking customer.  Her response to me was, "You're sweet.  Actually I don't even notice anymore."  And that's what made me sad.  Have we gotten to a point where it doesn't even bother us anymore when someone doesn't even acknowledge us?  Have we become so numb?  Has this become the norm?  It makes me sad if this is our new norm.  What I do know, though, is that it will never be the norm for me.  How 'bout you?
Today's project are a set of key chains I made for my nieces :)  I began with the same clay-covered masonite pieces that I have been playing with lately.  I was able to punch holes in them using my crop-a-dile.  Next I stamped to my heart's content!  I used black Staz-On and also good ol' classic SU ink.  I used the Dot, Dot, Dot stamp on Jordan's keychain and a retired SU stamp set called Groovy for Avery (she LOVES peace signs and everything groovy :)  I was also able to scratch into the clay surface, so I outlined the letters in Avery's name and also created a border on Jordan's tag that I then applied ink to.  I allowed the ink a bit of time to dry and then covered the tags with VersaMark ink and clear embossing powder.  I heat embossed the tags and then repeated the embossing steps (adding powder and heating) a few more times and then, before the powder cooled, I sprinkled a little dazzling diamonds over the tags.  Once the tags were cooled I painted the back with metallic paint and added the key chain hardware.  I hope you like them :)

Friday, January 20, 2012

Four Ways Friday #76 - Furry Folk

For this week's Four Ways Friday I decided to play with the adorable Furry Folk stamp set!
Let's begin with a clean and simple card!  I love that you can create little scenes with this stamp set!  Here I stamped the trees onto the Whisper White card stock using Always Artichoke ink.  Prior to stamping, I colored the trunks of the trees on the rubber stamp with my Chocolate Chip marker.  I stamped the bear in Early Espresso, with a Basic Black nose, onto a scrap of Whisper White card stock and cut him out.  Next I stamped the greeting from Petite Pairs onto the card with Jet Black Staz-On and then popped the bear up on a couple of dimensionals.
A number of the stamps in this set are the perfect size for making adorable little tile magnets!  Here is a video to show you how to make some magnets of your own!

Why stop at a small tile when you can make a bigger one!
I thought these adorable little guys would look great on a welcome sign!  To create the sign I began by stamping the letters from the Contempo Alphabet (retired) using Jet Black Staz-On onto a white tile.  Next I stamped each of the critters, also using Staz-On.  The last stamped image was the Woodgrain background stamp for the bottom of the tile, also stamped with Staz-On.  I then began adding small drops of ink to a little bit of Crystal Effects and painted each of the critters and the woodgrain.  Once all of the Crystal Effects was dry, I sprayed the entire tile with an acrylic sealer, just to ensure the Staz-On would not come off.  Finally, I drilled two holes into the tile and added the wire, beads and the touch of ribbon!
I decided to try heat embossing on glass with the adorable owl in this stamp set.  This was my first attempt at heat embossing on glass and I got better the more I practiced!  You can see some of the stray grains of embossing powder that got heated to the glass - if you use enough powder from your embossing buddy, you can prevent these stray grains from sticking to the glass!  I sandwiched a piece of Flirtatious designer series paper in between two pieces of glass.  I collaged a few words from a book to the designer paper before sandwiching it between the glass and soldering the pieces together.  This is what the back of the necklace looks like:
Here is a video to show you how to heat emboss on the glass!

I hope you've enjoyed this week's Four Ways Friday!  I hope it inspires you to play with your Furry Folks stamp set or to try stamping on tiles with VersaMark or heat embossing on glass!  I hope you have a wonderfully peaceful and creative weekend!!!

Thursday, January 19, 2012

Stamped & Embossed Necklace

Today's Lesson From The Craft Room:  You Can Turn Your Day Around!
It began as a good day - at least it felt that way.  I got up and did some journaling and then took Buddy for a walk.  I've been pretty determined to not start my day in front of my computer and journal instead.  I got home and ate breakfast and then began doing some creating until I ran into a bit of an issue with something I was making.  So I took a lunch break and it was while I was eating that a migraine decided to start to visit.  My migraines historically are pretty classic.  They begin with a visual aura - where I see spots/holes in whatever I am looking at.  Next comes the numbness in one of my hands that then travels up to my face and mouth.  Just writing about it makes me nauseous!  And yes, the nausea and head pain then shows up.  This time I didn't have much head pain (so grateful for that!).  What I did have were thoughts about what a wash the day was going to be.  I started feeling angry at my body - angry that I wasn't going to have the day I envisioned.  My internal chatter began to call the day a waste - a total wash.  And then I started to consider that.  Why was I giving up on the entire day when it wasn't even mid-afternoon?  Why was I resigned to throw away the rest of my day?  So I took a few aspirin and rested a bit and then, when I felt a little bit better, I made my way back into the craft room.  It was slow-going, but at least I wasn't sitting on the couch resigned to let the day slip by.  I went on our evening walk with Buddy - figuring that the fresh air might help - and it did.  By the time I got back from the walk, my head felt better and so did my disposition.  I realized that I had plenty of time to enjoy of my day so I headed back into the craft room before dinner and made some progress.  This day serves as an example to me - proof that you can turn your day around.  Don't give up on your day early - don't call an entire day a "wash."  Recognize that each day is lived moment by moment and while one moment may feel a bit of a waste, the next moment could be the moment you've been waiting for! :)
I wanted to share with you the project that I was working on during the day I described above.  I wanted to make a necklace for my niece Avery using my stamps.  I worked on a piece of clay-covered masonite as my base - I almost worked on a piece of card stock and a Scrabble piece instead, but went with the masonite.  I painted the surface with a shimmery watercolor paint and then stamped the letter from a retired SU! set (the letter was the perfect size) using Jet Black Staz-On.  Next I stamped the floral image from the Tiny Tags stamp set and added some color by dabbing on ink (Old Olive and Rich Razzleberry).  I sanded the edges and ran the tile over the Rich Razzleberry stamp pad.  Once everything was dry, I covered the masonite tile with VersaMark ink and clear embossing powder and heat embossed.  I repeated this step 2 more times to get a nice coating of embossing powder.  Before the embossing fully cooled, I pressed in a few tiny crystal rhinestones.  To make the tile into a necklace I added a bail with crystal effects and then strung it on ribbon.  I hope you like it! :)

Wednesday, January 18, 2012

Out On A Whim Wednesday: Painted Tile Baby Sign

Today's Lesson From The Craft Room:  The primary benefit of practicing art, whether well or badly, is that it enables one's soul to grow." -Kurt Vonnegut, Jr.
I'm not sure if you have had this experience, but I find that when people walk into my craft room they inevitably end up asking me what I am doing with all of the things I create - specifically if I'm going to sell them.  It's an interesting question and one that is also a little curious to me at the same time.  I get the impression that if my response was that I have absolutely no plans for my creations those same people would wonder why I'm bothering in the first place.  I mean, why would you make something if you don't have a specific plan for it - a plan to make money on it or give it away or decorate your home?  For those of us that make art, the secret lies so much deeper than the product of our efforts.  We realize the truth in Kurt Vonnegut Jr's words - that the primary benefit of practicing art isn't about financial gain or home decorating - the primary benefit is that it enables our souls to grow.  With each creative act you engage in, you are nurturing and growing your soul.  Whatever you eventually choose to do with your art, know this - you are doing exactly what you need to do just by creating it.
I went out on a whim again with my tile paint!  This time I chose to make a baby gift for a friend.  Here's the process I went through to create the tile.  I began with a blank tile and printed the baby's name on the computer.  I used tracing paper to get the outline of the letters onto the tile:
Next I used special paint that you can bake in your oven to outline and fill in the letters and add circles to the tile:
Then I used the same special paint to paint some of the circles:
The tile was then left for 24 hours to dry before being baked in the oven.  Once the tile had cooled, I drilled holes into the tile and created the hanging wire with beads and wire.  I hope you like it :)  If you do, you will definitely want to check back on Friday since I will share with you a similar sign I created using my Stampin' Up! supplies! :)

Tuesday, January 17, 2012

Foam Fortune Cookie With Stamped Fortune & Video!!!!

Today's Lesson From The Craft Room:  Are You Listening To What They Are Trying To Sell You?
I'm not sure why I was paying attention - usually I tune out during commercials when I'm watching tv.  But for some reason, I was paying attention to the two commercials that came on the other day.  The first was for Campbell's Soup.  And do you know what that commercial said?!  Let me quote, "Nothing brings you together like chicken noodle soup from Campbell's!"  Really?!?!  Are we supposed to believe that!  That there is nothing that can bring a family together like that product?????  It got better - next came the commercial for Overstock.com.  (and I actually have to admit to having purchased something from O.co prior to seeing this commercial).  I started laughing when I heard what that commercial said.  Let me quote again, "You'll find everything you need for a healthier, happier year!"  Really?!?!  Everything I need for a healthier, happier year!!!!  Hmmm - let me see what would be on my list - health for my family, peace in the world - or at least a tolerance for one another, regular exercise, a positive attitude toward what life will bring me in the coming year...do they really sell that on Overstock.com?!  I don't think so!  So how have commercials become so ridiculous?  Or maybe we have become a bit ridiculous by believing that a product, whatever it is, can bring us together like nothing else or can be everything we need for a healthier, happier year.  As long as you're listening, here's what I'm selling...I'm selling the belief that our connection, health and happiness is not achieved through something we can buy on-line or in a store.  It is found, instead, within ourselves and in our relationship with others.  (ps.  I want to thank you Doris for your amazing comment yesterday - it means so much to me and really supports today's lesson - I so appreciate the relationship you are sharing with me - it is a part of what is creating my healthy, happy year!).
Here is a video to show you how I created this foam fortune cookie with a stamped fortune!  They look good enough to eat! (but please don't...how's that for a legal disclaimer :)  Enjoy!!!!

Monday, January 16, 2012

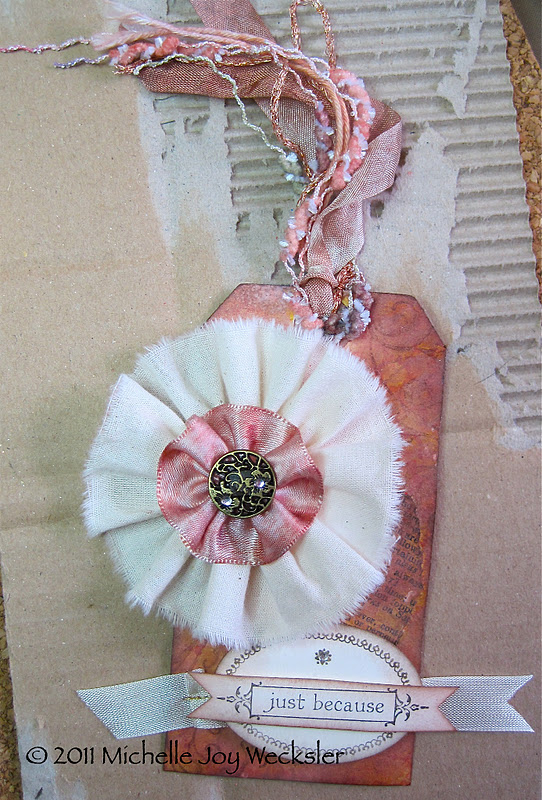
Just Because Gift Tag

Today's Lesson From The Craft Room:  Cut It Out, Don't Cut It Down!
When I was walking Buddy the other day, the song Colors Of The Wind from the Disney movie Pocahontas came rushing into my head.  Don't ask why, but they did.  (And I apologize if my mentioning it now means that you will have the song running through your head all day :)  Anyway, there is a line in the song that goes like this, "How high does the sycamore grow?  If you cut it down then you'll never know."  These words kept playing over and over in my head as I walked.  Then I realized why they were nagging at me - it was a very clear message to myself.  I know I have told you this before and here I am telling you this again - I have self-talk that is not always the most supportive or helpful.  I have a tendency to cut myself down quite a bit.  Somehow I'm not good enough or creative enough or _________ enough and my internal self-talk likes to harp on that and I am, well, sick of it!!!!!  So these lyrics came to me as a message - to remind me that if I keep cutting myself down I will never know how high I can grow!  If I can cut it out and stop cutting myself down, then I will be able to realize my potential.  So that's today's lesson from the craft room:  Cut it out; Don't cut it down!!!!  (ps  It is kind of embarrassing to share that I have yucky self-talk.  Somehow I think that I'm the only one who might be walking around the planet like that...but I think I might be wrong.  If you have similar negative chatter in your mind, just think of how much you could grow if you would release that chatter!).
Today's tag accompanied a recent gift to a friend.  I began with a vintage tag that I added some torn pieces of dictionary too.  Then I sprayed and stenciled and stamped the tag.  Then I gessoed it to tone-down some of the writing and sprayed and stenciled and stamped some more!  I created the flower using ribbon and some muslin.  (I'll show you how I made the muslin part in a video tomorrow!).  I sprayed the ribbon flower with a mixture of water and ink so that it would match the tag.  The seam binding ribbon used at the top of the tag was also sprayed.  The large oval from Notably Ornate was stamped (I only inked up part of the image so that I didn't get the words or the lines that are on the stamp).  I punched it out using the large oval punch and adhered it over some seam binding ribbon that I had sewn to the tag using gold metallic thread.  I then added a "banner" of sponged card stock that I had stamped with the greeting from Notably Ornate.
Here is a look at the back of the tag (this may ruin the surprise to the person I just sent this too - oops!  I edited out her name just in case she hasn't received it yet)!  I decorated the back of the tag as I had the front.  The only addition is that I took a piece of transparency/window sheet and cut it to fit most of the back of the tag and then I adhered it to the tag in 2 of the corners using mini glue dots - they are pretty invisible!  I was then able to use a Sharpie marker to write on the transparency.  I love that this allows the collage underneath to show through!  I'm also not too disappointed by my sloppy sewing (my sewing machine got stuck and being the unskilled sewing machine operator that I am, this was the best I could do :).  I like how you can see the bunches of threads.  Playing with tags has really been a lot of fun for me - a nice change from standard cards.  I hope you like it!

Friday, January 13, 2012

Four Ways Friday #75 - Petite Pennants Builder Punch (& Video!!!!)

Welcome to Four Ways Friday (and happy Friday the 13th)!  Today I'd like to share four ways to use your Petite Pennants Builder Punch!
Let's start simple!  The plain triangle makes a perfect flag/banner!  Here I punched a piece of Real Red card stock for the flag.  I stamped a "1" using Calendar Alphabet & Numbers and punched it out and popped it up on the flag.  I adhered a piece of Garden Green card stock to the Whisper White card base and then added a small punched oval of Crumb Cake card stock with glue.  The greeting from On Your Birthday was stamped with the stamp-a-ma-jig and Jet Black Staz-On.  I then cut a thin strip of Early Espresso card stock and adhered it to the card with glue.  The flag was then adhered to the end of the strip with glue.  Finally, I punched a small circle from Whisper White card stock and used my embossing tool to press into the circle so that it would become "raised."  I then used a very small piece of a dimensional to adhere it to the card.  So simple!
Why stop at one triangle when you can use many?! :)  Here I punched a bunch of plain triangles from Cajun Craze card stock.  I then glued them down, one by one, onto a Crumb Cake card base.  I trimmed the excess from the ends once the glue had dried.  Next I took the (SNEAK PEEK) Sale-a-bration Everyday Enchantment Lucky Limeade organdy ribbon and wrapped it twice around the card and knotted it.  I then cut out one of the doilies from the Flirtatious specialty designer series paper and adhered it to the card with glue.  I then stamped the tag from Tagtastic using Chocolate Chip ink onto Very Vanilla card stock.  I punched out the tag using the decorative label punch, sponged the edges with Chocolate Chip ink and then spritzed the card and the tag with the spritzer tool and a Chocolate Chip marker.  I added a (SNEAK PEEK) Sale-a-bration Everyday Enchantment brad using my piercing tool and then adhered the tag to the card with dimensionals.
Stegosaurus!!!!!!!  I'm laughing even as I am typing this!  How did I come up with this one?  Well, I had punched a bunch of the triangles out and had started playing with curling them and gluing them together and somehow those glued pieces looked like the scales/spines on a stegosaurus!  (are they even called scales/spines?)  I cut one of the scalloped triangles in half and glued the halves together for the head.  I added a googley eye (you can use punched circles just as easily).  The card body was made with the Clear Circle die.  I cut a piece of Basic Grey card stock and folded it in half and the made sure to line up the card stock just inside the outline of the circle die so that the top of the card would remain intact.  I then cut off the bottom of the circle.  Next I used the oval punch to cut the legs.  I then ran the card and the legs through the Big Shot with the Distressed texturz plate (it is a bit hard to see the texture in the photo).  I then punched out eight of the plain triangles.  I cut three of them in half to make the straight spines and I curled and glued five of them to make the curled spines.  I found that the curled spines stayed together much better when I glued them with Crystal Effects!  I then sponged all of the pieces with Basic Black ink and adhered them to the card with Crystal Effects.  Finally, the greeting from Just Believe was stamped and torn out of Whisper White card stock and adhered to the card with dimensionals.  I hope this one makes you smile :)  And, if it didn't, maybe this last one will!!!!! :)
Making creative punch art from punches is always a ton of fun!  I played with the scalloped triangle shapes and came up with this poodle!  Here is a video to show you how you can make one!

I hope you've enjoyed this week's Four Ways Friday!  I hope these projects inspire you to look at your Petite Pennants Builder punch in a new way!!!!!  Wishing you a wonderfully peaceful and creative weekend!!!!!

Thursday, January 12, 2012

Here's Looking At You Kid! Owl Card

Today's Lesson From The Craft Room:  Help Spark Someone's Creativity!!!!!
One of my friends was sharing with me that she was out of touch with her creative side.  She and her husband are struggling a bit financially right now and she has also been dealing with some chronic pain in her hips and back.  It seemed to me like the perfect time to try to help spark her creativity since I know, first-hand, how therapeutic creativity can be!  So I decided to put together a basket of creativity for her!  I kept walking around my craft room pulling things off shelves and out of drawers and placing things into small plastic bags or directly into this recycled basket!  It was fun putting the mix of card stock, canvas, fibers, bottle caps, lace, fabric, ribbon, punched shapes, beads, rhinestones, etc together!!!!  It even inspired my own creativity in the process!!!!!  Here's the basket:
 Michael delivered the basket for me and I immediately received a text from my friend saying, "WOW!  You are a beautiful gift to me.  Thank you ever so for this thoughtful and lovely surprise.  I'm gonna have so much fun!  Xoxo...love and kisses."  Sounds to me like she has been sparked!!!!! :)  How can you help spark someone's creativity????  And don't forget...that someone could be you :)
Today's card was inspired by Humphrey Bogart's character Rick in the movie Casablanca :)  I'm not sure why this quote popped into my head, but it did, and it needed a card :)  I stamped the quote onto a small 3x3 card using the Calendar Alphabet & Numbers stamp set.  I paper pieced the exclamation point.  I punched the owl using the 2-step owl punch from Chocolate Chip card stock and the decided he needed some wings.  I punched a small oval and then cut the edges to use as the wings.  The body was adhered to the card with dimensionals and the wings were then adhered beneath it with glue.  The nose was cut from a scrap of Pumpkin Pie card stock.  Finally, I punched the heart from a scrap of designer series paper and then adhered it to the owl and covered it with Crystal Effects.  What quote can inspire you to make a card????  I would love to hear your quotes :)

Wednesday, January 11, 2012

Out On A Whim Wednesday: Painted Ceramic Tiles

Today's Lesson From The Craft Room:  Challenge Yourself To Figure Out How To Make It With The Supplies That You Have!
If you have been following/reading my blog, you know that I recently have been playing around with both porcelain and glass paint!  I've been having a ton of fun searching for different surfaces to paint - things that can then be placed in the oven here at home and heated so that the items are both dishwasher and microwave safe.  Well, it didn't take me long to move from the idea of painting food service items to the idea of painting tiles that can be used in so many different ways around the house and on home decor items!!!!!  So I pulled out some 2"x 2" white and black tiles that I happened to have in the house and I began to paint and experiment.  As you can see, I became obsessed with creating these grid patterns!  I used a gold outliner to create the lines and then just filled in the little boxes with paint - it is so therapeutic!!!!  It looks like faux cloisonne to me - very enamel-like.  You are probably now seeing how I became inspired to make the tile magnets I shared with you yesterday :)  After painting quite a few of these tiles I began to wonder how I might be able to make something similar (although not dishwasher/microwave safe) using my Stampin' Up! materials.  The heat embossed tile magnets using gold embossing powder and Crystal Effects was the result of that thinking!  How can you challenge yourself to figure out how to make something you really like using the supplies that you already have on hand?????  You might amaze yourself by what you come up with!!!!

Tuesday, January 10, 2012

Heat Embossed Tile Magnets & Video!!!!

Today's Lesson From The Craft Room:  There Is So Much Going On On The Inside That You Can't See From The Outside!
As I look out my office window I can see the bare branches of the lilac bush that lives just on the other side of the window.  I see mostly brown branches...but if I look very closely I see something else as well...tiny little buds at the ends of the branches!  Here we are in the midst of winter and this bush is reminding me that there is so much more going on on the inside of it!  From far away it may look like it is resting - taking a long winter's nap.  But really it has so much going on on the inside and the buds are one small sign of that!  It excites me to know that I can watch this plant and wonder about the potential it has stored inside.  I can't wait for it to show me what it can do in the Spring!!!!  The same is true for each of us - there is so much going on on the inside that others may not be able to see from the outside - so much potential we have stored inside that is waiting for the chance to burst through!!!!
I know I have shared one magnet video with you already - now let's build on that idea!!!  I have to admit that this is actually the first magnet I made.  It was inspired by some tile painting that I did and that I will share with you tomorrow.  I wondered how I could recreate the painted tile look with my Stampin' Up! supplies and this is what resulted from that thinking!  The beaded tile I shared with you last week was the second tile design.  And yes, there will likely be a third, fourth, fifth.... :)
Here is the first heat embossed tile magnet I made along with the second one that I added additional beads to:
Here is a video to show you how I made the tiles using embossing powder and Crystal Effects!  I hope it inspires you to make some of your own!!!

Monday, January 09, 2012

Love & Tulle Mini Card

Today's Lesson From The Craft Room:  Oh How I Love Windows!
Michael decided he needed to make some changes in his office to better accommodate his working style.  What this usually means is that I too begin to examine how I have my home office set up and I get the itch to move things around too!  I have to admit that I have avoided my home office a lot.  It just felt cramped and cluttered (not to mention a bit of a mess).  But the motivation I needed to make a change came in the form of Michael deciding to mix things up in his space.  As a result, I took out 2 pieces of furniture in my office, moved things around, and brought in another desk surface that Michael was moving out of his office.  Now I find myself in a space that I love and it's not even cleaned up yet!!!!!  The biggest difference is that instead of working on my computer on a desk with a big hutch, I have moved my computer down to the desktop that is now in front of my corner windows.  Ahhhhhhhh - what a difference a change makes!!!!!!  I love the light that comes in the windows and I love being able to look out the windows as I gather my thoughts.  I just took this photo of my desk space as I am writing this post...sorry about the lighting - the sun has already gone down here so the colors are a bit "off"...but hopefully you'll see what I'm loving about my new space!
Today's card is simple 3x3 card - perfect for a Valentine's Day gift :)  I cut a small strip of tulle and wrapped it and knotted it on the front of the card.  I cut the ends so that it looks like a bow.  Next I stamped the tag from Tiny Tags and punched it out using the jewelry tag punch.  I then pierced a small hole in the tag and attached it to the tulle knot using crochet thread.  I added a small piece of a dimensional to the back of the tag so that I could keep the tag in place.  Finally I punched a small hear using the Heart to Heart punch.  I hope you like it!